Permissions
The full Intrexx permissions concept includes the visibility of navigation elements, access to entire applications, as well as access to individual pages, data groups and a distinction by actions (display, create, change, delete) within the applications. In addition to the fixed assignment of permissions within the application, permission settings can also be made accessible via the browser if required. For example, in Intrexx Share, the collaboration application by Intrexx, it is possible to make posts and discussion groups accessible to certain user groups only.
Portal administrator
Once you have created a portal, the portal has a portal administrator. This role is responsible for central actions related to the administration of a portal. Please refer to section "Administrators" user group
You can create and manage additional portal administrators in the Intrexx Portal Manager after you have logged in to the portal. See also section Manage users.
Provide permissions
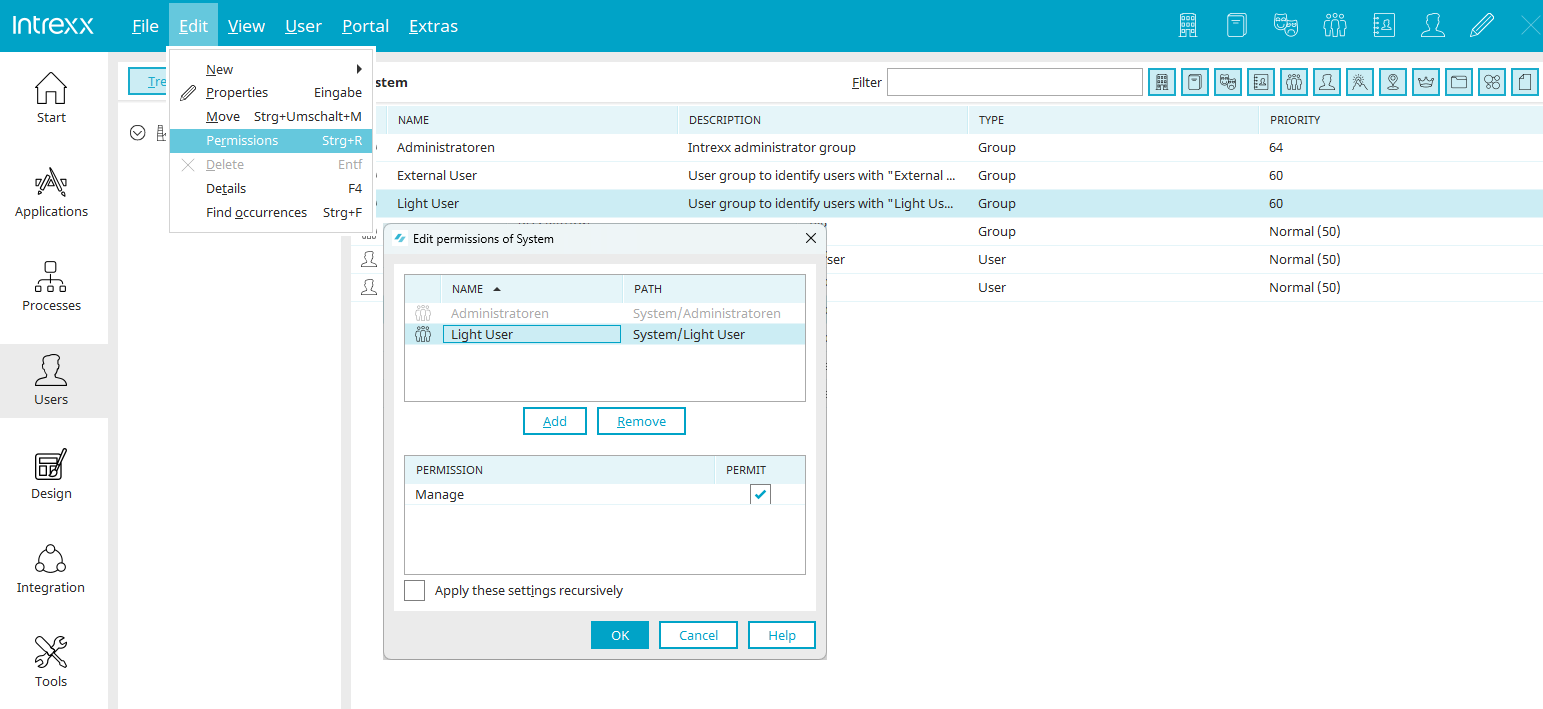
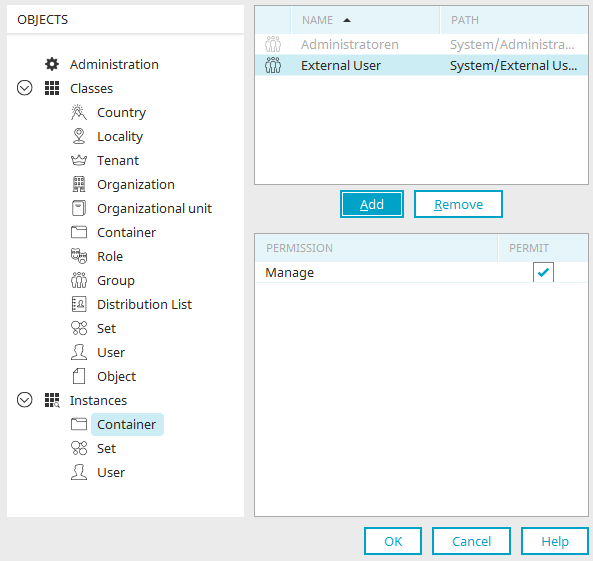
In Intrexx, permissions can be provided in the permissions dialog which generally always has the same structure.
First column
Displays an image that represents the type of permission holder.
"Name" column
Displays the name of the permission holder.
"Path" column
Displays the path to the user object in the "User" module.
"Add" button
Opens a dialog where a user object can be selected.
"Remove" button
Removes the user object from the list. This does not mean that all of their permissions are automatically removed. The permission holder could still possess permissions by being a member of other objects, e.g. by being a member of the Users group.
"Permissions" column
When you select a permission holder at the top of the dialog, the individual permissions are displayed at the bottom.
Permit
Activate the respective checkbox to provide the user object with the desired permissions.
Portal access permissions
The portal rights can be found in the main menu under "Portal > Portal rights...".
The menu item is accessible only after logging into a portal. All permissions defined here are valid for the current portal.
After you have selected the menu item, the "Set portal rights" dialog box is displayed.
Click on a user or user role to display the list of rights.
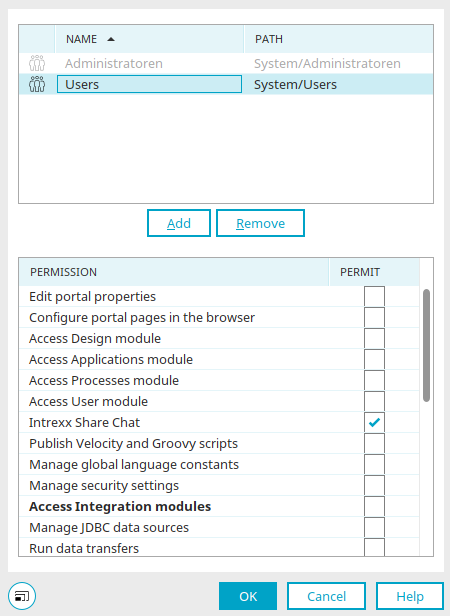
Below you will find an overview of the portal rights.
|
Name
|
Description |
|---|---|
| Administrate portal | With this permission, portal properties can be configured and portal exports or imports can be created via the main menu "Portal / Portal exports" or "Portal imports". |
| Configure portal pages in the browser | Permissions holders are allowed to administrate the portal pages in the default mode. |
| Access design module |
Rights holders have access to the Design module (Set design and layout in the Portal Manager. The right "Access to module design" or the right "Access to module applications" is required to be able to edit the menu structure of the portal (Edit the menu structure of the portal ). |
| Access module applications |
Rights holders have access to the Applications module (Applications in the Portal Manager. The right "Access to module applications" or the right "Access to module design" is required to be able to edit the menu structure of the portal (Edit the menu structure of the portal ). |
| Access module processes | Rights holders have access to the Processes module (Create processes in the Portal Manager. |
| Access user module | Rights holders have access to the Users module (Manage users in the Portal Manager. |
| Intrexx Share Chat | Permission holders can use Intrexx Share Chat. |
|
Publish Velocity and Groovy scripts |
Users with this permission may publish Velocity and Groovy scripts to the server. |
|
Manage global language constants |
Permission holders can edit language constants under Portal properties / Country settings / Global texts, as well as under Applications. |
|
From Intrexx version 12.0.1 Manage security settings |
Principals can manage connection data in the "Integration" module and have access to the credential store. |
|
Access Integration modules |
Automatically activates the "Allow" checkbox for all corresponding portal permissions so that they do not have to be selected individually. |
| Run data transfers |
Rights holders have the right to carry out data transfers in the Portal Manager (Data transfer). |
| Manage FileWalker connections |
Rights holders have the right to manage FileWalker connections in the Portal Manager (FileWalker). |
| Manage API keys |
Rights holders have the right to manage API keys for the Intrexx Application API in the Portal Manager (Intrexx Application API). |
| Register OData services |
Rights holders have the right to register OData services in the Portal Manager (Connector for OData – Consume data). |
| Provide OData services |
Rights holders have the right to offer OData services in the Portal Manager (Connector for OData – offer data). |
| Register web services |
Rights holders have the right to register web services in the Portal Manager ( Define new web service). |
| Provide web services |
Rights holders have the right to offer web services in the Portal Manager (Web service). |
| Configure WebDAV |
Rights holders can access "WebDAV" in the "Tools" module (Configure WebDAV). |
| Document integration |
Rights holders have the right to set up document integration in the Portal Manager (Collaboration - Documents). |
|
|
Rights holders have the right to register SAP Gateway sources in the Portal Manager (Connector for SAP Gateway). |
| Register Lotus Notes sources |
Rights holders have the right to register Lotus Notes sources in the Portal Manager (Connector for IBM Lotus Notes). |
| Manage Microsoft Exchange sources |
Rights holders have the right to manage Microsoft Exchange sources in the Portal Manager (Connector for Microsoft Exchange). |
| Manage SAP Business Suite sources |
Rights holders have the right to manage SAP Business Suite sources in the Portal Manager (Connector for SAP Business Suite - Create connection). |
| Register M-Files services |
Rights holders have the right to register M-Files services in the Portal Manager (Connector for M-Files 2.0). |
| Register dg hyparchive services |
Rights holders have the right to register dg hyparchive services in the Portal Manager (Connector for dg archive). |
| Access to tools | Users with this permission are allowed to configure the "Tools" module: |
| Use system monitor |
Rights holders have the right to use the System Monitor in the Portal Manager (System monitor). |
| Manage search indexes |
Rights holders have access to the Lucene index administration (Search). |
| Manage task scheduler |
Rights holders have the right to administer task planning in the Portal Manager (Task scheduler). |
| Manage request variables |
Rights holders have the right to manage request variables in the Portal Manager (Validate form and request values). |
| Access email service |
Rights holders have access to the e-mail service (Email service in the Portal Manager. |
Special features for users who are not members of the "Administrators" user group
- Users with the "Change portal properties" right can make changes in the "Documents" area of the portal properties without the "Access to Applications module" right.
- Users with the "Change portal properties" right can make changes in the "Country settings" area of the portal properties without the "Access to Design module" right. The "Access to module design" right has no effect on this area in the portal properties. To be able to edit global language constants, you need the "Manage global language constants" right.
- The "Manage security settings" right is also required for the settings under "Security" and "Certificates" in the portal properties. These pages are not visible to users without this right.
User
In the Users module, permissions are managed on two different levels: Global and individual permissions.
Global permissions
Global permissions are managed via the User menu / Permissions main menu. Permission holders can edit object classes and object instances, have access to the Schema manager, can add, edit and delete classes or attributes or edit the organigram.
Administration
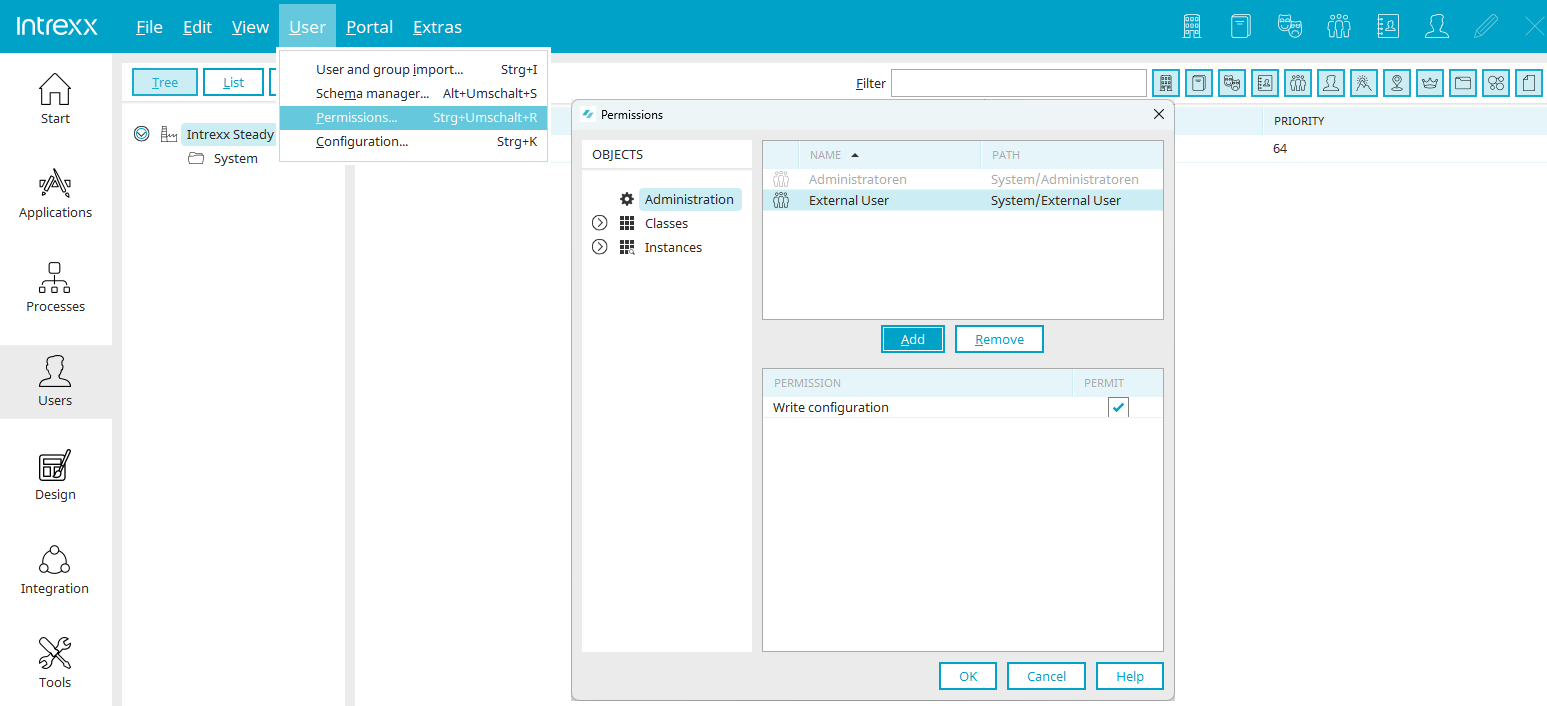
With the permission "Write configuration", existing object classes in the Schema manager can be edited.
Object classes
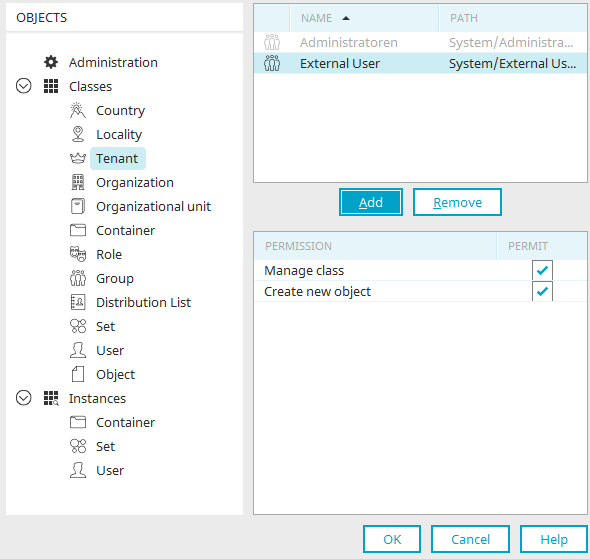
Manage class
With this permission, existing object classes in the Schema manager can be edited.
Create new object
Allows the creation of new objects within the class in the Schema Manager.
Object instances
Manage
Applies to the instances taken from the basic classes Container, Set and User. It enables the editing of all taken instances or the respective basic class including the instances from subclasses.
Please note that individual permissions will be overruled when you assign global permissions.
Individual permissions
These are managed via the main menu "Edit / Permissions". This menu is available if a user object has been selected.
Add user objects
Click here for more information about the selection of users in the upper area of this dialog.
"Manage" permission
With the individual permission to edit the properties of individual object instances, you permit the changing of values that are also stored physically in the database for each instance, such as the name of the instance or address or contact data for an instance of the user object.
Apply these settings recursively
With this setting the "Manage" permission is applied to all objects subordinate to the current user object or also suspended there, if you have disabled the right in the currently selected object.
Default users and user groups
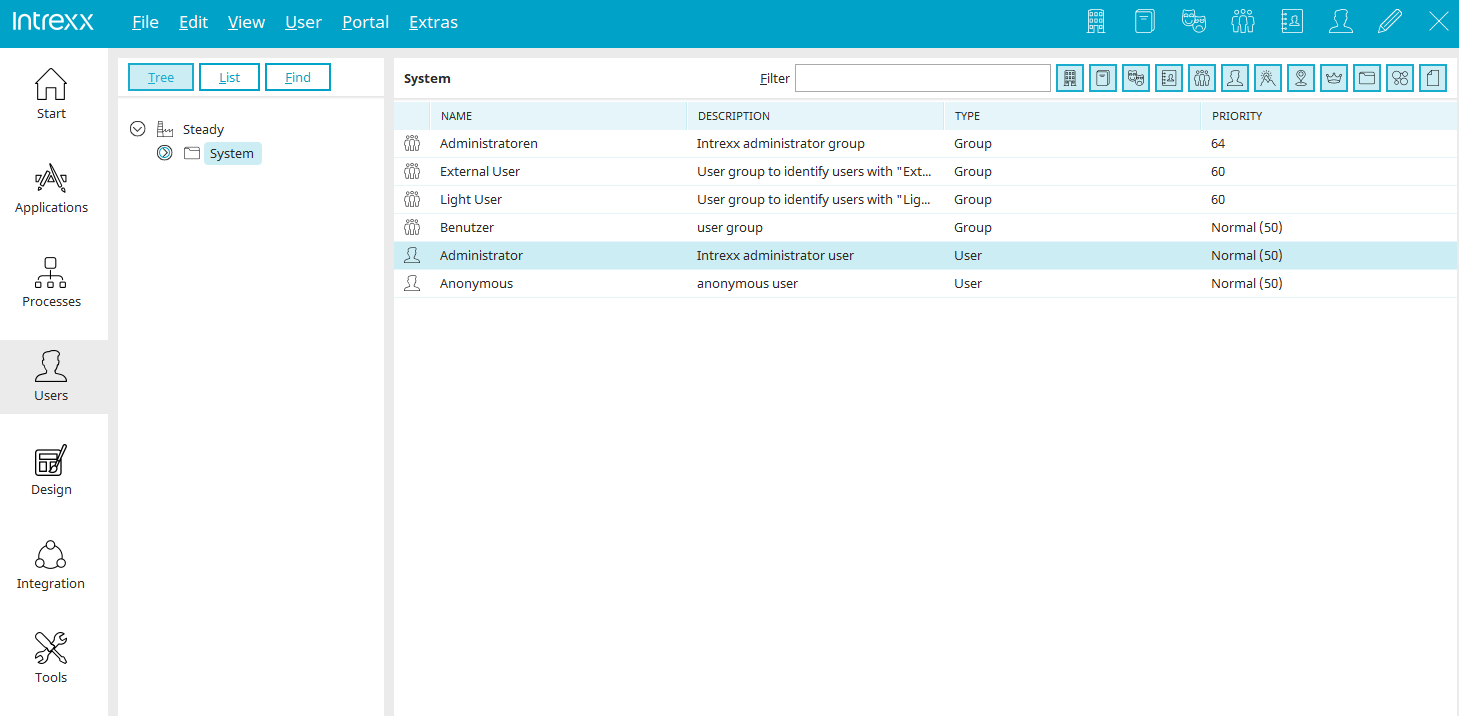
In new created portals there are already the user groups "Administrators" and "Users". You can also find the users "Administrator" and "Anonymous". Here you can find information about the permissions of these users and user groups.
Application permissions
Application permissions are defined in the "Applications" module.
Furthermore, the administration permission, which allows the user to edit the application technically, can be provided. The application permissions can be edited via the Application menu / Permissions or the Edit menu / Properties when the application node is selected.
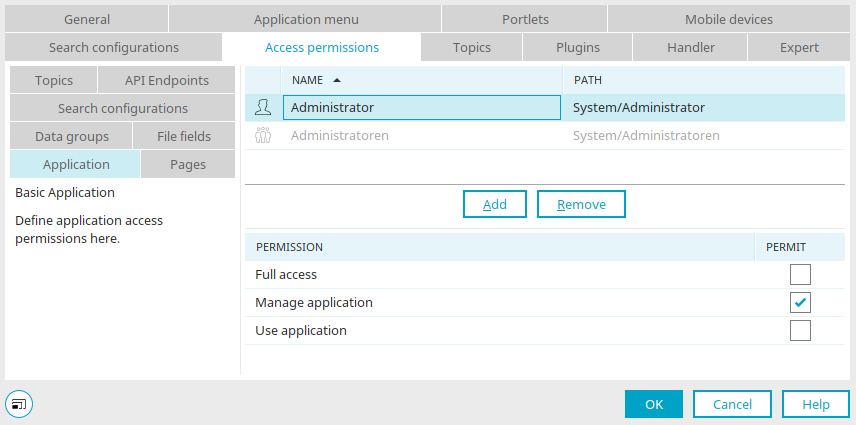
On the left of the dialog, you can see tabs which represent the different levels of access permissions that can be defined for the application:
-
Application
Access to the application link and the starting page in the browser, administration permissions
-
Pages
Access to additional individual pages
-
Data groups
Read and write access to application data
-
File fields
Read and write access to file fields
-
Search configurations
Permissions for search configurations
-
Topics
Permissions for topics
-
API endpoints
Permission to be able to use the Intrexx Application API.
Click here to find out how you can add permission holders and assign individual permissions in the right area of the dialog.
New or edited permission settings are transferred to the server when the application is published.
Application
Full access
This setting automatically activates all other permissions.
Manage application
Permissions holders are allowed to administrate the application in the Applications module.
Use application
Permissions holders have access to the application link and the starting page of the application.
The Administrators user group has full access to all pages and data groups of the application, as well as the application itself. This setting cannot be changed within the application permissions. Remove a permission holder from the Administrators user group if you do not want them to have the permission to administrate applications. The creator of an application always has permission to administrate the application. This permission will be given automatically to the creator of an application.
Pages
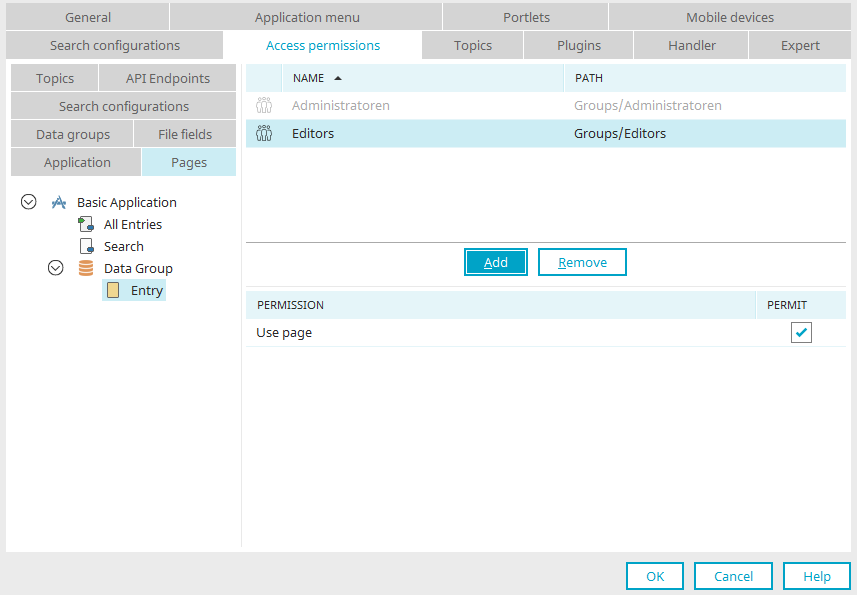
Allows you to provide access to individual pages of the application. If you select one or more pages on the left, you can determine the permissions for all of these pages on the right. All pages, which the user does not have permission for, will be automatically hidden from the application menu. Buttons that lead to an unpermitted page will not be shown in the browser.
Data groups
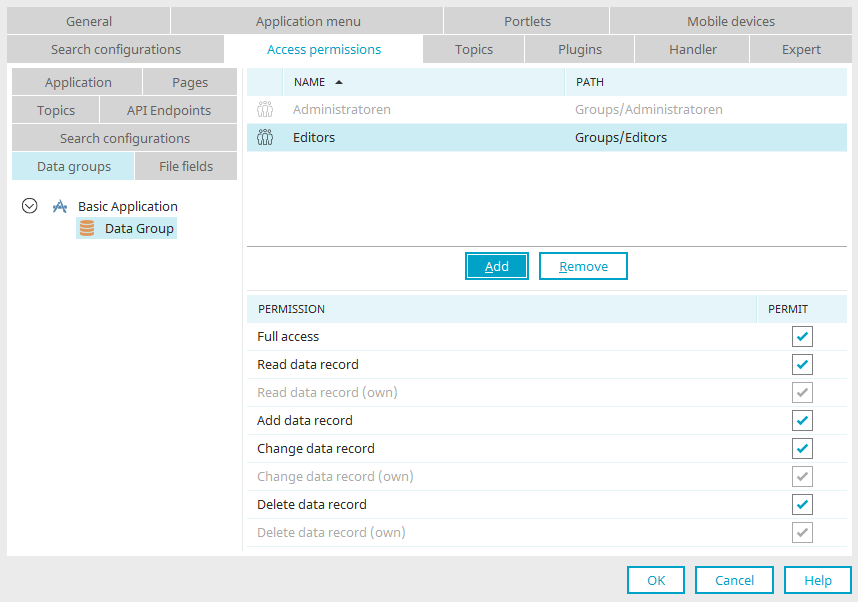
Here you will define in which data group data can be read, added to, modified or deleted.
The data group permissions for Intrexx Share are controlled internally with Java classes and cannot be changed here.
Full access
This setting automatically marks all additional permissions.
Read data record
Permissions holders may read the data of an application.
Read data record (own)
Permissions holders may read existing data records they have saved.
Add data record
Permissions holders may add new data.
Change data record
Permissions holders may modify existing data records.
Change data record (own)
Permissions holders may modify existing data records they have saved.
Delete data record
Permissions holders may delete existing data records.
Delete data record (own)
Permissions holders may delete existing data records they have saved.
File fields
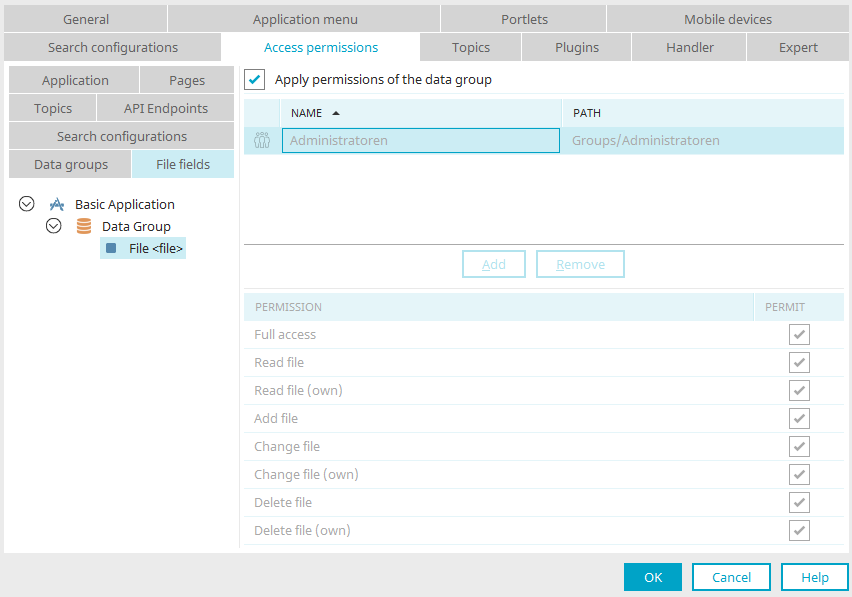
If a data group contains file data fields, the following permissions can be assigned here:
-
Full access (enables all permissions named below)
-
Read file
-
Read file (own)
-
Add file
-
Change file
-
Change file (own)
-
Delete file
-
Delete file (own)
erteilt werden. To do so, select the corresponding file field in the application structure in the left-hand area of the dialog.
Apply permissions of the data group
If this setting is active, all permissions configured for the data group will be applied to all file fields contained in it. The permissions for data fields can only be set individually if this setting is not active.
If individual permissions are assigned to a single file field, a conflict check occurs. In the permissions table, the permissions will be highlighted in red if a conflict has been detected. A conflict occurs when permissions to a file field are assigned that, according to the data group, are not permitted. For example: A user may only read in the data group. If this user is given the Delete permission for a file field in the data group, a conflict occurs. The "Delete" permission will then be highlighted in red.
Search configurations
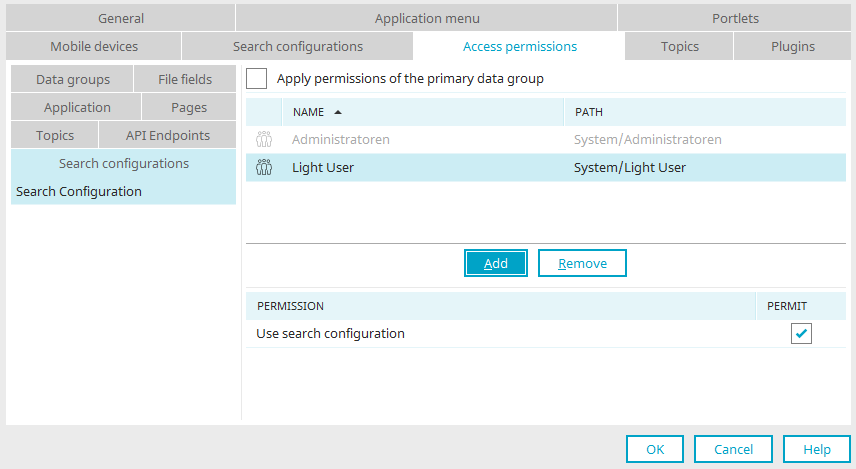
Select the search configurations, you would like to define the permissions for, on the left-hand side of the dialog.
Apply permissions of the data group
If this setting is activated, the permissions of the data group, which you have defined in the search configuration properties, will be used.
Topics
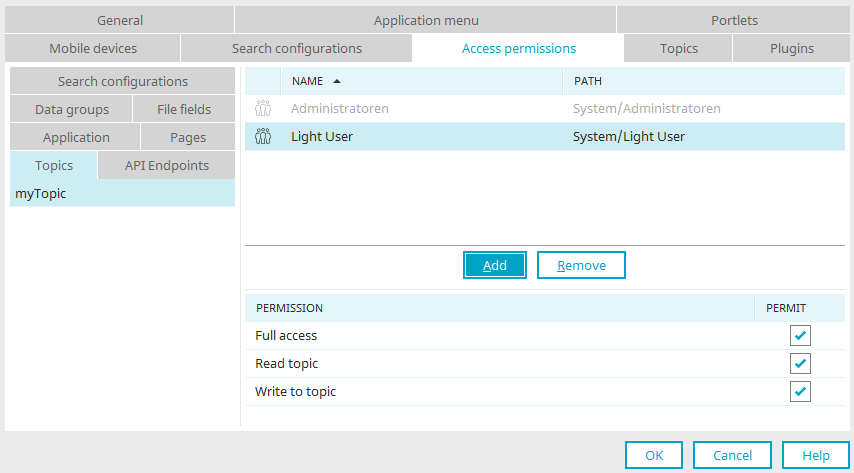
"Topics" are connected to WebSockets. They represent the object that WebSocket messages output/make available. A "consumer" can subscribe to a topic. A topic can be compared to a message channel that can be subscribed to.
You can grant the following permissions for topics:
Full access
If you select this option, the corresponding user is granted both the "Read topic" and "Write to topic" permissions.
Read topic
With this permission, you can control which users should be able to see WebSocket messages in the browser.
Write to topic
This permission refers to the user of a process that contains a WebSocket action or a Groovy action with WebSocket functions. You can execute processes in a user context. The permissions of the respective user are relevant in this case. If the user does not have the "Write to topic" permission, then a WebSocket message will not be sent via the process and will also not appear in the browser.
More information about WebSockets is available here:
API endpoints
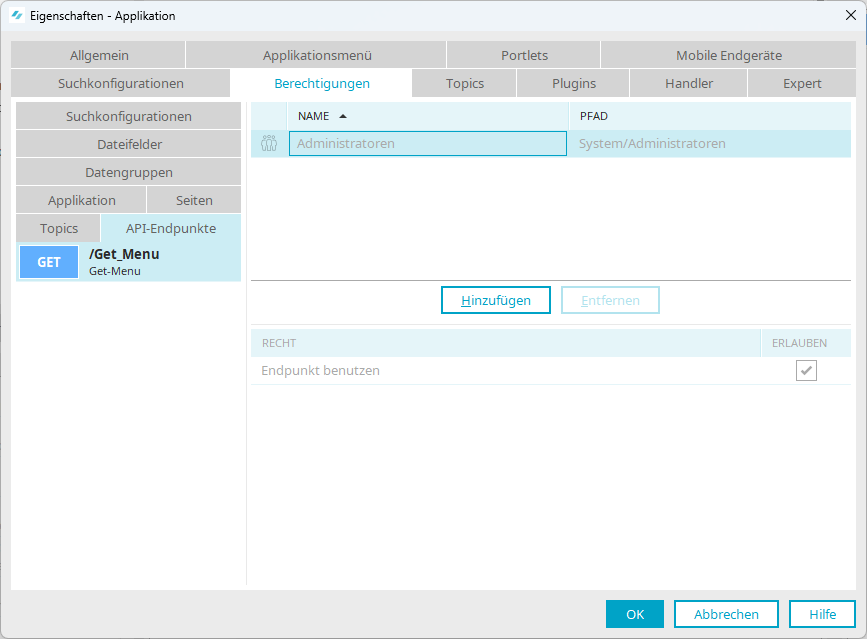
This displays the API endpoints that you have created within the application. You can select one or more API endpoints and then assign a user or a user group.
Further information on assigning rights for API endpoints can be found in section Assigning a user to an API endpoint.
You can find more information about the Intrexx Application API in the section Intrexx Application API.
Menu structure

Permissions can be assigned for each menu item. These permissions can be edited via the main menu "Portal / Edit menu structure". Menu items that a user may not select will be hidden in the browser.
The permission "Administer menu item (CMS)" allows the CMS application to publish articles under this menu item. Articles are published directly in the CMS application. For menu items that originate from the CMS, the permissions cannot be managed via the menu designer. Deleting a CMS menu item is also only possible via the CMS application. Menu items that refer to CMS content can only be managed in the CMS application.
The permission "select menu item" allows the corresponding user to select the menu item in the browser.
With the permission "Full access" all rights are automatically marked as "Allowed" and with click on "OK" also applied.
Click here to find more information about editing the menu structure.
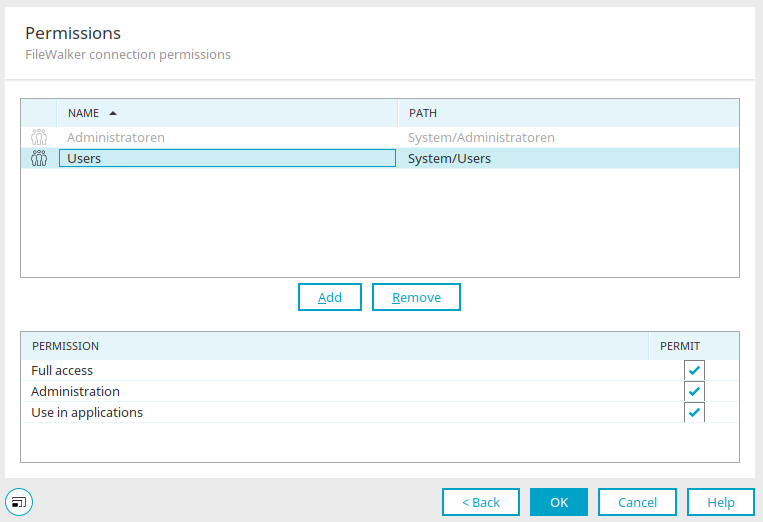
FileWalker
The access to files on the network are managed at two points: The permissions for the FileWalker connection are provided in the properties of the connection in the Integration module. The permissions for the FileWalker application element are provided on the Permissions tab in the properties dialog.
Set permissions in the Integration module
Click here to find information about how to add users to the list of permission holders.
Full access
This setting automatically activates all other permissions.
Administration
With this permission, the settings of the connection can be administrated.
Use in applications
Permissions holders are allowed to select the connection in the Applications module and assign it to a FileWalker element.
Please note that permissions for FileWalker connections are subordinate to the directory permissions of the individual users.
Application permissions
The permissions for the FileWalker application element are provided on the Permissions tab in the properties dialog.
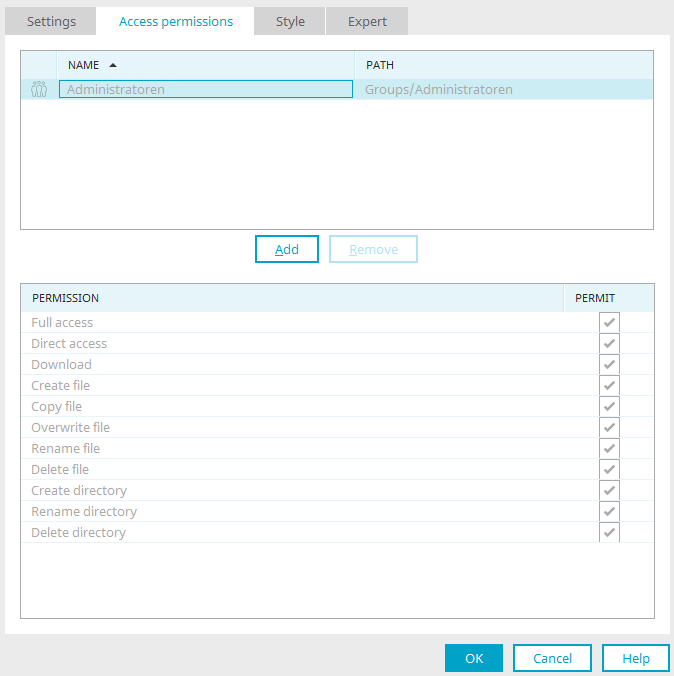
Click here to find information about how to add users to the list of permission holders.
Full access
This setting automatically marks all additional permissions.
Direct access
The permissions holder has direct access to all files. Changes will be applied to the original files.
Download
Download files.
Create file
Create new files.
Copy file
Create copies of a file.
Overwrite file
Overwrite files.
Rename file
File names can be changed.
Delete file
Files can be deleted.
Create directory
Additional network directories can be created.
Rename directory
Directory names can be changed.
Delete directory
Directories can be deleted.
The permissions can be activated by clicking the corresponding checkbox in the "Permit" column. Users of the FileWalker also require permissions for the application and for the page that contains the FileWalker element.
Web service
To be able to configure web services, the user requires the portal permission Register web services and permission for the Tools module.
Implement a login module
All information on this topic can be found here.
Generic permissions
Requirements
To be able to open the Generic permissions management, the "Enable expert options" checkbox must be enabled under "Extras > Options > Portals".
Target audience
Generic permissions management is designed for experts who want to manage additional permissions beyond the dialog-supported assignment of permissions. To use the function, it is helpful if you are familiar with "Java Permission Classes".
Functional description
With the Generic permissions management, you have the option of assigning the permission classes provided by Intrexx as well as your own permission classes to specific objects. You can then assign the objects to principals. You can specify which actions are to be executed in each case. Later, you can use Groovy, for example, to query at runtime whether a specific principal is allowed to perform a specific action for a specific object and react accordingly.
The following is an example of how to add a (further) principal to an Intrexx permission class and how to add an additional permission.
Use Intrexx permission classes - Add authorized object
Step-by-step guide
Proceed as follows to add an (additional) principal to an Intrexx permission class:
-
In the main menu, click on “Portal > Expert Area > Generic Rights.”
To access this menu item, the “Enable options for experts” checkbox must be selected under “Tools > Options > Portals.”
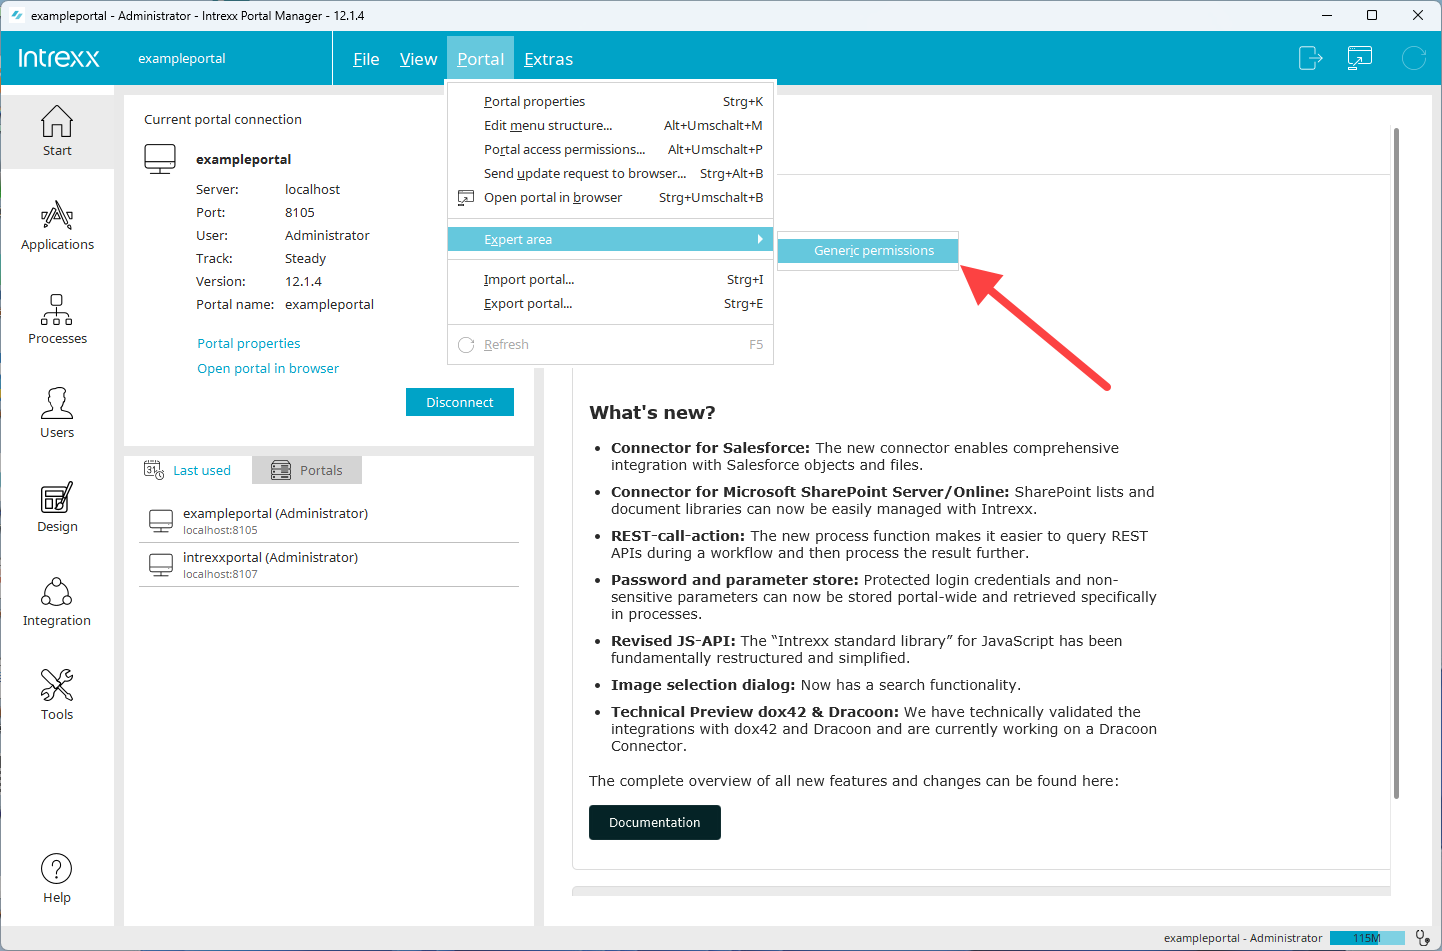
The “Generic permissions management” dialog box appears.
-
Open the "Permission class" selection list.
The permission classes provided or used by Intrexx are displayed.
You can find information on Intrexx permission classes under the following links:
-
Select the desired permission class (
 ).
).In the screenshot below, the permission class en.uplanet.lucy.security.permission.ApplicationPermission has been selected.
All objects (applications) that use this permission class are displayed in the "Object" area (
 ). In this case, the identifier is the GUID of the respective application.
As soon as you select an identifier, the principals are displayed in the "Principals" area (
 ).
).Once a principal is selected, the permitted actions are displayed in the "Actions" field (
 ). The "Actions" field is an edit field. Here you can add or remove actions (separated by commas).
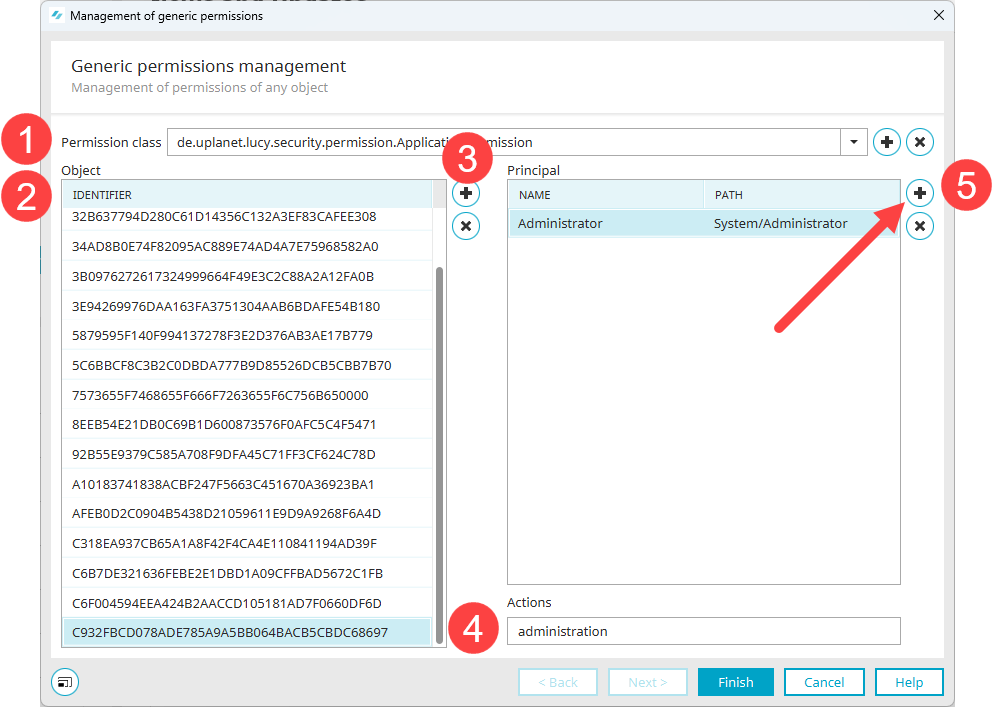
-
Click on the
 icon.
icon.The "Add authorized object" dialog box is displayed.
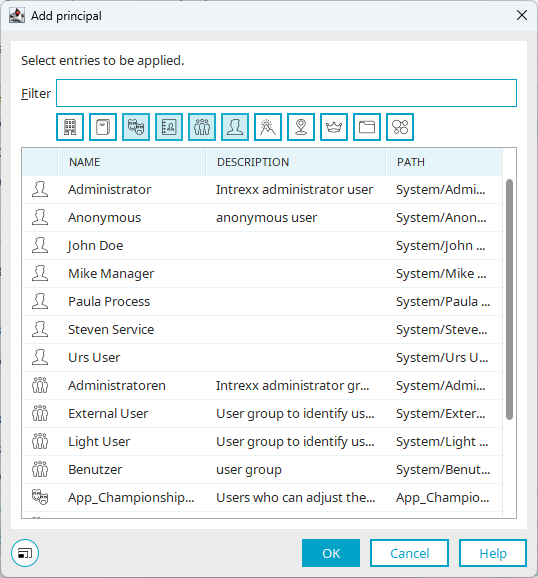
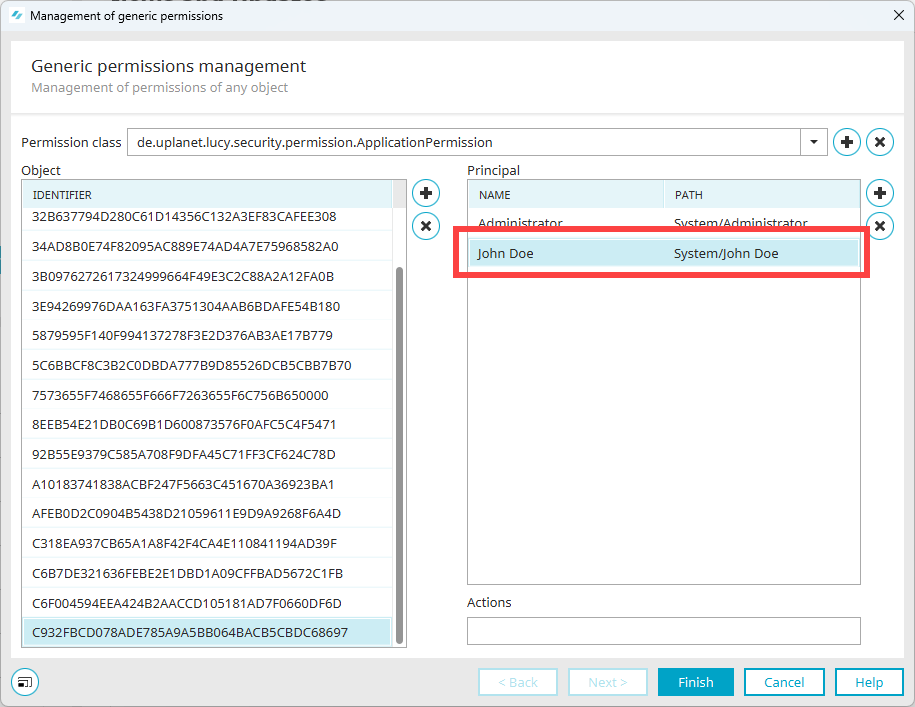
-
Select the desired principal.
The principal is displayed.
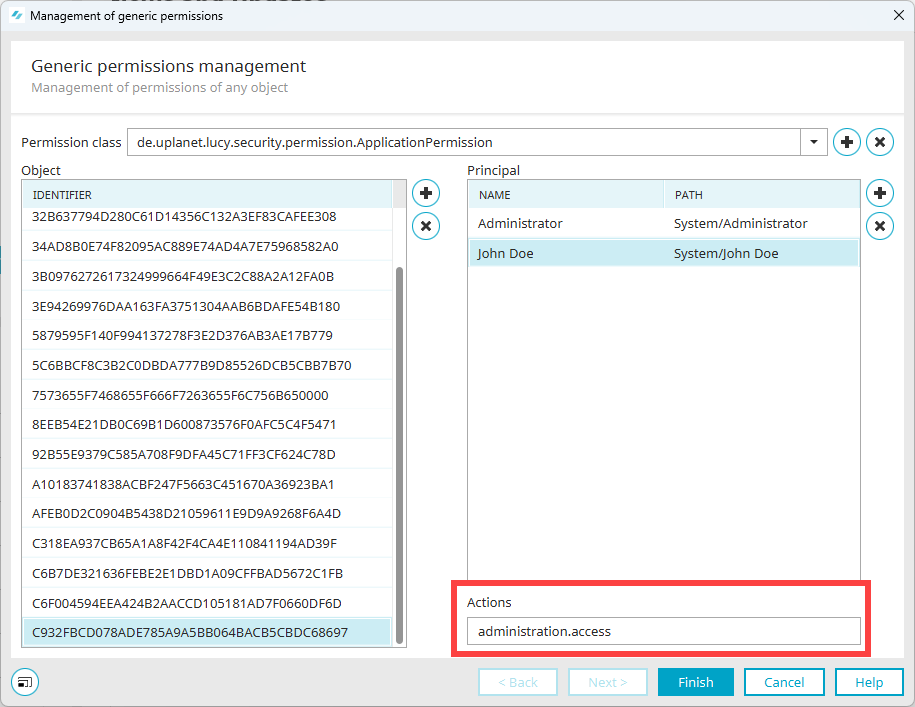
-
Enter the desired permissions in the "Actions" field.
The screenshot below shows the administration,access permissions.
-
Click on "Finish".
More information
Add your own permission classes
Step-by-step guide
Proceed as follows to add your own or a new permission class:
-
Click on the
icon.
The "Permission class" dialog box is displayed.
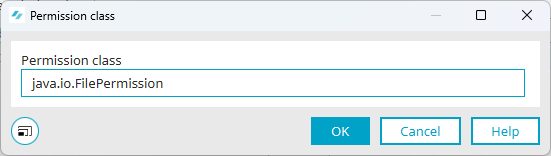
-
Enter the permission class.
In the screenshot below, this is java.io.FilePermission.
-
Click on "OK".
You are taken back to the "Generic permissions management" dialog box.
The permission class entered is displayed.
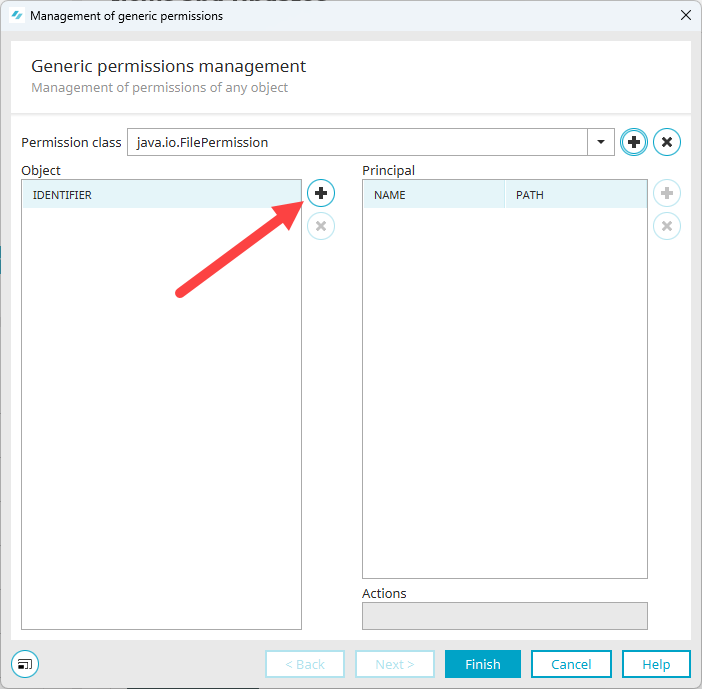
-
Click on the
icon.A new line is displayed in the "Object" area.
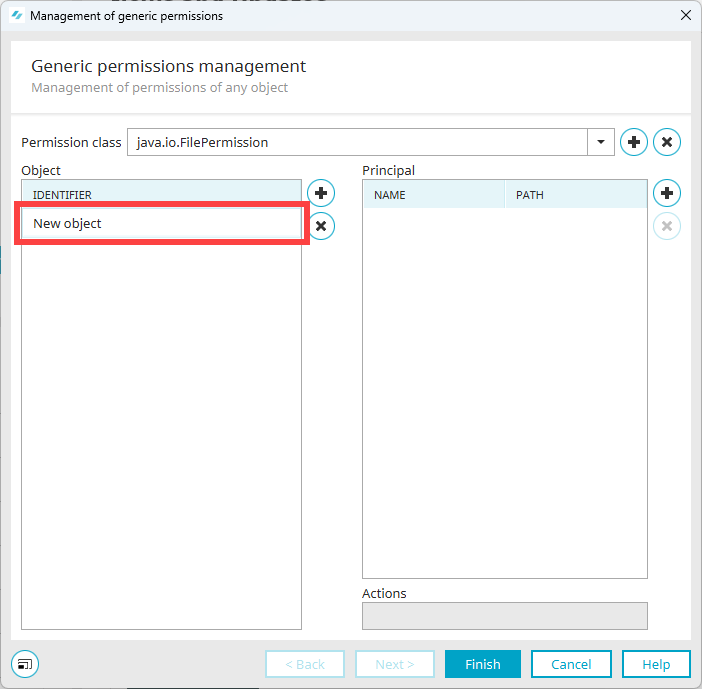
-
Click on the new line and enter the identifier.
In the screenshot below, this is a path to a file.
(Refer also to Class FilePermission
 .)
.) -
Click on the
icon in the "Principal" area. -
The "Add authorized object" dialog box is displayed.
-
Select the desired principal.
You are taken back to the "Generic permissions management" dialog box.
The principal is displayed.
-
Enter the desired permissions in the "Actions" field.
The screenshot below shows the read,write permissions.
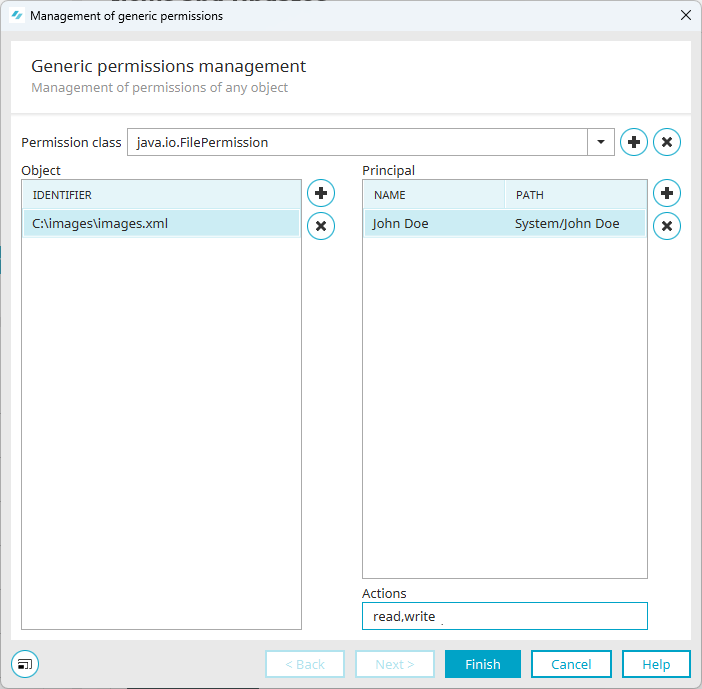
-
Click on "Finish".
More information