Overview of CRM scenario with SAP ERP
In this example, data from an SAP ERP system, or rather R/3 system is integrated into an Intrexx CRM using external data groups. At least a "View Only" license for the Connector for SAP Business Suite is required for this. Writing scenarios require the licenses "View & Write" (e.g. functional calls) or "Developer API" (complete data group functions such as create, modify, delete). The ERP Mini-CRM demonstrated here will have the following functions:
-
Research in the SAP customer base
-
Detailed information about the customer
-
Offers for the customer
-
Contact person from customer
-
Correspondence management
Create an application

Our example application can be downloaded here. Open the application for editing. The application title should be changed to "Demo SAP Mini CRM" by double-clicking on the Application node. Save the application and arrange it in the menu structure of the portal. Open the application in the browser.

On the "Administration" page, the categories
-
Offer
-
Contract
-
Contract
were added.
View SAP customer base
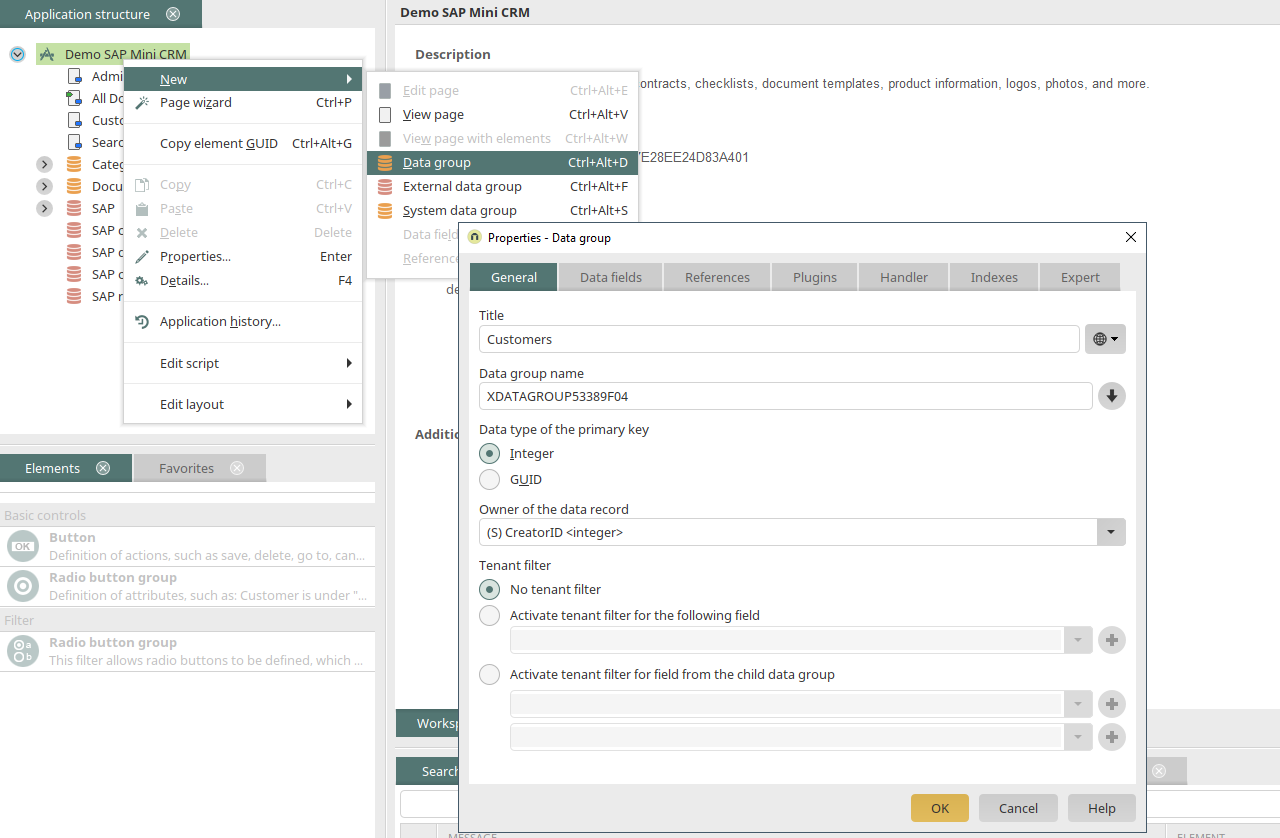
Create external data group

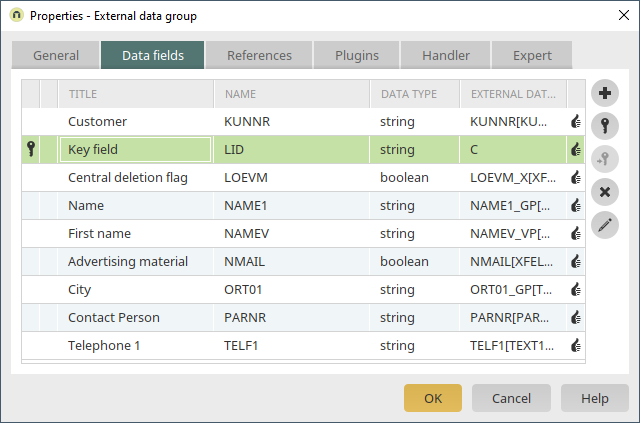
A new external data group will now be created. Use the properties dialog of the external data group to select the database connection "saperp", which is already configured in our example. Because we're only reading data from SAP and not writing to it, the SAP table "KNA1" can be integrated using the datahandler "Generic View".
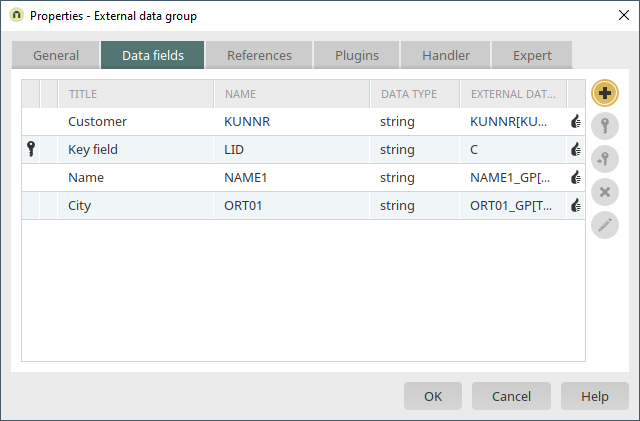
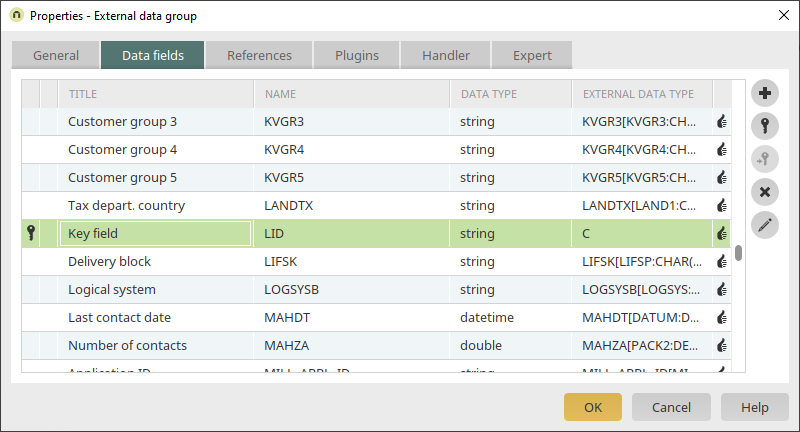
The required data fields from SAP can be selected on the "Data fields" tab.
-
LID
-
KUNNR
-
NAME1
-
ORT01
The "LID" data field is a generated help field that contains the entire SAP key of the data record (without client). This field should always be selected. The texts for all of the languages configured in the Intrexx portal are identified in SAP in this step and the corresponding titles are applied. With a final click on "OK", the SAP external data group is created.
Create customer view page

A new view page is generated via the context menu of the Application node and the title is changed to "Customers". A view table is now created on the page and the SAP external data group is selected in the properties dialog. In the properties dialog of the table, select the SAP external data group and add the data fields as a column whose values are to be displayed in the table. By clicking on "Sorting", the table can be sorted by name. The table is created by clicking on "OK".

The new view page should be available via the application menu in the browser. After double-clicking on the Application node, the properties dialog of the application is opened. On the "Application menu" tab, the "Customers" page is selected and positioned. The new setting is saved by clicking on "OK". The application can be saved and published. Once the application has been saved, the SAP customer base is available in the portal.

Research in the customer base
Filters will be used to enable users to search by customer number and the first letter.
Operator filter - Search by customer number

On the "Customers" view page, a dynamic filter (Operator) is added above the table. On the "Comparison" tab in the properties dialog, the operator "Begins with" is selected. Additionally, the data group "SAP" and the data field "Customer" are selected.

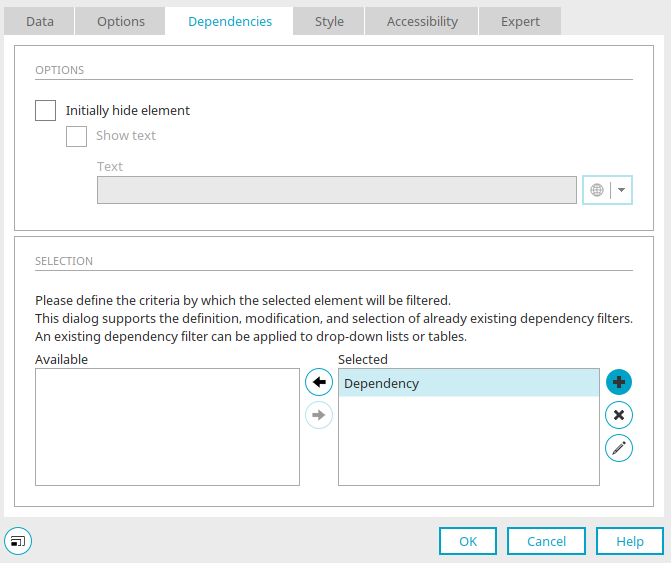
The setting "Show list with operators" can be deactivated on the "Miscellaneous" tab. Filter is created by clicking on "OK". Now, the dependency needs to be defined for the table. To do so, open the properties dialog of the table and go to the "Dependencies" tab. Add a new dependency. In the properties dialog of the dependency an event can now be added. Select the Operator filter and the event "onchange" here.

A filter expression needs to be defined now. This is done with "Add new filter expression". Here, the field "Customer", the operation "Is contained in", the control "Operator", which serves as the search field, and the comparative data field "Customer" are selected. The new settings are applied with "OK".

The dependency is now created. The dialog is closed by clicking on "OK".
Alpha-index filter - Search by customer's first letter
Now, the second filter for searching by the customer's first letter will be defined. The "Alpha-index" filter will be used for this.

The settings here can be left as they are and applied with "OK". The additional filter expression can be created by double-clicking on the view table.
Click on ![]() "Edit dependency" here.
"Edit dependency" here.
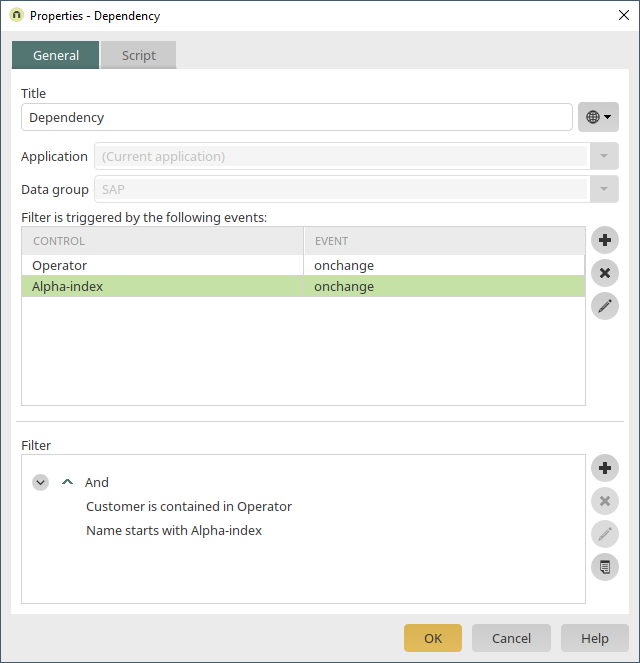
The Alpha-index filter is now added as a triggering control here. The new filter expression is defined as: Name starts with "Alpha-index". You can see the details of the filter expression's properties below:
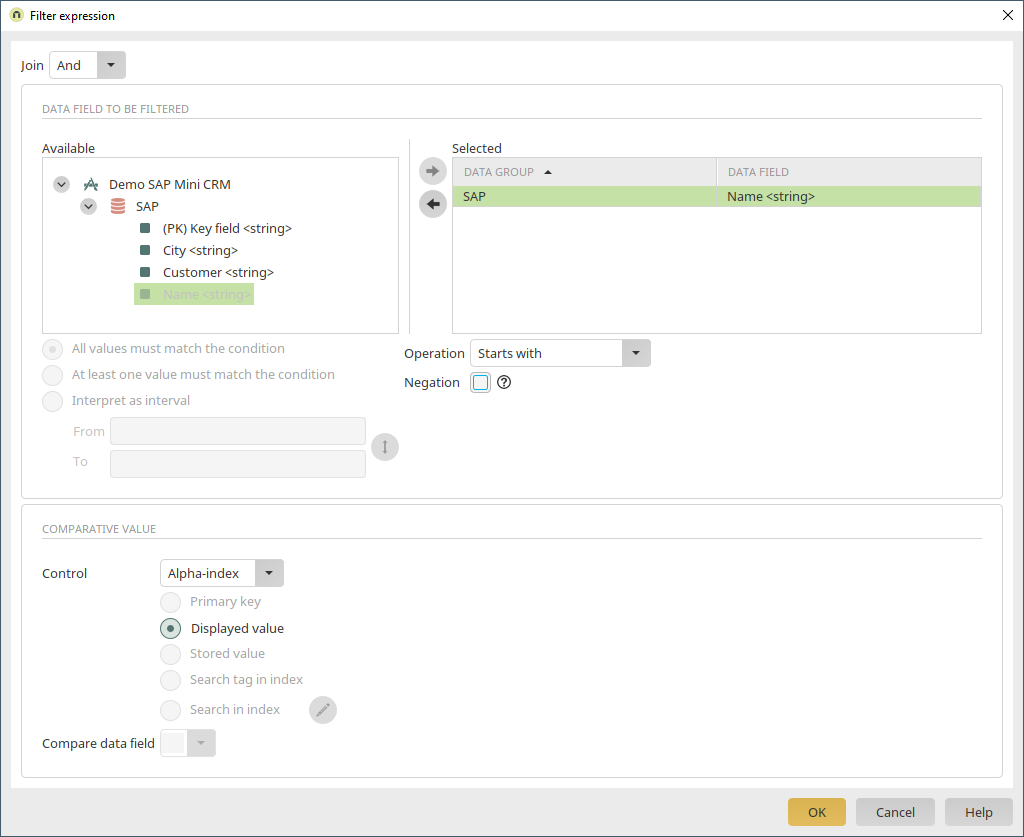
The new settings can be applied with "OK" and the application can be saved.
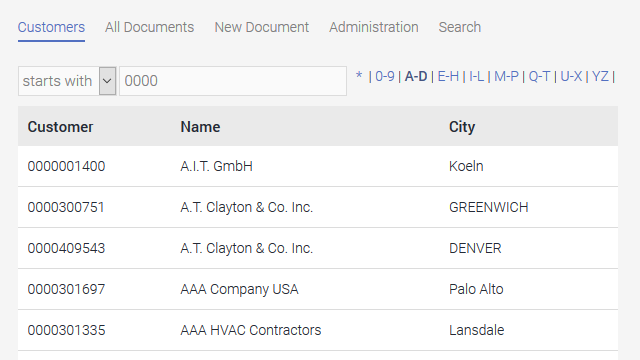
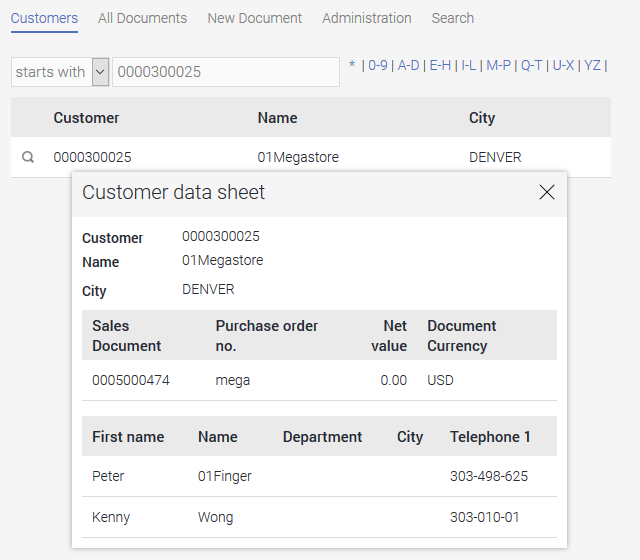
In the browser, the users can now search using a combination of the customer number and name. In this example, a search has been made for customer numbers beginning with "0000" and customer names beginning with A-D. There are of course other options for filtering by the customer name. You could, for example, configure this like the customer number filter so that all customer names are found that begin with a specific character string.
Detailed view - Customer data sheet
Create detailed view
In the next step, we will created a detailed view for the customers which can be opened from the view table on the customer page. By the way: The customer page can be defined as the start page for the application via the Main menu "Edit / Start page" if it is currently selected in the application structure.
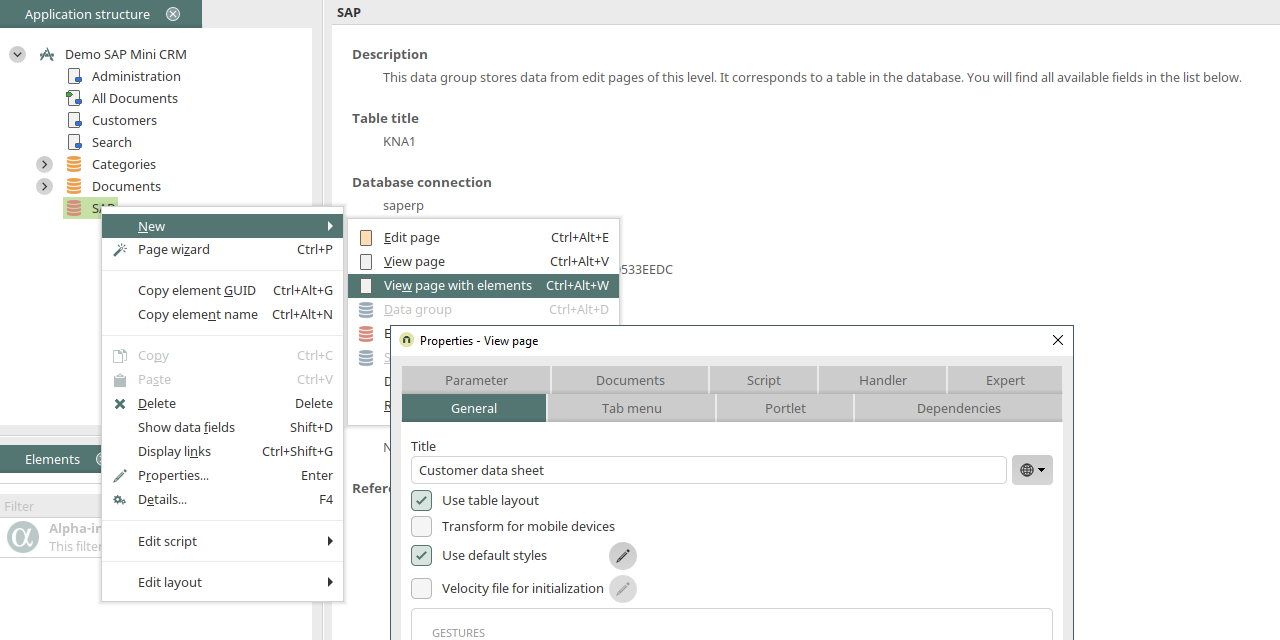
Via the context menu "New / View page with elements", a view page can be generated with all of the integrated data fields from the SAP external data group. The title is changed to "Customer data sheet" here.
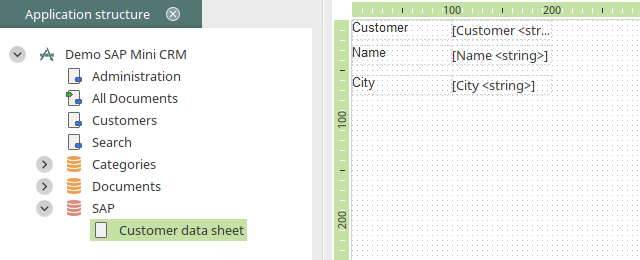
Redundant view elements can be deleted. If you would like to provide more data on this page, such as ZIP code and city, the corresponding data fields need to be included in the SAP external data group.

A button that links to this details page is added in the properties dialog of the view table on the "Customers" page by clicking on ![]() "Add column". The target destination "Customer data sheet" has already been selected correctly. Click on
"Add column". The target destination "Customer data sheet" has already been selected correctly. Click on ![]() "Edit column" after selecting the button column.
"Edit column" after selecting the button column.
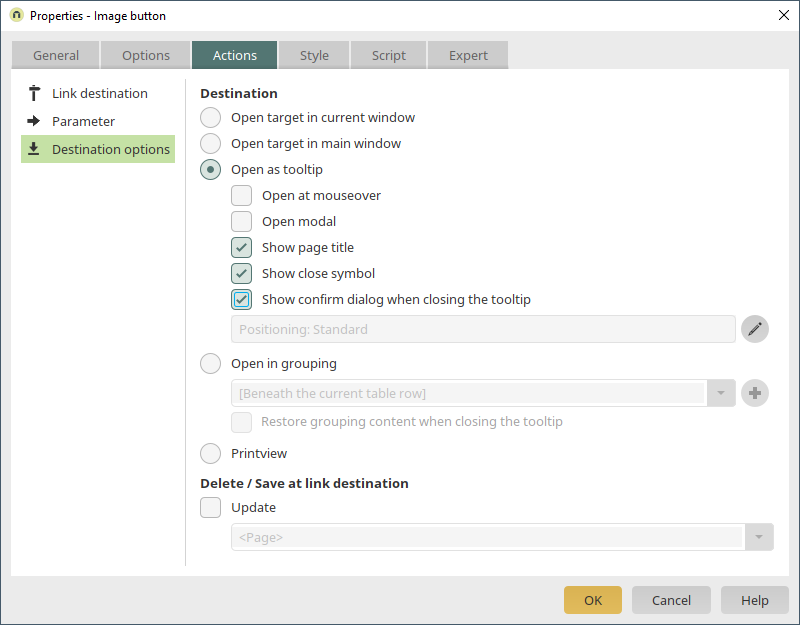
On the "Actions" tab, you can define that the customer data sheet is opened in a tooltip when a user clicks on the button in the table. Apply all of the settings by clicking on "OK" and then save the application.
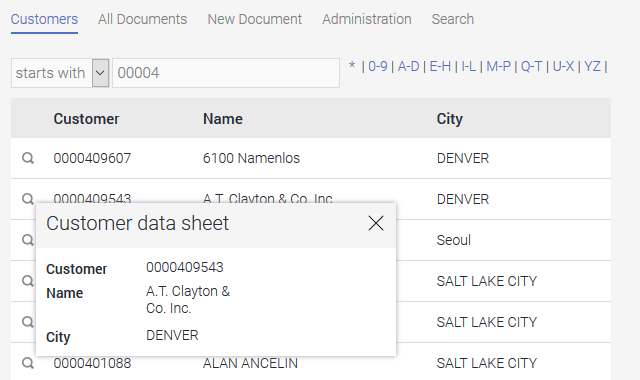
In the browser, the customer data sheet will be displayed in a tooltip by clicking on the button.
Display orders in the customer data sheet
To display orders for the customer in the customer data sheet we will create another external data group that integrates the SAP table VBAK (SAP task information).

Switch to the "Data fields" tab.
All of the required data fields from the order header can be selected here. Apply all of the new settings by clicking on "OK".
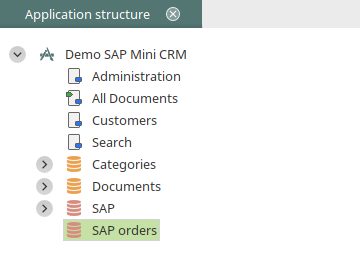
The external data group "SAP orders" has now been created. Now, a filtered view table for the customer orders should be created on the customer data sheet.
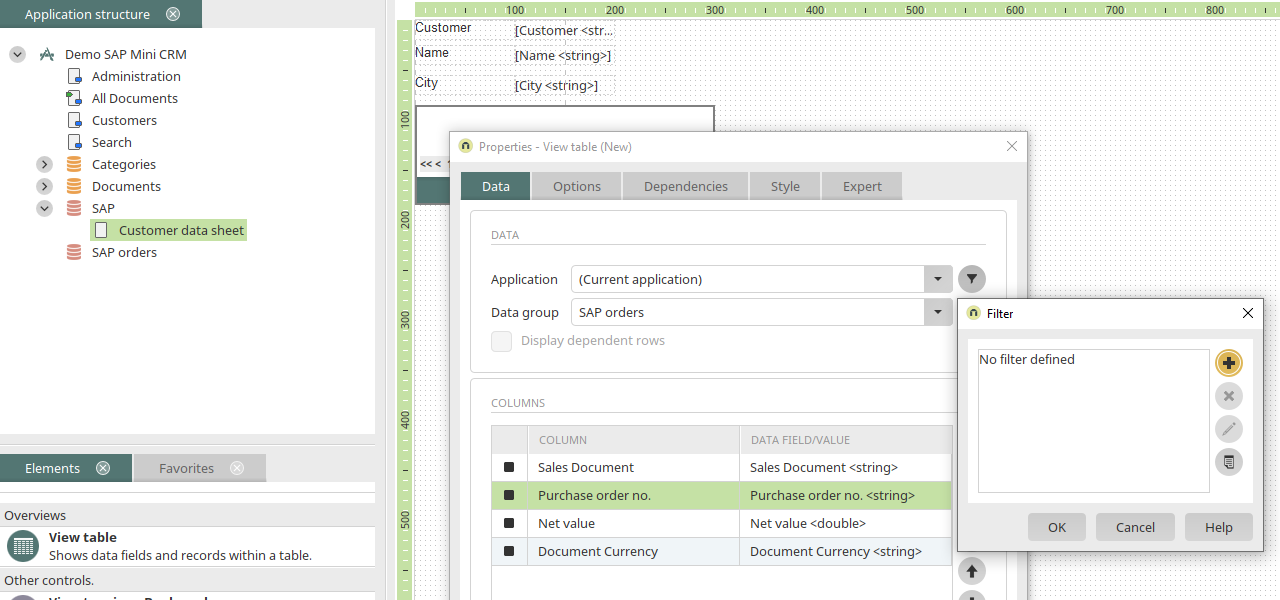
The external data group "SAP orders" is selected in the properties of the view table. The, select the required data fields for the table columns by clicking on ![]() "Add column" and sort them with the aid of the
"Add column" and sort them with the aid of the ![]()
![]() arrow buttons. Finally, open the filter dialog by clicking on
arrow buttons. Finally, open the filter dialog by clicking on ![]() "Filter".
"Filter".
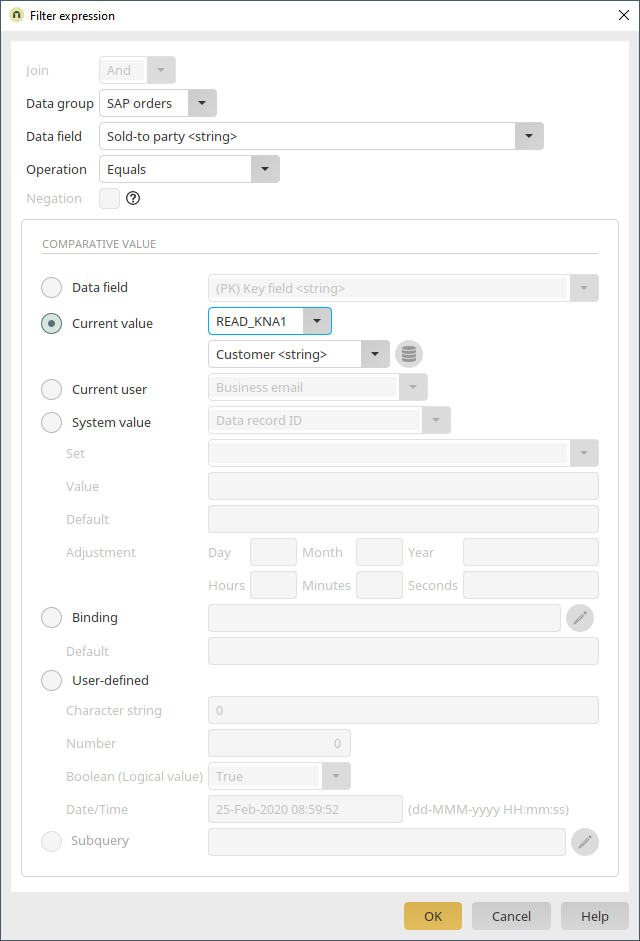
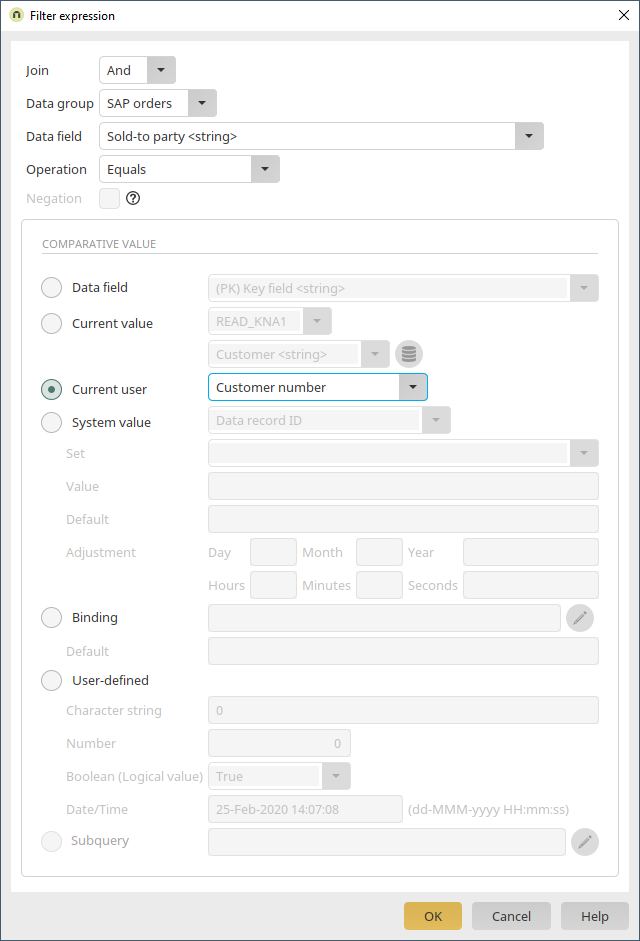
Here, click on ![]() "Add new filter expression". Select "Sold-to party" as the data field and "Equals" as the operator. The data field should be compared with the value from the data field "Customer" on the current page. If the values match, the table will display the orders where customer number of the currently displayed customer data record is saved in the "Sold-to party" data field. Click on "OK".
"Add new filter expression". Select "Sold-to party" as the data field and "Equals" as the operator. The data field should be compared with the value from the data field "Customer" on the current page. If the values match, the table will display the orders where customer number of the currently displayed customer data record is saved in the "Sold-to party" data field. Click on "OK".
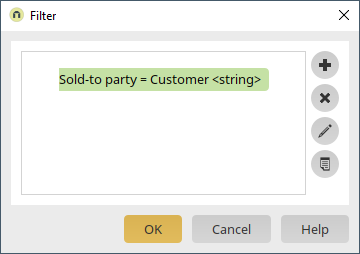
The first part of the filter expression has now been defined. Furthermore, the results displayed should be restricted to the sales document category C. This category is used for orders. Without this restriction, every document would be shown where the customer is defined as the sold-to party. Click on ![]() "Add new filter expression".
"Add new filter expression".
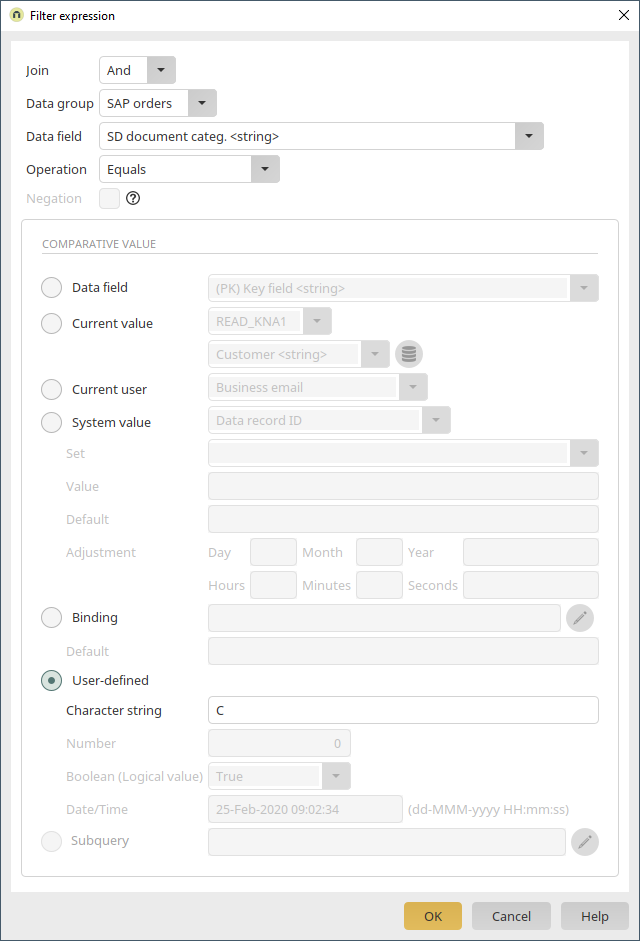
The second part of the filter expression has to be created with an AND join. An OR join would display every document category of the sold-to party OR every document with the category C. With the AND join, both conditions are applied to the available data, meaning that only documents with the current customer as the sold-to party AND with the category C are displayed. The data field "SD document categ." is entered here with the operator "Equals" and the user-defined character string "C". Click on "OK".
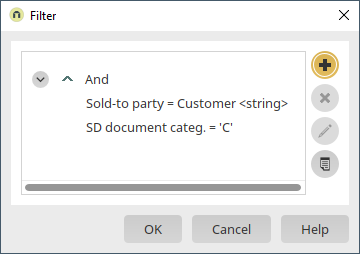
The filter expression is now finished. Apply all of the new settings by clicking on "OK" and then save the application.
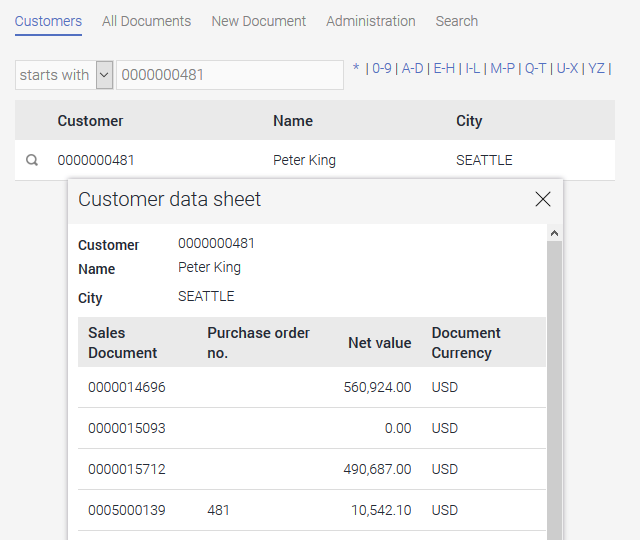
The orders are now shown in the customer data sheet.
Display contact persons
SAP external data group for customizing table
A new SAP external data group, which contains the customizing table for the "Department" field, is created via the application node.

Our SAP database connection is selected once more. The customizing table "TSAB" is integrated as the table.
The SAP portal plugin immediately breaks customizing tables down into the connected text tables. Information about how this behavior can be avoided can be found in the SAP API Developer's Manual.
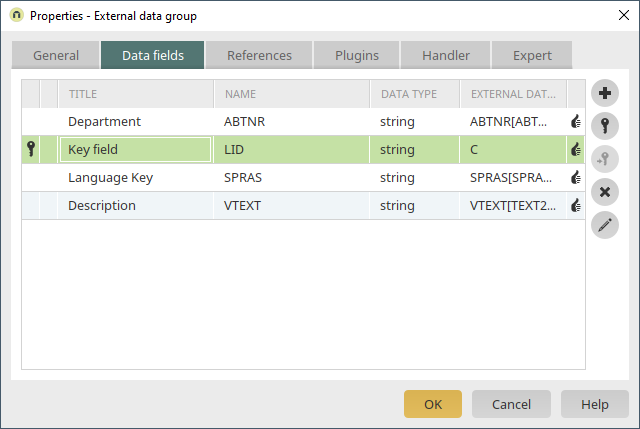
On the "Data fields" tab, the required data fields can be selected as usual.
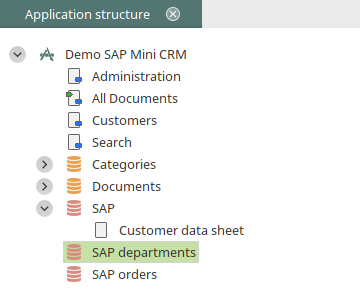
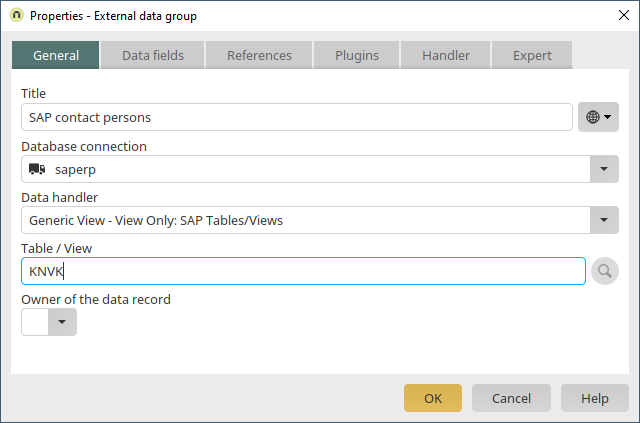
SAP external data group for contact persons with reference
The master data table "KNVK", which contains the data for the SAP contact persons, will be integrated into the application.
The data fields needed can be selected on the "Data fields" tab.
Click on "OK".

The field "ABTNR", or rather "Department", will now be added to the "SAP departments" data group created earlier as a reference. To achieve this, double-click on the new data group "SAP contact persons" and switch to the "References" tab.

Click on ![]() "Add reference" to create the reference. Enter "Department" as the reference title. Click on
"Add reference" to create the reference. Enter "Department" as the reference title. Click on ![]() "Other languages" to enter this title in the other portal languages. The "SAP departments" data group is referenced (corresponds to the SAP customizing table). Click "Next".
"Other languages" to enter this title in the other portal languages. The "SAP departments" data group is referenced (corresponds to the SAP customizing table). Click "Next".
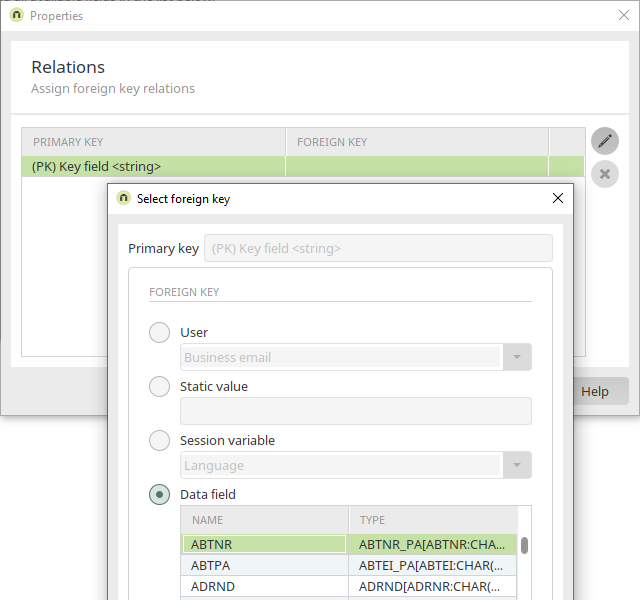
Now, click on ![]() "Edit". Then, select the "ABTNR" data field that contains the SAP coding. Click on "OK".
"Edit". Then, select the "ABTNR" data field that contains the SAP coding. Click on "OK".

The assignment is now created. Click "Next".
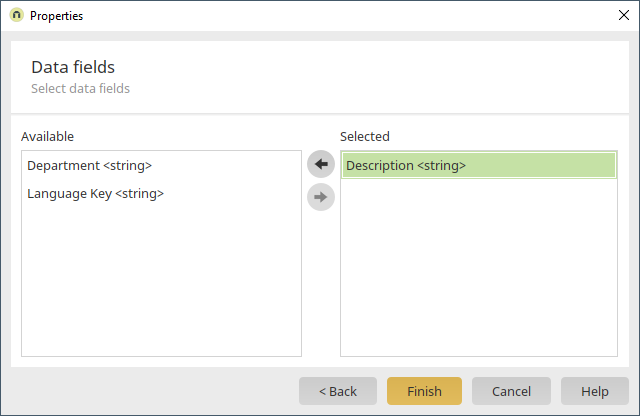
Here, you can select which fields from the customizing table should be visible to the users. Select the field that contains the description text for the coding. Click on "Finish".
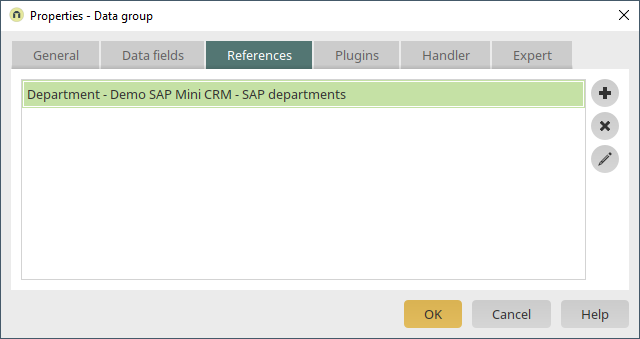
The reference is now complete. General information about "references" can be found here.
Adding the contact persons to the customer data sheet
We will now added another view table to the customer data sheet.

The referenced deparment field can also be integrated as a table column. If you would like to change the name of a table column, select it and then click on ![]() "Edit column". The order of the columns can be edited with the
"Edit column". The order of the columns can be edited with the ![]()
![]() arrow buttons. The access to the SAP contact person now needs to be restricted to the current customer with a filter. To do that, click on
arrow buttons. The access to the SAP contact person now needs to be restricted to the current customer with a filter. To do that, click on ![]() "Filter".
"Filter".
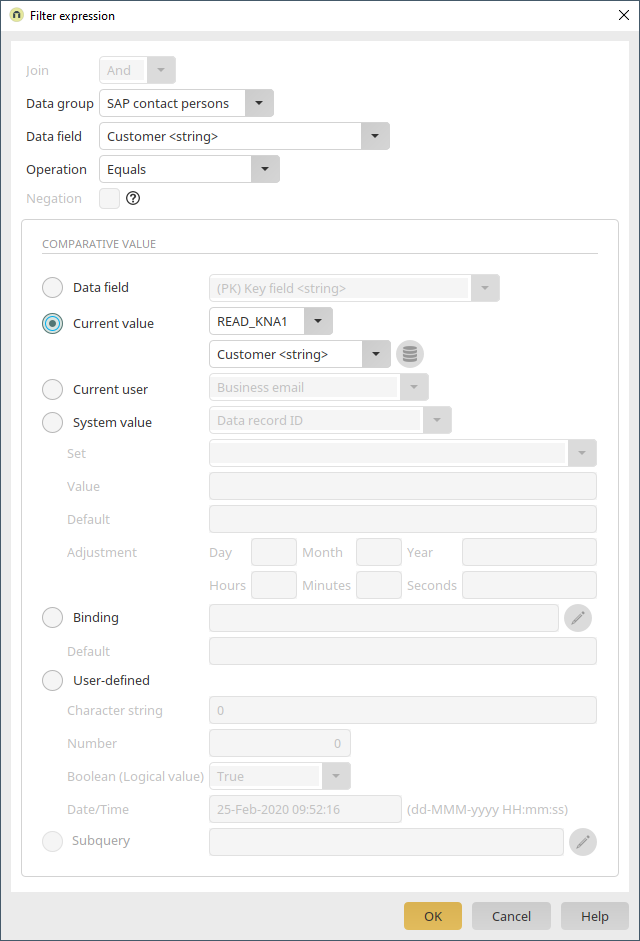
Here, click on ![]() "Add new filter expression". The "Customer" data field should be compared with the current value from the "Customer" field in the "SAP" data group with the "Equals" operator. This means that the table loads the data records where the same customer number is stored in both fields. Confirm your settings with "OK" and then save the application.
"Add new filter expression". The "Customer" data field should be compared with the current value from the "Customer" field in the "SAP" data group with the "Equals" operator. This means that the table loads the data records where the same customer number is stored in both fields. Confirm your settings with "OK" and then save the application.
To make it easier to tell the difference between the tables in the browser, you can define a table in each of the properties dialogs and then activate the setting "Display title".

Once the application is saved, the title will be shown in the browser.

Customer correspondence
Enhancing the application template

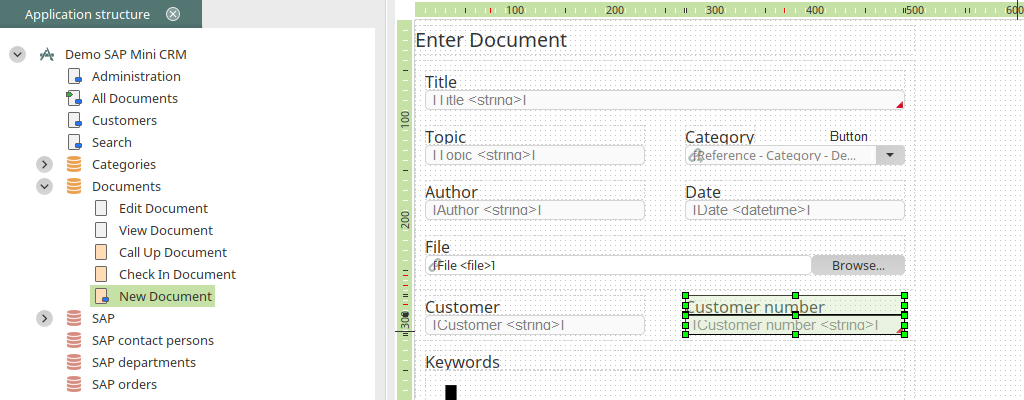
Add a new edit field to the "New document" edit page. Select the option to create a new data field at the same time. Click "Next".

This field will be used for the customer search later. Its title is "Customer". The control type is text and the data type is string.

Click on "Next" on the subsequent dialog pages and leave all of the settings as they are until the element is finished and created.

Another edit field for the SAP customer number is now created. Users may not enter data into the field. However, a data record is only valid when a customer number is in this field.
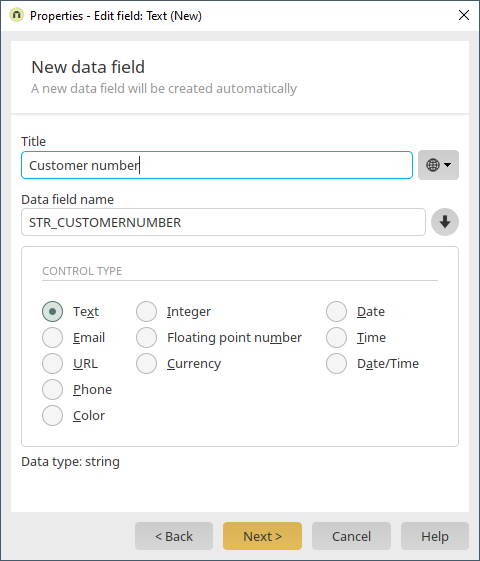
Its title is "Customer number". The control type is text and the data type is string. Click on "Next" and then on "Finish".
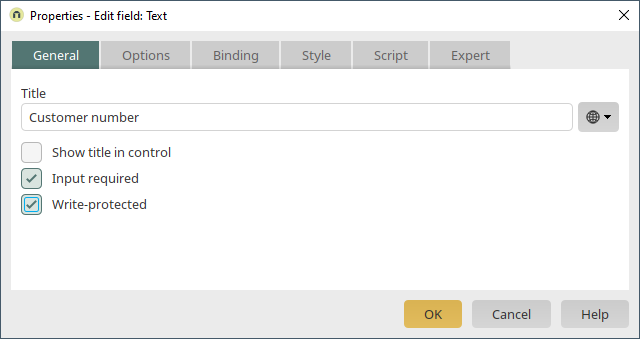
The settings "Read-only" and "Input required" are activated here. Click on "OK".
Customer search via Data Picker
The user should be able to search for a customer by typing their name, either entirely or in part, in the customer field and then by selecting them from a suggestion list. A button with the Data Picker action performs this action. Once the user selects the customer, the customer number is automatically written to the customer number field.
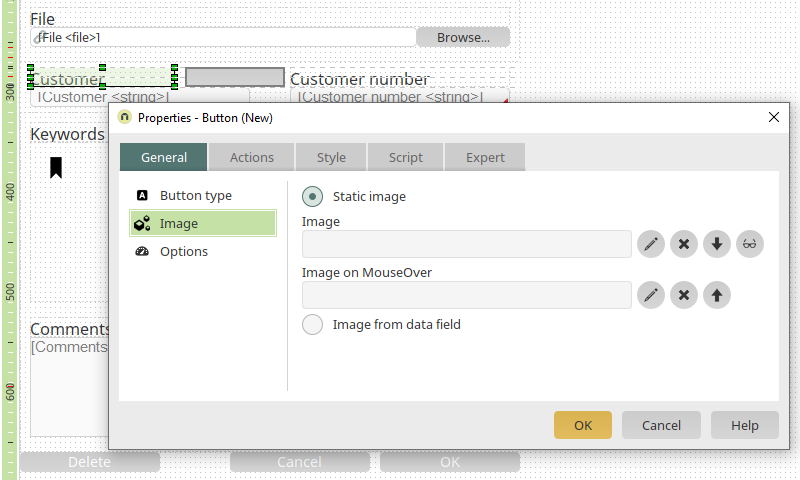
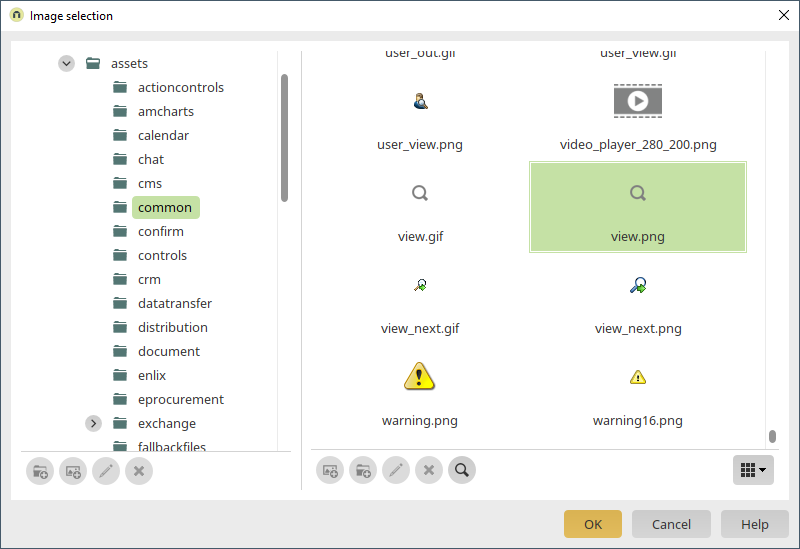
The button is defined as an image here. By clicking on ![]() "Edit", a suitable image can be selected for the button when the mouse is over it and when not.
"Edit", a suitable image can be selected for the button when the mouse is over it and when not.
Click on "OK".

The image for the button has now been defined. Switch to the "Actions" tab.

"Data Picker" can be selected as the action type here. The customer field is selected as the search field. The search should be performed in the current application in the "SAP" data group which contains the customer data. "Name" is selected as the data field. At the bottom, the "Customer number" field can be mapped to the "Customer" field from the SAP external data group. This means the customer number is taken from the SAP external data group and copied to the "Customer number" edit field on our edit page. The data group selected for the search can be restricted by clicking ![]() "Filter" - for example to remove undesired results such as data marked for deletion. Click on
"Filter" - for example to remove undesired results such as data marked for deletion. Click on ![]() "Advanced" to open a further dialog where the appearance of the list, which displays the search results to choose from, can be defined. At the top, you can specify which fields should be shown to the user in the search list so that they can make their choice. The number of results shown can be restricted at the bottom. With the "Show navigation element" setting, the user can navigate through a longer list of results. More information about the settings in this dialog can be reached by pressing F1. Usually, the user has to click on the Data Picker button to trigger the search function. The search function can also be triggered automatically when a specific number of characters have been entered. This behavior is controlled by the setting "Show results with an entry length of at least ... characters". In SAP, this setting can be relevant for performance and it is better to select a number that is too high and to limit the results with filters. Confirm your settings by clicking on "OK".
"Advanced" to open a further dialog where the appearance of the list, which displays the search results to choose from, can be defined. At the top, you can specify which fields should be shown to the user in the search list so that they can make their choice. The number of results shown can be restricted at the bottom. With the "Show navigation element" setting, the user can navigate through a longer list of results. More information about the settings in this dialog can be reached by pressing F1. Usually, the user has to click on the Data Picker button to trigger the search function. The search function can also be triggered automatically when a specific number of characters have been entered. This behavior is controlled by the setting "Show results with an entry length of at least ... characters". In SAP, this setting can be relevant for performance and it is better to select a number that is too high and to limit the results with filters. Confirm your settings by clicking on "OK".

The size of the button can be automatically adjusted to the original size of the image selected by selecting "Set full size" from the context menu.
Adding the new fields to the view page and search
In the previous, the new data fields "Customer" and "Customer number" were added to the Intrexx data group "Documents" along with the corresponding edit fields. The contained data will now be shown in the view table "All documents" and also added to the search configuration for the search.
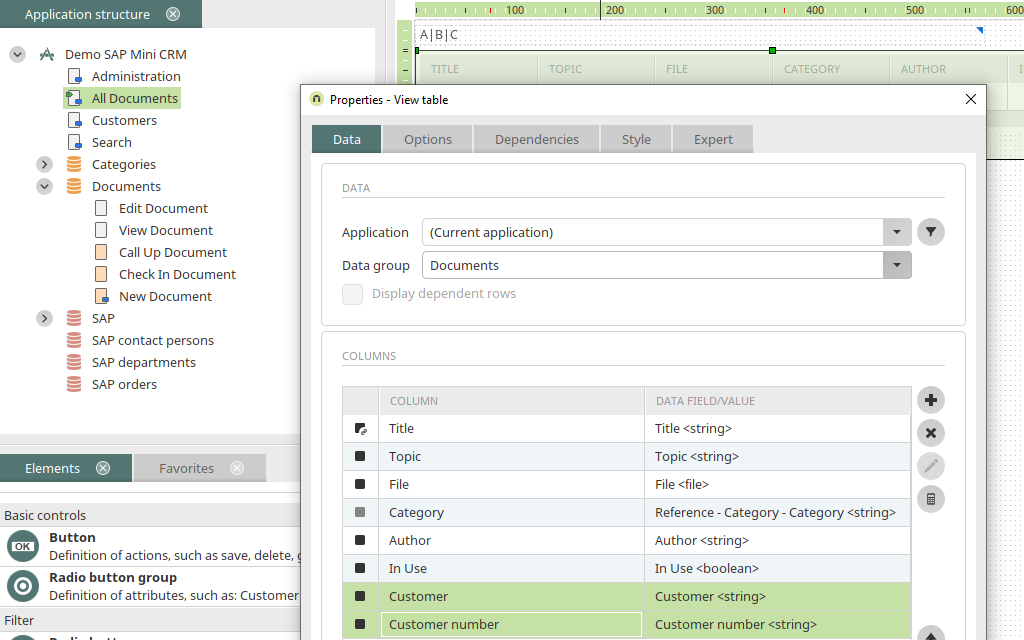
Open the view page "All documents" and open the properties of the view table by double-clicking on it.
You can add the two fields by clicking on ![]() "Add column". Save the changes by clicking on "OK" and then switch to the "Search" page.
"Add column". Save the changes by clicking on "OK" and then switch to the "Search" page.

On the "Search" page, open the properties of the button by double-clicking on it. Then click on ![]() "Edit search configuration" and then
"Edit search configuration" and then ![]() "Edit search configuration" in the subsequent dialog. Activate the setting "Search" at the bottom of the dialog for the fields "Customer" and "Customer number". Apply all of the new settings with "OK" and then save the application.
"Edit search configuration" in the subsequent dialog. Activate the setting "Search" at the bottom of the dialog for the fields "Customer" and "Customer number". Apply all of the new settings with "OK" and then save the application.
Test the application

A test data record can now be created on the "New document" page. "Mega" will be entered in the customer field and then the Data Picker button will be clicked on. Because there are multiple hits, a list will be shown from which the correct customer can be selected.

When you select a customer, the correct name is automatically in the Customer field and the correct number in the Customer number field. Click on "OK" to save the new data record.

The new record can now be seen in the table on the "All documents" page.
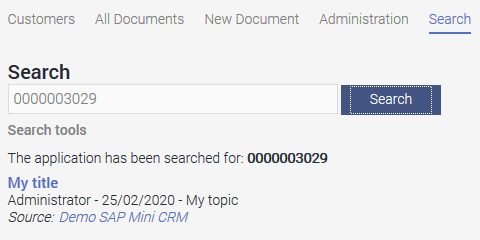
You can search, for example, for the customer number on the "Search" page. Hits will be shown beneath the search field when you click on "Search". Click on the title link of a hit to load the "Call up document" page where the data record can be viewed.
Create simple master data list with SAP Reports
A simple method of presenting SAP information as master data sheets is provided by the report integration of the Connector for SAP Business Suite. Proceed in exactly the same manner as shown earlier in the previous chapters and create an external data group for SAP Reports.
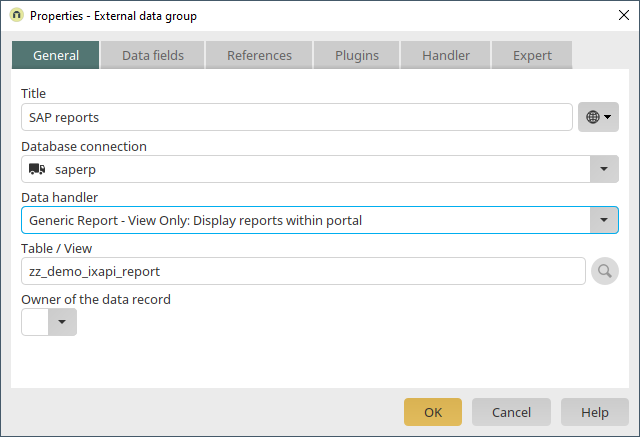
In the properties of an external data group, select your SAP connection as usual. Select the data handler "Generic Report" and enter the technical name of the report in the Table/View field (e.g. in the code example below "zz_demo_ixapi_report"). Intrexx accesses SAP via the Generic Report data handler and transfers the parameters and generated lines of text. The scaffolding of the SAP reports contains simple PARAMETERS instructions that are then available in Intrexx as filter criteria. The following example contains the material number as the parameter for which information in SAP will be acquired in the START-OF-SELECTION section.
            report zz_demo_ixapi_report no standard page heading line-size 256.
* ------- interface
parameters matnr type matnr.
start-of-selection.
The complete coding of this example can be found here.
Possible extensions
Filter criteria from the user context
In some scenarios it makes sense to use additional filter criteria to restrict the number of hits for authorization reasons. Examples for filter values from the user context are
-
Customer number
-
Personnel number
-
Cost center
-
Sales organization
Additional attributes can be defined in the "Users" module in the portal. The values entered in the attributes are then assigned in the respective user account.

In a customer portal, for example, the view of your own orders could be automatically restricted to the customer number from the user account (filter expression: Sold-to party = Current user - Customer number).
Personalized access
An SAP system is accessed by at least one system user, who is configured in the settings of the SAP data source. However, it is also possible to work with the SAP user of the portal user. To do so, enter the login mode as an expert attribute in the properties of the SAP external data group.
Improved search
Searching using the SAP customer base, as implemented in the example application, is case-sensitive (a distinction is made between upper and lower case). If this is not taken into account in the search term, or if the search term can be found in another field, e.g. if you search for the postal code instead of the name of the customer, no results are obtained. To optimize this state, you can implement your own handler in the SAP portal plug-in. A sample code can be found here.
8.3 Display an optimized internal SAP table
Deleting SAP-typical codes via a reference, as in the previous example, is not always technically feasible in this way. The resolution of texts for a large number of fields can also lead to performance problems. In some cases, the data in SAP is distributed across several dependent tables, so it is hardly possible to form a join across all the tables required. In such cases, it is quite possible to build the data in SAP as a typical internal table and only then integrate it into the portal. The API methods GET_LIST and GET_DETAIL must then be implemented for read-only access. For an example of how internal SAP tables can be made available, see here.
Replicate SAP data in Intrexx data groups
As an alternative to external data groups, SAP data can be written to Intrexx data groups via a process.
To begin with, a new Intrexx data group is added to our example application. The data from the SAP external data group SAP, where customer data from SAP is integrated, should be replicated in the new Intrexx data group via a process. Before the application is saved, the data type of the primary key field "ID" needs to be changed to "string" to be able to use the SAP customer number as the primary key in the Intrexx data group. Switch to the "Data fields" tab.

Click on ![]() "Edit data field" here. In the next dialog, switch to the Expert tab. There, edit the value of the attribute "datatype" to "string". Save the application. Save the application and switch to the Processes module and create a new process with a time-controlled event.
"Edit data field" here. In the next dialog, switch to the Expert tab. There, edit the value of the attribute "datatype" to "string". Save the application. Save the application and switch to the Processes module and create a new process with a time-controlled event.
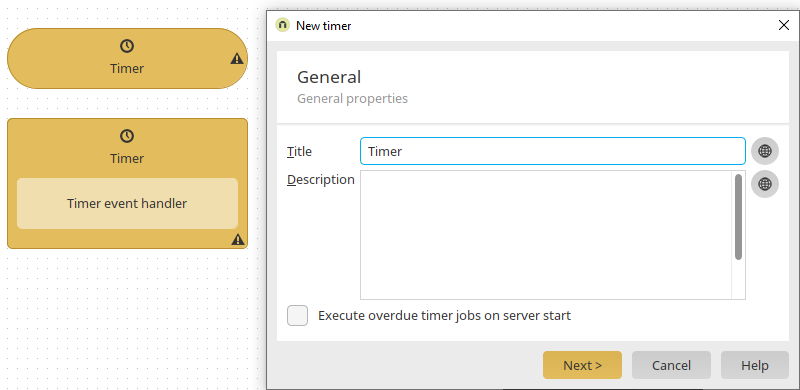
Click "Next".
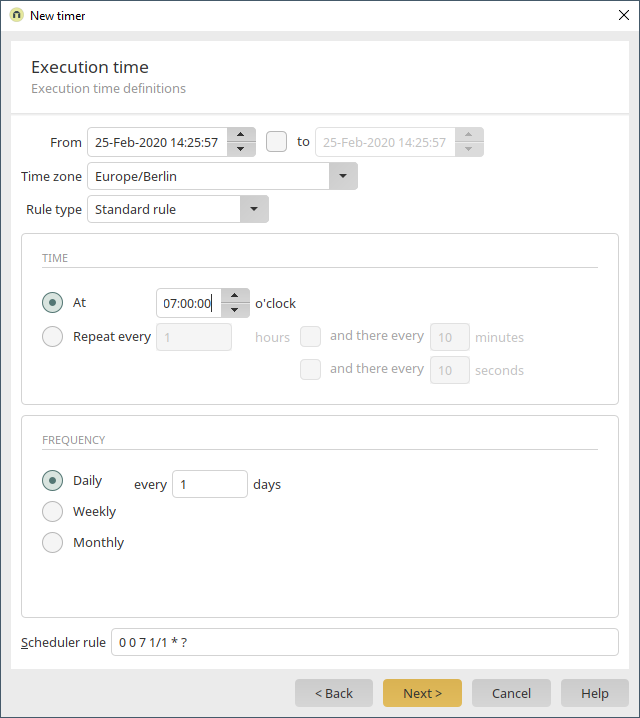
The timer should be defined so that all data records in the Intrexx data group are deleted at a specific time (07:00). Click "Next".
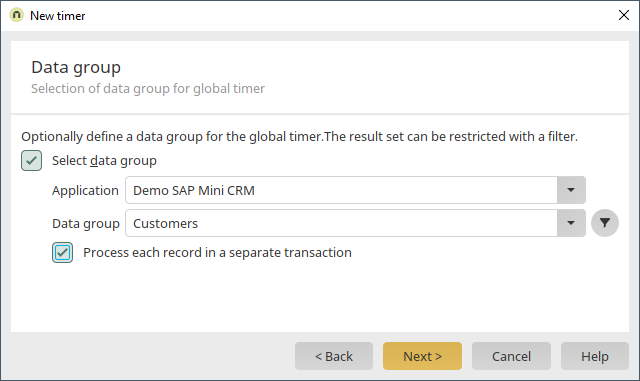
Select the Intrexx data group "Customers". Click on "Next" without defining a filter and leave all of the following settings as they are and finally click on "OK". The timer is now already defined in the process element timer event handler.

A data group action is now connected to the timer event handler. The action will delete data records. Click "Next".
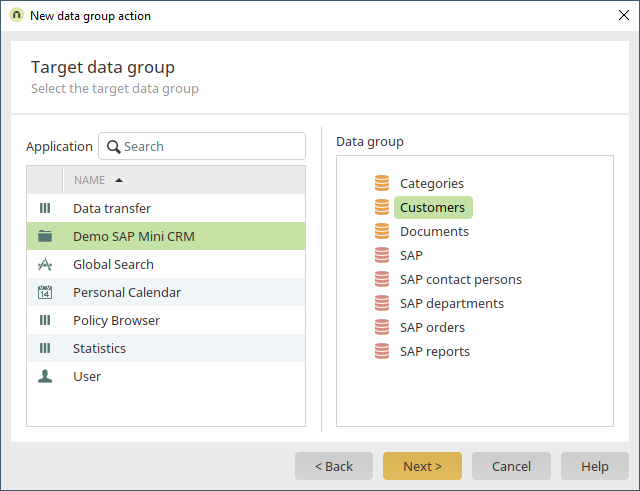
Select the SAP application and then the "Customers" data group. Click on "Next" and leave the subsequent settings as they are.

Based on the same principle, create a second global timer and set the execution time to 08:00.

Select the SAP external data group "SAP".
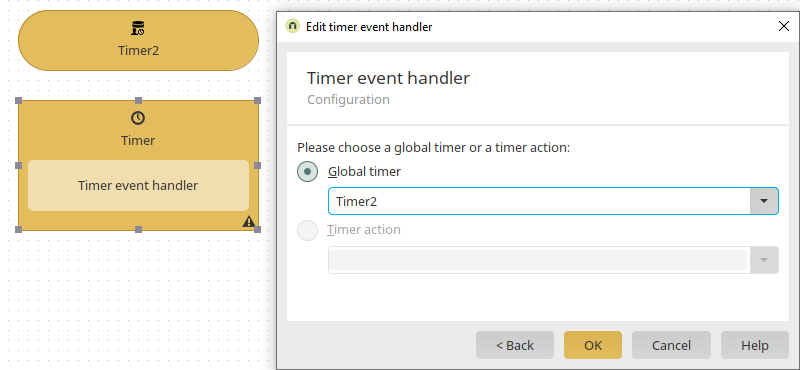
Add a new timer event handler and select the second timer here.

Connect a data group action to the handler. This will transfer the data from the SAP external data group to the Intrexx data group. Select the option "Add record" here.
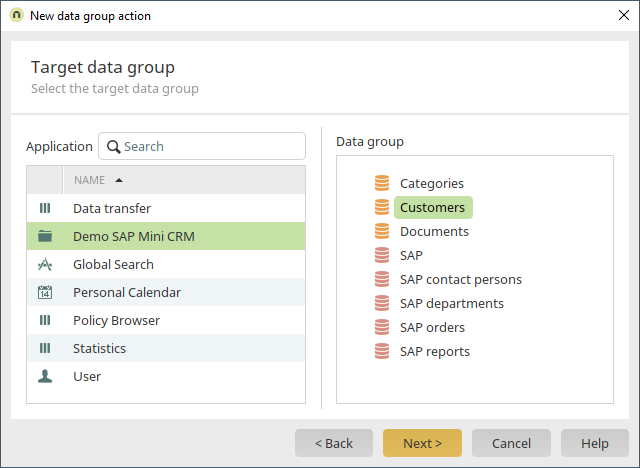
The target data group is the Intrexx data group "Customers".
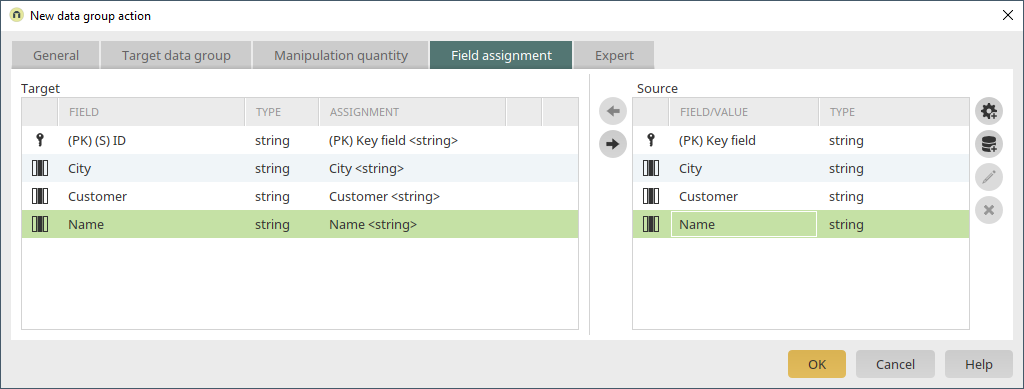
The primary key and the remaining fields are assigned here. The process is immediately activated once the process is saved. To prevent the process from running before it has been tested properly, deactivate it to begin with. Both timers can be started manually for testing purposes.

In the Tools module, open the Task scheduler and find the timer actions in the list of tasks. Use the context menu to start the corresponding timer manually.
Generic writing to a Z table
There is often a requirement to convert a new Business Object for SAP. This means that Z tables and a user interface (for example, simple table maintenance) are implemented in SAP in the customer namespace. The method described here is one way of implementing the data model in SAP and mapping the user interface completely in Intrexx. A sample code for the corresponding data handler (derived from Generic View Handler) can be found here. The data handler is registered as GENERIC_WRITE. A table with a GUID key field of technical type RAW(16) is required. This can refer to data element ZIA_IXA_GUID or SYSUUID_X, for example. It is easier to use a GUID than number ranges, since the Global Unique IDs (GUID) created with the SAP function module GUID_CREATE are unique worldwide. As of SAPPOPI Version 2010, the data handler GENERIC_WRITE is part of the package. This version also removes the restriction of the GUID key field. Data records with a simple key can then be changed and deleted. However, it is impossible to insert new data records without adjusting the handler, since the handler has no knowledge of the logic of new keys.
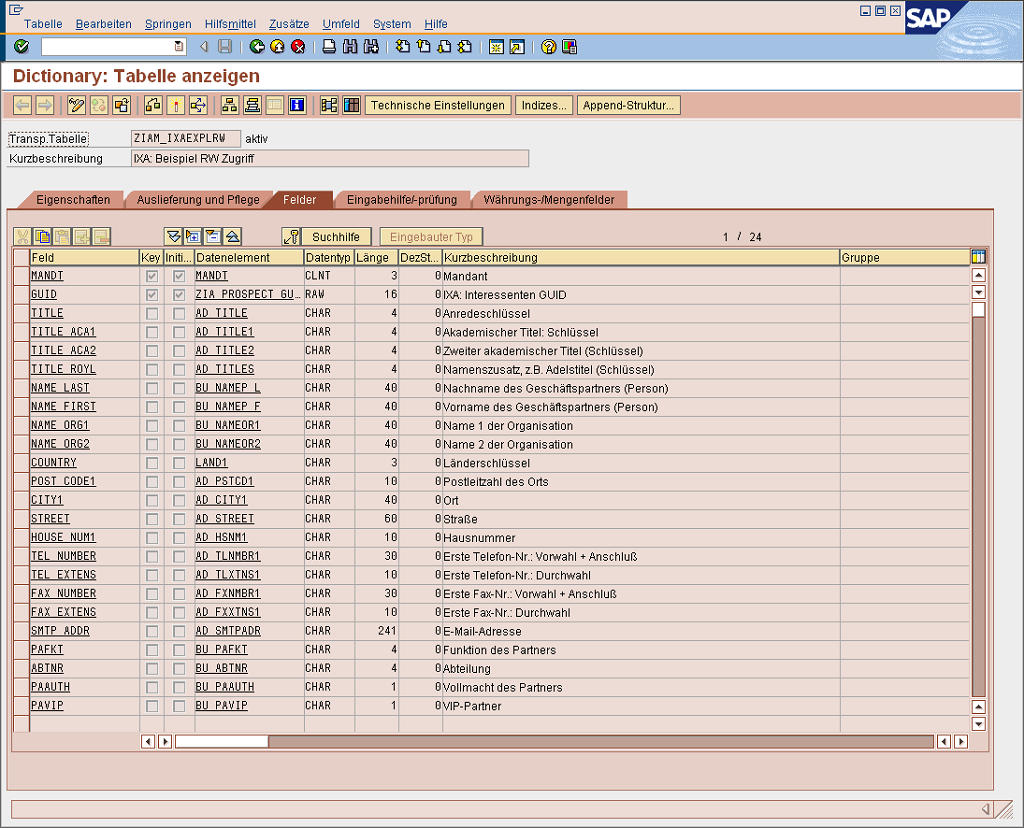
If you have created such a table with the GUID key field (and the client field), the table must be registered in the mapping of the SAP Portal Plugin. As of SAPPOPI 2010, registration is no longer required.
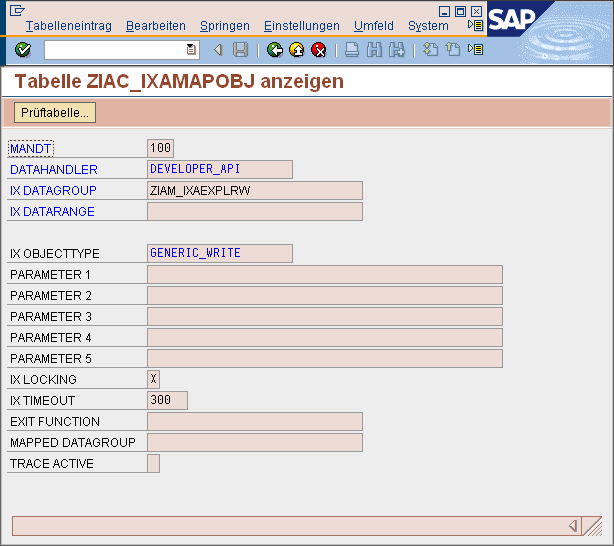
The table can then be used immediately as an external data group of the Developer API with full access in Intrexx.

All functions such as create, change and delete are available for the Developer API objects and the "Generic Write" handler.
Display documents in the portal
In SAP, documents (for example, drawings, correspondence, invoices) are available in three different ways:
-
As a document in the archive system (or in KPro)
-
As a document in the file system or accessible via an FTP server
-
As a document in the SAP database (for example, cluster tables, BLOB fields)
If one wants to make these documents available to the portal user, it must first be generally clarified whether direct access by external users to the documents from points 1 and 2 can and may be made possible. Point 3 is excluded here, since direct read access to the SAP tables is generally not possible here. If direct access from outside is technically possible, you can work with a URL. It does not matter whether the data comes from the archive system or is already in the file system. It is only important that a web server, which delivers the documents, exists and is accessible for the portal user. The task of the SAP system is solely to generate the corresponding URLs, which are then displayed in the portal as buttons or links. A sample code for generating the URL for archive documents can be found here. If the files are on a network drive (point 2), the coding is similar. In this case, however, the URL must be generated that corresponds to the network drive from the portal's point of view. The data handler GENERIC_ARCLINK can be used for this. If technically possible (e.g. under Unix), the network drive can be mounted in a sub-path to the portal, e.g. as directory docs under the portal directory external/htmlroot. The documents are then available to the user at https://<host>:<port>/<portal>/docs/*. If the user cannot access the documents directly, the documents must be provided on a path accessible to the web server. Technically, the documents must then be read on the SAP application server and copied to the externally accessible path. The easiest way to do this is with the SAP ABAP command OPEN DATASET ... TRANSFER. If only FTP is available for file transfer, the SAP programs RSFTP* demonstrate how to use the FTP protocol. You can also use Remote Services to exchange files between the SAP application server and the portal server using the RFC protocol. For many documents (e.g. all invoices for one user), not all documents should always be replicated. The handler methods in GET_LIST and GET_DETAIL can be separated here. The list view would create an overview of the available documents based on the filter criteria. Only branching to the detail view must trigger replication to the Web server. To do this, the sample code must be extended by the API method GET_DETAIL, which initiates replication in addition to formatting the data.--> For security reasons, the file names can be encrypted. The SAP function module GUID_CREATE is suitable for this. An invoice 1204387.pdf becomes 81C0C8484EB3A637E1000000C0A8DEE6.pdf. Security is further enhanced if these files are automatically deleted after a certain period of time.
Edit SAP objects
Change SAP objects Changing access at table level would be technically possible, but is not supported by the SAP Portal plugin. The developer manual for the plugin contains an example of how to deal with SAP objects. In principle, it must be possible to represent the SAP object in a transfer structure. Then all desired methods (e.g. Modify, Delete) must be implemented in the API. In these methods, the transfer structure is mapped and processed to available BAPI functions. The BAPI functions always contain the lock concept.
Document flow to portal objects
Document flows can be mapped in Intrexx without any problems. However, if document flows are also to be mapped to external objects in the SAP System, you must proceed differently here. In principle, pages of the portal can also be included in SAPGUI transactions. To do this, a special URL is called that branches to a detail page for the object. The key of the object is encrypted in the URL. So that external objects can be called from the SAPGUI transactions (for example, document flow), a BusinessObject is required that implements a DISPLAY method and generates a view of the portal when generated by the SAP standard. The document flow between SAP and non-SAP objects is generated using standard SAP functions. In SAP transactions, you can usually double-click the BusinessObject using the DISPLAY method.
Special concepts
Expert attributes for SAP external data groups
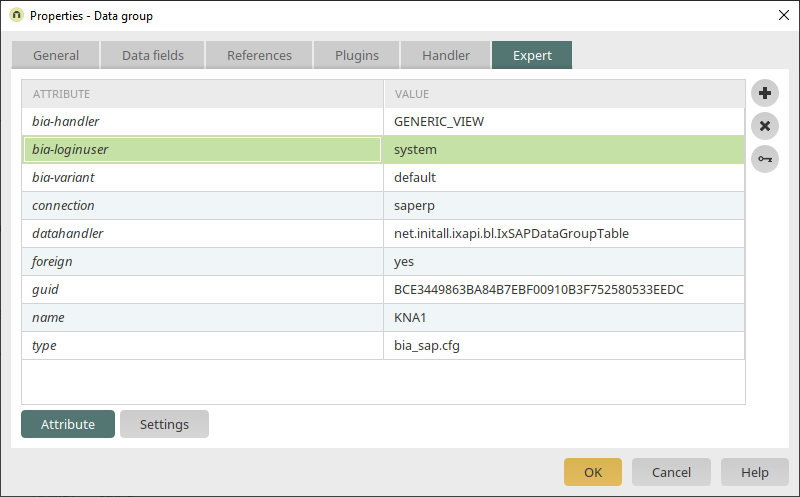
Expert attributes are used in Intrexx applications to provide additional configuration options that are not or not yet available in the properties dialog. Information about the Expert mode can be found here. For example, the expert attribute "bia-handler" specifies the SAP data handler to be used (e.g. "GENERIC_VIEW"). The additional expert attribute "bia-loginuser" controls, for example, whether access to the SAP system should be personalized. A list of other available attributes and their use can be found here. These expert attributes are used in relation to the data group (e.g. "bia-forcefilter = <true|false>" forces one or more filter criteria) or to the contained data field (e.g. "bia-KUNNR-numkeylen = <len>" maps the data depending on the direction with and without leading zeros in the specified length). If a setting is to refer to a data field, the expert attribute must be entered in the naming convention "bia-<Name of field>-<option>". The expert attribute is then called "bia-<option>", since the data field name is always given.
Generic View: Variante nolangtab
The most frequently used data handler "Generic View" has been implemented so that the linked text table is automatically determined when customizing tables are accessed and only the texts in the portal login language are transferred when the data is selected. In most cases this has made work easier. However, some Customizing tables contain interesting additional information that was no longer available. There was a workaround to use these leading tables, but it was cumbersome and had to be configured in the SAP system. This is compounded by the fact that some very important tables in the SAP System look technically like Customizing tables (for example, table "MARA"). Therefore, the handler "Generic View" in the variant "nolangtab". This variant prevents access to the text tables and thus allows access to tables such as "MARA" without great effort.
Generic F4
The "mapcodefield" expert attribute can be used to map the codes used in certain SAP fields into meaningful SAP F4 help texts. The "Generic F4" data handler provides these F4 helps as a simple code text table in the login language of the portal. This means that list boxes of dynamic filters, for example, can be filled without major problems. “<SAP DDIC structure or table>-<table field>" is expected as the table. Unfortunately, determining the F4 texts is not always easy. Therefore, this cannot be supported for every field. However, you can also support special cases using the inheritance concept of the SAP data handler class.
Generic ArcLink
This handler enables access to archived documents that are assigned to an SAP object. The SAP data handler would determine the archive documents for the specified SAP BusinessObject and the corresponding object ID and make them available as a table. This table contains a "URL" field that contains the URL to the archiving system (SAP server or external solution). This URL field can be transferred to another (e.g. hidden or external) display using the expert attribute "bia-mapurl". The purpose of this handler is in any case to provide easy access to documents (e.g. order confirmation as PDF) via the direct path of the URL.

The handler expects the SAP BusinessObject (such as VBAK) as the table or the character * for generic access. In any case, the ID of the SAP object (for "VBAK" the document number "VBELN") must be specified in the filter. The SAP BusinessObject is also expected for generic access (*). You can provide the ID of the SAP object very easily using dynamic filters. In the expert attributes, you can also set here that
-
The object ID is automatically converted to a 10-digit numeric key ("bia-OBJECT_ID-numkeylen = 10" option) and
-
the data group requires a filter ("bia-force filter = true")
Generic text
This data handler provides generic access to long texts in SAP (table STXH). The text object must be specified as the table name (e.g. BUS2032). Generic access with the * character is possible here if the text object is available via filters. The data handler returns the "STXH" table, supplemented by two fields that contain the actual text. A long text is automatically generated with the unformatted text ("TEXT_NORMAL" field) and with HTML formatting ("TEXT_HTML"). These fields can then be included as usual on a view page.
Permissions for own data records in SAP external data groups
In conjunction with external data, it is not easy to determine when the available data records are your own data records. This problem and its solution will be demonstrated using the example of the SAP order header data (table "VBAK"). Depending on the context of the portal user, there are fields in this SAP table that can be used to identify your own data records. From a customer's perspective, for example, this is the SAP field "KUNNR" (customer number), which must be populated with the customer number for their own data records. From an internal employee's perspective, however, it could be the SAP field "ERNAM" that contains the SAP user of the order creator. The second challenge is to determine the values to be checked in SAP (for example, customer number, SAP user name or personnel number). The required mapping between the user logged in to the portal and the SAP value to be checked can be performed in many different ways. The easiest option is to create your own attribute value via the Schema manager in the "Users" module and maintain values such as the SAP customer number here.

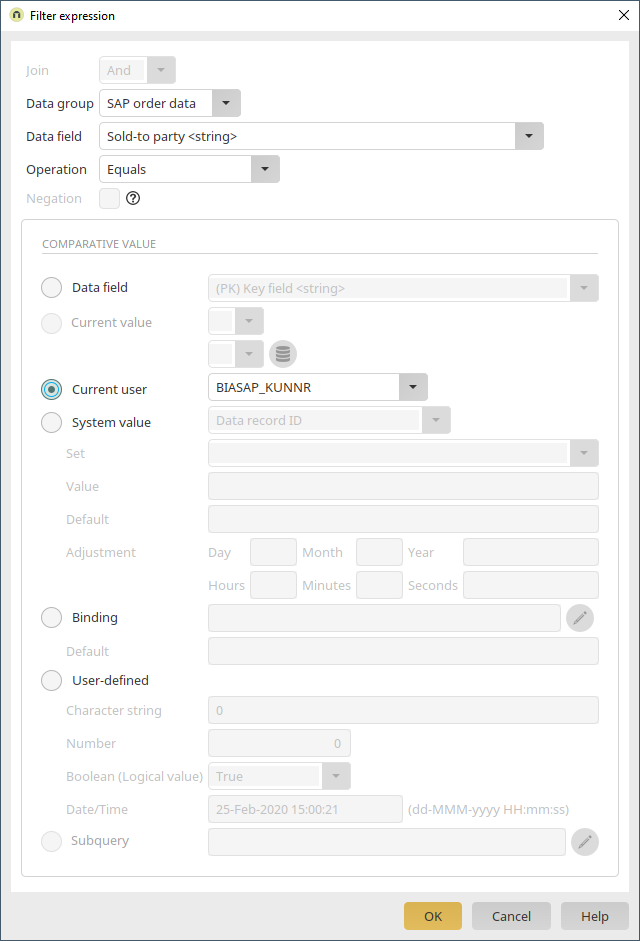
Such an attribute can be used as a filter value for view tables, for example. This allows you to control the permissions for SAP data in lists. However, the application permissions for data groups are not yet evaluated here. This therefore does not prevent direct navigation to a detail page that is not permitted. A concept called "Permission Filter" is used here. You can imagine the effect as a permanent filter directly applied to the external data group, which is also used when displaying the detail pages and thus prevents the loading of non-permitted pages. A simple application that implements access to the SAP "VBAK" table is used here as an example. Access will be restricted via application permissions. Own data records are interpreted as SAP data records that have the value from the user attribute BIASAP_KUNNR in the "Sold-to party" field (KUNNR).
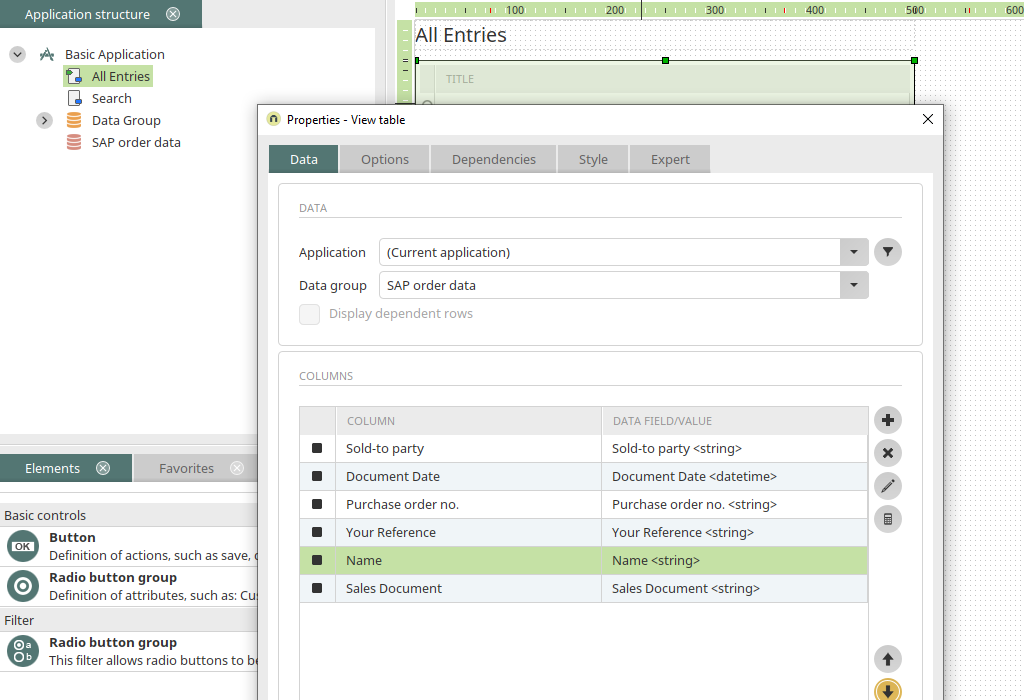
The SAP table "VBAK" is now added to the "All Entries" page. To do so, select the external data group "SAP order data" and the desired data fields in the properties of the view table. Then create a filter that compares the data field "Sold-to party", which contains the customer number in SAP, with the value from the user attribute "BIASAP_KUNNR".
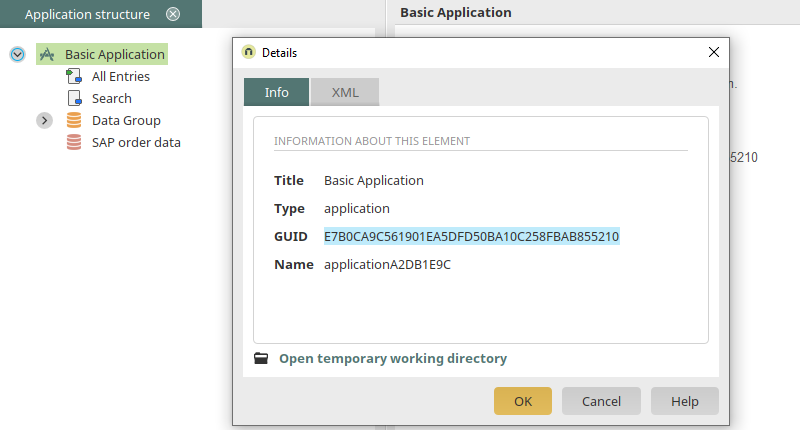
Save the application and publish it in the menu structure. Afterwards, determine the following GUIDs:
-
GUID of the application
-
GUID of the page that contains the table with the filter defined earlier
-
GUID of the table where the filter is defined
-
GUID of the SAP external data group
This is easily done by selecting the respective element (e.g. the application node) and then pressing F4.
Open the portal directory and navigate to the folder "internal\application\store". Open the folder with the same name as the application GUID. Open the folder "structure/pages". Close the application now. The changes in the next step cannot be saved unless the application has been closed. In the section "viewpage", search for the filter we just created. This section is after "tablecontrol". This section is after "tablecontrol".
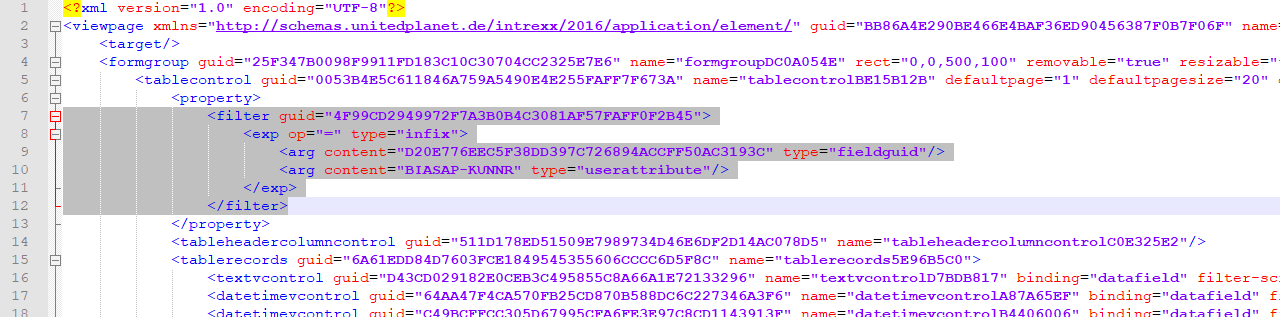
Cut the entire area <filter> … </filter> and keep this on the clipboard. Then, open the folder "structure/datagroups". Then, open the folder "structure/datagroups". Open the XML file whose name is the same as the GUID of the SAP external data source. Before the "datafield" section, add a new section called "<permission></permission>". Paste the copied filter section into this permission section.

Save the modified XML file. Then reopen the application in Intrexx. There should now no longer be a filter in the properties of the view table. Via the context menu, show the data fields from the external data group "SAP order data".

The permission filter should now be shown under the data group.

Open the properties of the application by double-clicking on the application node and switch to the "Application permissions" tab. Provide the permission "Read data record (own)". Save the application. Afterwards, all accesses made to the data group and its detail pages will be restricted accordingly.
More information
SAP Trust Manager SSO configuration
API description Part 1 - Overview
API description Part 2 - SAP Portal Plugin
API description Part 3 - Implementing custom processing modules
API description Part 4 - Sample coding
Developer's Manual Part 3 - Scripting integration scenario
Developer's Manual Part 4 - Personalized SAP Access / Single Sign On (SSO)