

Intrexx Share Plugins
When you define an Intrexx Share plugin in an application, the data from the corresponding data group can be displayed as a post in the "News" module in Intrexx Share. To do this, the user must subscribe to the plugin, which is listed as an "app" in Intrexx Share.
Find out here how users can personalize the news feed in Intrexx Share.
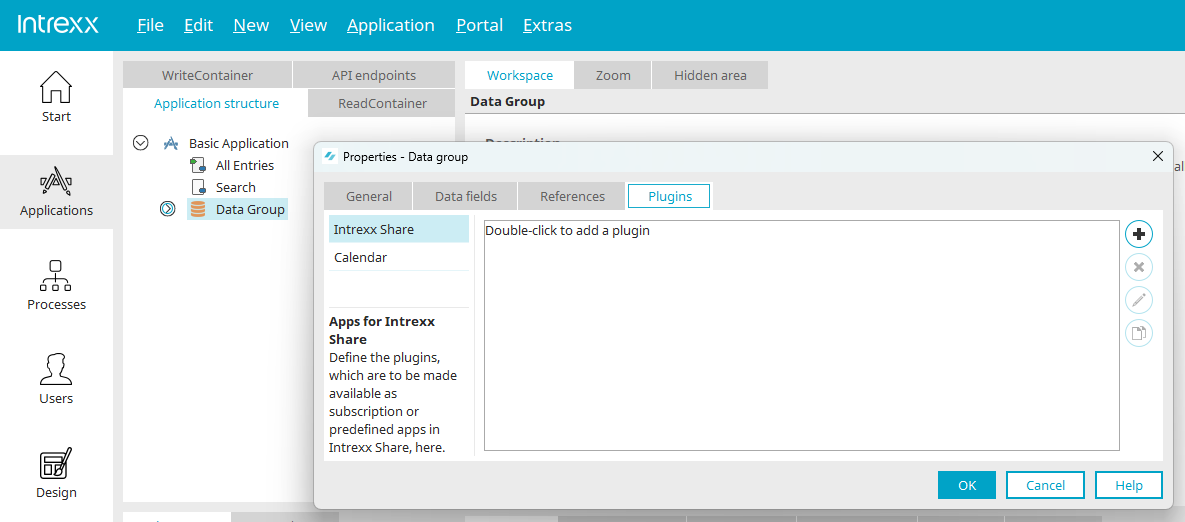
To create a plugin, open the application whose data you want to display as a post in the News section of Intrexx Share.
Plugins can be created in any application via the properties dialog for data groups or through the application node. In the Properties dialog box, switch to the "Plugins" tab.
Clicking "Create New Plugin" at  opens a wizard where you can configure the new plugin.
General Basic Configuration of the Element
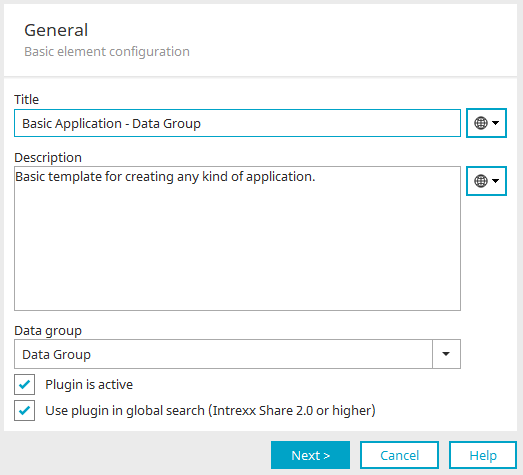
Title
The title allows you to identify the plugin in Intrexx Share when you personalize the feed. The title can be defined in multiple languages and also as a language constant. You can find more information here.
Description
You can enter a description of the plugin here. The description is also displayed when a plugin is subscribed to in Intrexx Share.
Data Group
Here you can select the data group for the plugin.
The plugin is active
Makes the plugin available in Intrexx Share. You cannot subscribe to inactive plugins.
Include in global search
With this setting, Share posts from the plugin are included in the global search.
Click "Next."
Ad - Category Details and Additional Ad Options
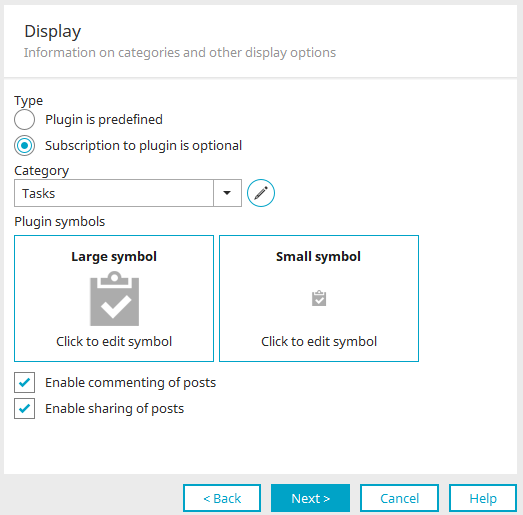
Type
The plugin is predefined
With this option, the plugin is integrated into Intrexx Share for all authorized users and is therefore automatically subscribed to by all authorized users. This means that the records in the data group for which the plugin is defined will also be displayed in Intrexx Share without the need to explicitly subscribe to the plugin. Users cannot deselect predefined plugins.
You can optionally subscribe to the plugin
Here, you must actively subscribe to the plugin in Intrexx Share. The entries in the data group for which the plugin is defined will only be displayed in Intrexx Share.
Category
Here, you can select one of the categories used to group posts in Intrexx Share.
 Manage Categories
Opens a dialog box where you can create and edit Share categories.
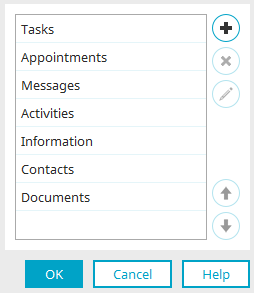
Here you can see the categories that have already been created.
/ Edit Category
Opens a dialog box where you can create a new category or edit an existing one.
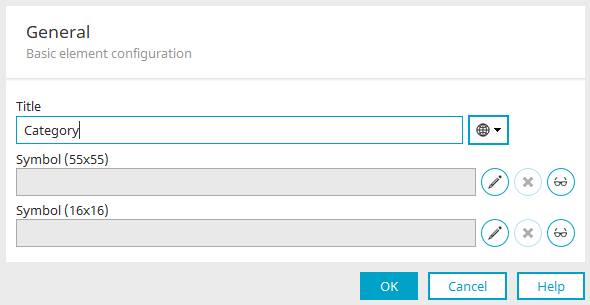
Title
Enter the category title here. You can find more information on this here.
Icon (55x55) / Icon (16x16)
Here you can add large and small icons to represent the category in the browser.
Edit
Opens a dialog box where you can select an image.
 Remove
Removes the reference to the image.
 Edit Text Alternative
Opens a dialog box where you can enter alternative text to be displayed in browsers that do not support images.
Click "OK" to save the changes and close the dialog box.
Delete Categories
Click this button to delete the currently selected category.

 Move selected categories up or down
Changes the order of the categories.
Click "OK" here as well to save the new or modified category and close the dialog box.
Plugin Icons
Here you can select large and small icons that represent posts from this plugin configuration. The image is suggested based on the category and can be changed if necessary.
Enable comments on posts
This setting determines whether users in Intrexx Share are allowed to post comments on posts generated by this plugin configuration.
Enable sharing of posts
With this setting, posts from this plugin can be shared by Intrexx Share users.
Click "Next."
Life Cycle and Time Management
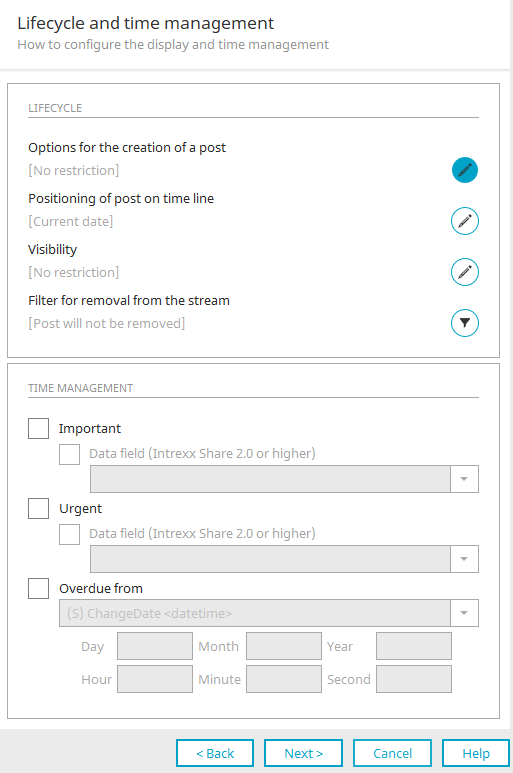
Life Cycle
Options for Creating a Post
Here you can see the conditions under which a post is generated.
Options for Creating a Post
Opens a dialog box where you can edit the conditions.
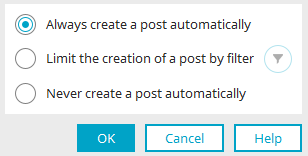
The post is always created automatically
This option automatically creates a post.
Restrict Post Creation Using Filters
This option allows you to filter the data.
 Filtering Posts
Opens a dialog box where you can enter the filter expression.
The post is never created automatically
This option does not generate an automatic post.
Select the "Post is never created automatically" option if you intend to use the plugin exclusively in processes that use the plugin feed action.
Click "OK" to save the settings and close the dialog box.
Placement of the post on the timeline
Here are the criteria that determine the post's position on the timeline in Intrexx Share News.
Edit Positioning
Opens a dialog box where you can adjust the positioning.
Positioning on the timeline
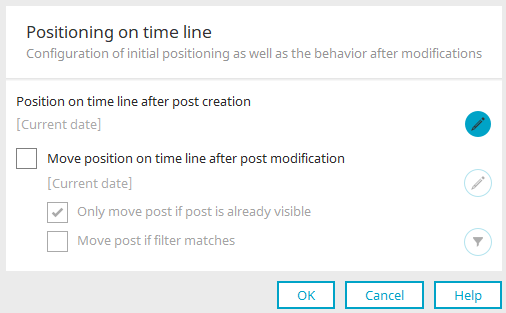
Position on the timeline at the time the post was created
Here you can set the position of a feed on the timeline when you create it.
Edit Position
Opens a dialog box where you can configure the position.
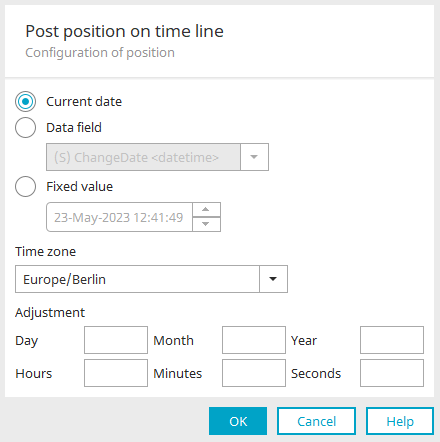
Current Date
Uses the current date to position the post on the timeline.
Data Field
Here, you can select a data field from the application. The date stored in this data field is used for positioning on the timeline.
When you save a new record, a post is also created. It doesn't matter whether the current date or a data field containing the creation date is selected here. If a record is saved that already existed before the plugin was created, the post will be sorted—depending on the settings—either by the current save date (at the very top) or by the record's creation date (usually further down). If a post already exists when the plugin is created, it is moved to the very top with the current date, whereas with the creation date data field, the post remains in the same place because the creation date of the record has not changed.
Fixed value
You can enter a static date here, which will be used to position the post on the timeline.
Time Zone
Set the time zone here.
Adjustment
Here, you can adjust the date relative to the current date or the value from the selected data field.
Click "OK" to save your changes and close the dialog box.
Move the position on the timeline when the post is edited
Causes an existing post that is positioned further down the timeline to be moved to a different position on the timeline when the record is modified.
Move the post only if it is already visible
Ensures that, when a record is modified, only posts that are already visible in Intrexx Share are moved.
Edit Position
Here, too, the post can be edited—just as when creating a post on the timeline.
Move the post only if it is already visible
Posts that are not yet visible in the News Feed or have been hidden will not be moved with this setting.
Move the post if the filter applies
Any filter can be specified as an additional criterion for determining when a post should be moved on the timeline.
Edit Filter
Opens a dialog box where you can create the filter.
Click "OK" to save the settings and close the dialog box.
Visibility
Here you can see which users currently have access to the posts generated by the plugin. Once a user has subscribed to the plugin, the permissions defined in the underlying application, data group, and page apply from that point on.
Configuring Visibility for This Plugin
Opens a dialog box where you can restrict the visibility of the post in the Intrexx Share news feed.
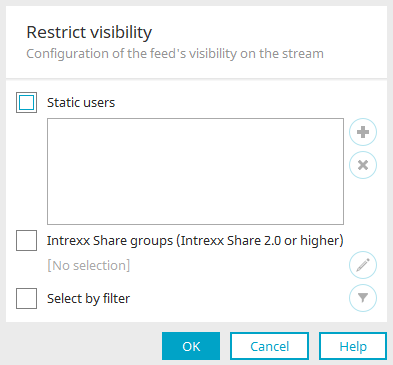
Static Users
Users can be selected here from the "Users" module. All users included in this list are authorized to view the corresponding posts.
Add a User Object
Opens a dialog box where users can be selected.
Remove User Object
Removes the currently selected user from the list.
Intrexx Share Groups
This setting allows you to configure visibility for Intrexx Share groups.
Select Intrexx Share Groups
Opens a dialog box where you can select groups.
Intrexx Share Groups
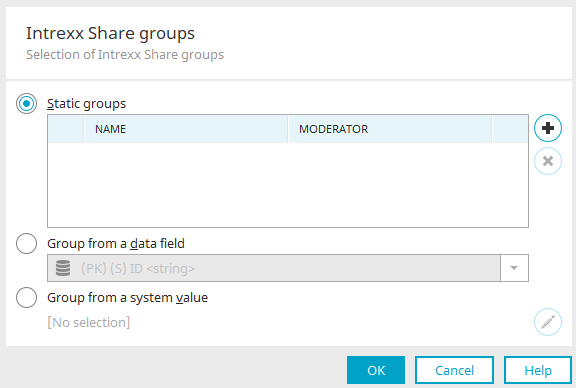
Static Groups
Here you can see the Intrexx Share groups for which posts are visible.
Add an Intrexx Share Group
Opens a dialog box where you can select groups.
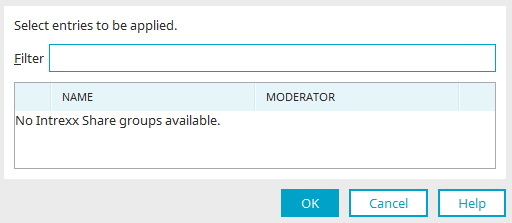
In the "Filter" field, you can search for existing groups in Intrexx Share. Select the desired group and click "OK" to save the setting and close the dialog box.
Remove the Intrexx Share Group
Removes the currently selected group from the list of static groups.
Group from data field
This option specifies a data field that contains the GUIDs of the Intrexx Share groups for which posts should be visible.
Group from System Value
With this option, system values that provide group IDs or GUIDs can be used to determine the visibility of posts.
Edit System Value
Opens a dialog box where the system value can be defined.
Click "OK" to save the settings and close the dialog box.
Selection Using Filters
Here, you can use filter criteria to narrow down the list of feeds.
Edit Filter
Opens a dialog box where you can create a filter expression.
If neither the "Static Users" setting As long as the "Select via filter" setting is still selected, the post is visible to all users. Is the "Static Users" setting the only one selected? Once selected, the post will be visible only to the users you have selected here. Is it just the "Select via Filter" setting? Once selected, the post is visible to users who meet the filter criteria. If both settings are selected, the post is visible to users who are either on the static user list, meet the filter criteria, or both.
Click "OK" to save the settings and close the dialog box.
Filter for removal from the stream
Here you can see whether a filter has been set up to remove the post from the Intrexx Share news feed.
Configure Filters for Archiving
Opens a dialog box where you can set up a filter for archiving the records. All records that do not meet the filter criteria are hidden.
Time Management
Important / Urgent
With these settings, a post generated by this plugin in Intrexx Share is automatically marked as important or urgent.
Data Field
If this setting is also enabled, you can select a Boolean data field that contains the corresponding values. The entry is marked as important or urgent if the data field has the value "True."
Overdue as of
Here, you must select a data field that contains the date from which a payment is considered overdue. The date adjustment feature allows you to adjust the due date relative to the data field. In addition, a filter must be created to remove it from the stream. Overdue posts will then be hidden from the Intrexx Share news feed based on the filter criteria.
Click "Next."
Display in Desktop Browsers
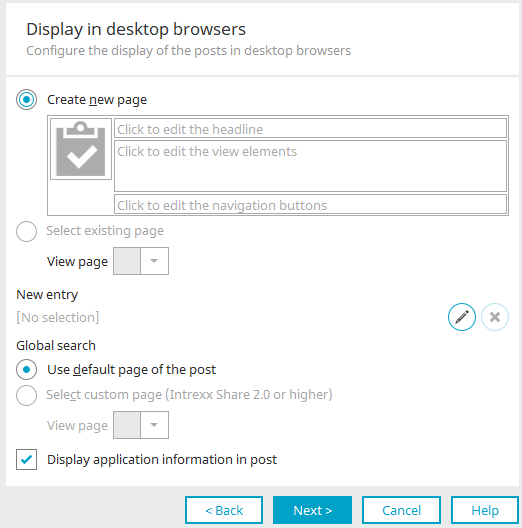
Create a New Page
Allows you to create a new page that displays data from the current data group and application in Intrexx Share.
Please note that the dimensions of the post must be maintained to avoid disruptive layout changes in Intrexx Share.
You can adjust the length of the post as needed, but be careful not to include too much information in it. If you need more detailed information, you can always use tooltips, etc. by clicking the buttons within the post.
Click here to edit the headline
Opens a dialog box where you can enter the heading.
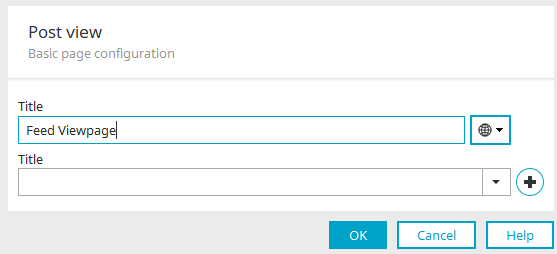
Enter the title here and select a data field that contains the values for the heading.
Click "OK" to save the changes and close the dialog box.
Click here to edit the view elements
Opens a dialog box where you can select or create the view elements for the new page.
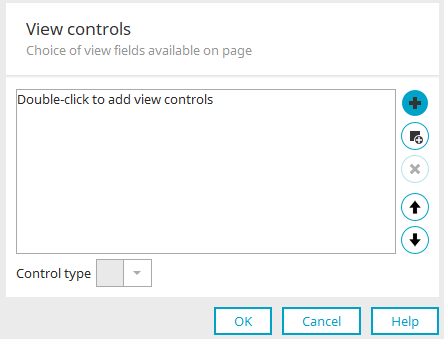
Here you can see a list of all view elements that will be created on the page you are currently configuring.
Create a data field
Opens a dialog box where you can create a new data field.
 Add a check
Opens a dialog box where you can select an existing data field.
Remove Element
Deletes the currently selected control from the list.
Move up / down
Changes the order in which the elements are arranged on the new page.
Control Type
Select the desired control type for the currently selected item here.
Click "OK" to save the changes and close the dialog box.
Click here to edit the navigation buttons
Opens a dialog box where you can configure the navigation buttons for the new page.
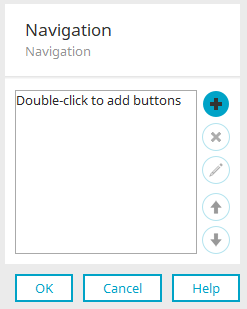
Here is a list of the buttons that are configured for jumps or actions from posts.
Add Button / Edit Button
Opens a dialog box where you can create a new button or edit an existing one.
Remove Button
Removes the currently selected button from the list.
Move up / down
Changes the order of the buttons.
Please note that no permission settings have been configured yet for a newly created view page, and access permissions still need to be assigned.
Click "OK" to save the changes and close the dialog box.
Select an existing page
Here, you can select an existing page to display in Intrexx Share. Make sure that the selected page fits within the Intrexx Share layout—in other words, that it is not too tall or too wide.
New Entry
In Intrexx Share, new records can also be entered directly. They will then be automatically saved in the application where you set up the plugin.
Select the entry page for a new entry
Opens a dialog box where you can select an appropriate input page for entering the new records. Make sure to use a layout that is compatible with Intrexx Share.
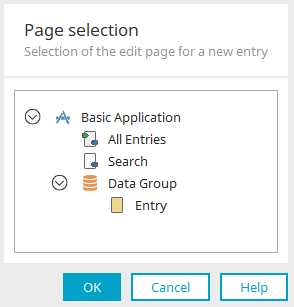
Select the page you want here. All main pages and the input pages from the data group in which the plugin is defined are available. This data group must be at the top level; pages from subordinate data groups cannot be selected.
Click "OK" to save the changes and close the dialog box.
Do not allow the creation of new entries
With this setting, you cannot create new entries.
Global Search
In Intrexx Share, you can select a custom view page for displaying the post in the global search. If no such page is selected, the post's default page will be displayed.
Use the post's default page
The post's default page is displayed.
Select a Custom Page
A custom page can be embedded here for display in Global Search.
Show application information in the post
With this setting, the application title is displayed in the footer of the post.
Click "Next."
Display on mobile devices
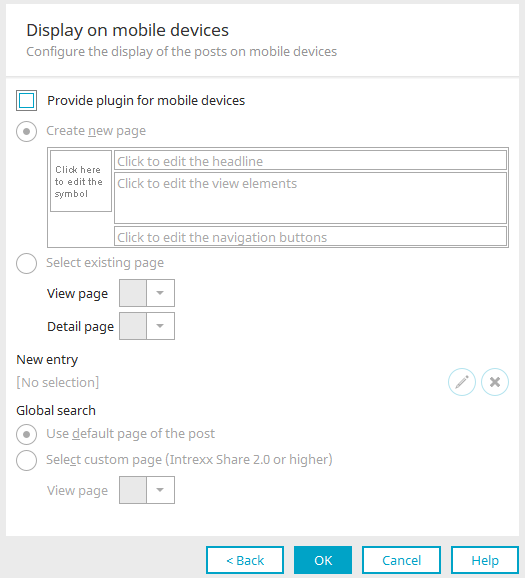
Pages for mobile devices can be defined here. The same settings are available here as for viewing in desktop browsers. The order of view elements cannot be changed for mobile display. In addition to the familiar settings, the following settings are available for mobile pages:
Make the plugin available for mobile devices
This setting enables page transformation for mobile devices.
Details Page
Here, you can select a page that provides more information. A link to the details page will then automatically appear on the view page you select.
Click "OK" to complete the plugin configuration.
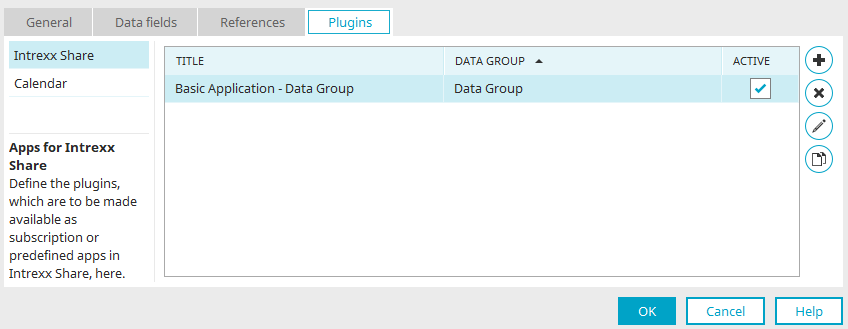
To subscribe to the plugin in Intrexx Share, the checkbox in the "Active" column must be selected here. Inactive plugins are not available for a subscription.
Delete Selected Plugin
Deletes the currently selected plugin.
Please note that when you delete a plugin, any posts already generated by that plugin in Intrexx Share will also be deleted.
Edit Selected Plugin
Opens the wizard for editing the plugin.
 Duplicate Selected Plugin
Creates a copy of the currently selected plugin. Posts created by the original plugin are not copied.
You can find an overview of all Intrexx Share plugins set up in the portal in the "Integration" module.