Create external data group
An existing connection to an OData data source can be used in any Intrexx application. Find out how and where you can create and configure a connection here.
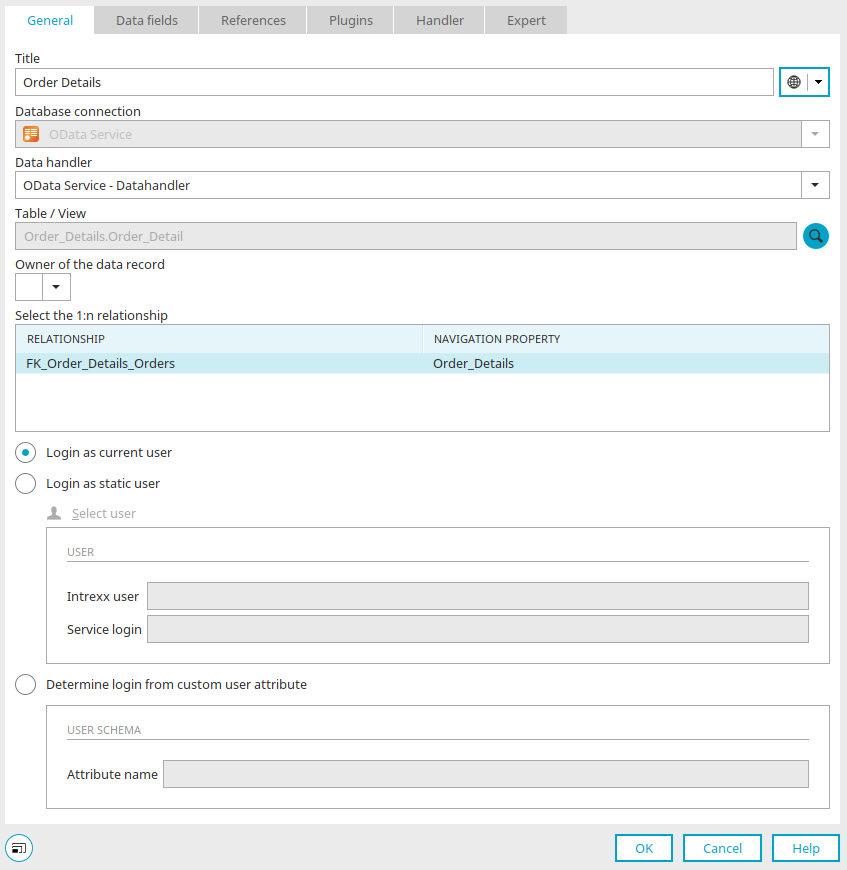
To integrate the connection into an application, select the application node and create a new external data group via the main menu "New / External data group".
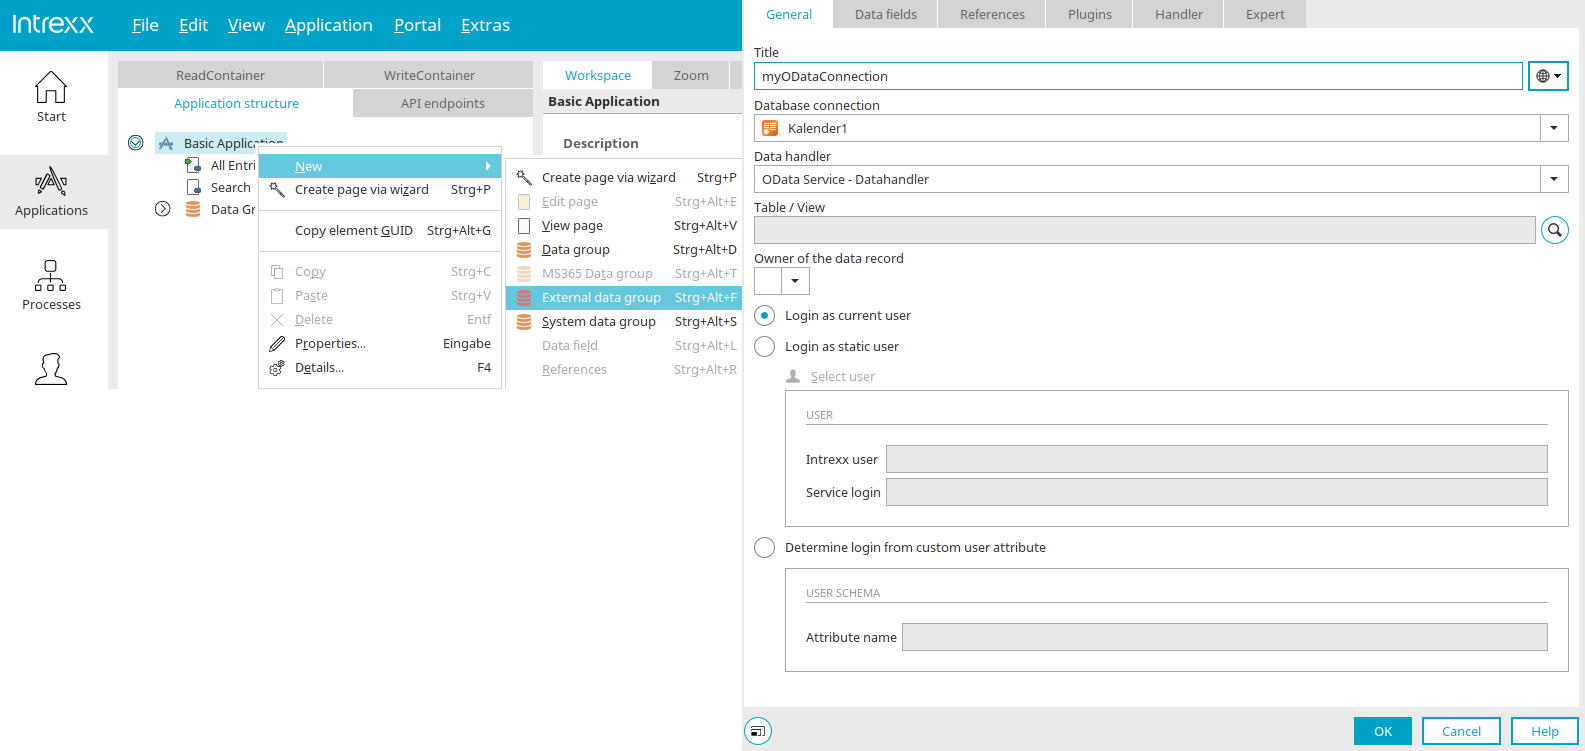
Define the title of the new external data group and then select the desired OData database connection. A suitable data handler is then entered automatically.
You can enter the name of the desired table or view it directly, or click on ![]() "Search" and search for the table or view name in the following dialog.
"Search" and search for the table or view name in the following dialog.
Search tables / views
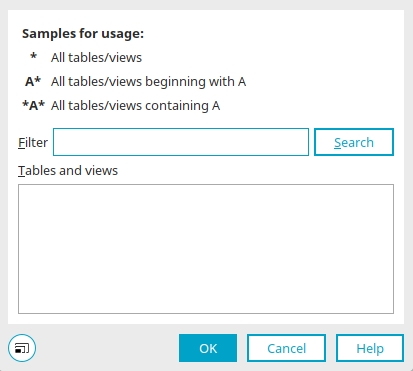
Filter
Here you can search for the table or view name. Enter a string for the search in this field. The * symbol serves as a placeholder for any character. A* will find all tables or views with names beginning with A. *A* returns all tables / views whose names contain the letter A.
Tables / Views
Select the required table or view here.
Click on "OK" once you have selected your table view.
Click here for more information about the settings for logging in.
The data fields being provided by the OData service and displayed in the application can now be selected on the "Data fields" tab and linked to application elements.
Data types
When selecting the data fields, the Connector automatically converts the OData data type into the corresponding Intrexx data type. Please note the following special characteristics:
-
In contrast to Intrexx, OData defines different data types for date and time. In Intrexx, all OData date / time data types are converted into the "datetime" data type. Conversely, Intrexx date values are converted by default into the OData data type "Edm.DateTime". In certain circumstances, however, the service defines another data type. In this case, the correct OData data type can be stored in the Expert settings of the respective field.
-
OData defines so-called complex data types. These are multiple fields of simple data types bundled into a new complex data type. As an example, you could combine the fields Street, ZIP, and City into a complex data type "Address". Since Intrexx does not recognize complex data types, they are converted into multiple Intrexx data fields. To guarantee the uniqueness of such a fields, it is created from the components <complex data type name>/<field name>, such as Address/City.
References
1:1 Relationships
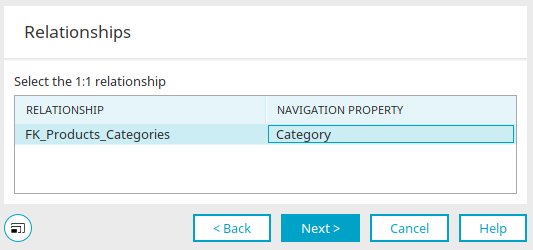
In Intrexx applications, references can be created from any kind of data group. If the output data group and the referenced data group contain foreign data groups from an OData connection, a 1:1 relationship can be established between them, provided that a corresponding relationship is defined in the service metadata.
For a 1:1 relationship between two OData external data groups (OData terminology: "Entity Sets"), primary and foreign key data fields do not need to be defined. For OData references, the relationship type is directly determined and selected from the metadata of the OData service. Thus, for example, the possible relationships between a seminar and a room booking are automatically detected by the OData Connector based on the service metadata and then offered for selection. Click on "Next" when you are done. In the next step, you can select the desired data fields on the "Data fields" tab.
1:n relationships
Relationships of type 1:n between OData data groups are mapped via parent data groups (e.g. flights) and subordinate child data groups (e.g. bookings) in Intrexx. If you set up the database connection in the properties of the child data group and select the corresponding OData collection (table), the possible 1:n relationships are then offered for selection. In the next step, the data fields for the child data group can be selected on the "Data fields" tab. On view and edit pages of the parent data groups, there is then the possibility to show dependent data records from child data groups in view tables.
m:n relationships
The Velocity callable "ODataLinksCallable" can be used to create and remove m:n relationships between two OData external data groups.
Creating an m:n relationship
$ODataLinksCallable.createLink(<Configuration GUID>, <Service GUID>, <Impersonation GUID>, <Source DG GUID>, <Source_Record_ID>, <Target Navigation Property>, <Target DG GUID>, <Target_Record_ID>)
Removing an m:n relationship
$ODataLinksCallable.deleteLink(<Configuration GUID>, <Service GUID>, <Impersonation GUID>, <Source DG GUID>, <Source_Record_ID>, <Target Navigation Property>, <Target DG GUID>, <Target_Record_ID>)
The following parameters are required:
-
Configuration GUID
GUID of the OData configuration
-
Service GUID
GUID of the OData service.
-
Impersonation GUID
GUID of an impersonation user, or "null" for the current user.
-
Source DG GUID
GUID of the source data group.
-
Source Record ID
ID of the source data record.
-
Target Navigation Property
Name of the OData navigation property that defines the relationship.
-
Target DG GUID
GUID of the target data group.
-
Target Record ID
ID of the target data record.
Files
Binary data fields
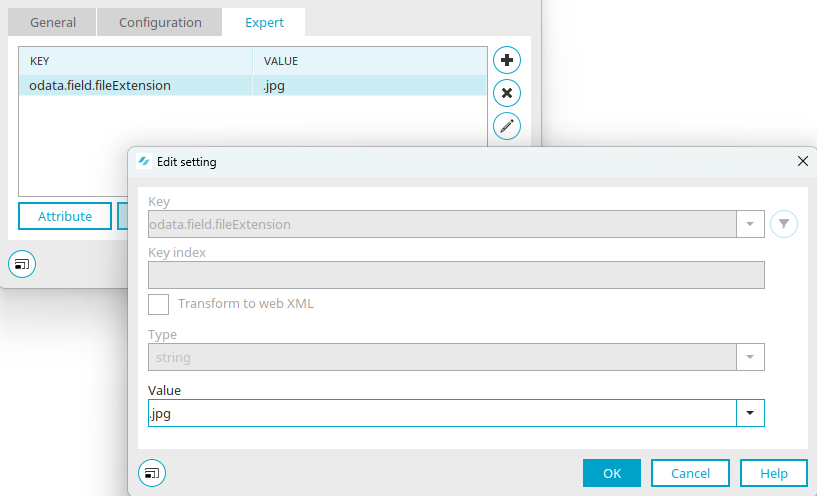
OData data fields of type "Edm.Binary (BLOB)" are handled in Intrexx as the File data type. This allows binary data to be saved in Intrexx file data fields. As the file type and the required file metadata cannot be automatically determined from OData Binary fields, these must be stored in the Expert settings for the data field.
At first, a file extension for general use can be defined. This is only necessary for OData services that are not provided via the Intrexx OData Provider.
The file type is automatically used as the file extension when the binary data is saved. Currently, only one file type per field can be defined for all data records. Furthermore, an OData-specific file storage location is required with the alias "odata", in order to temporarily store the files.
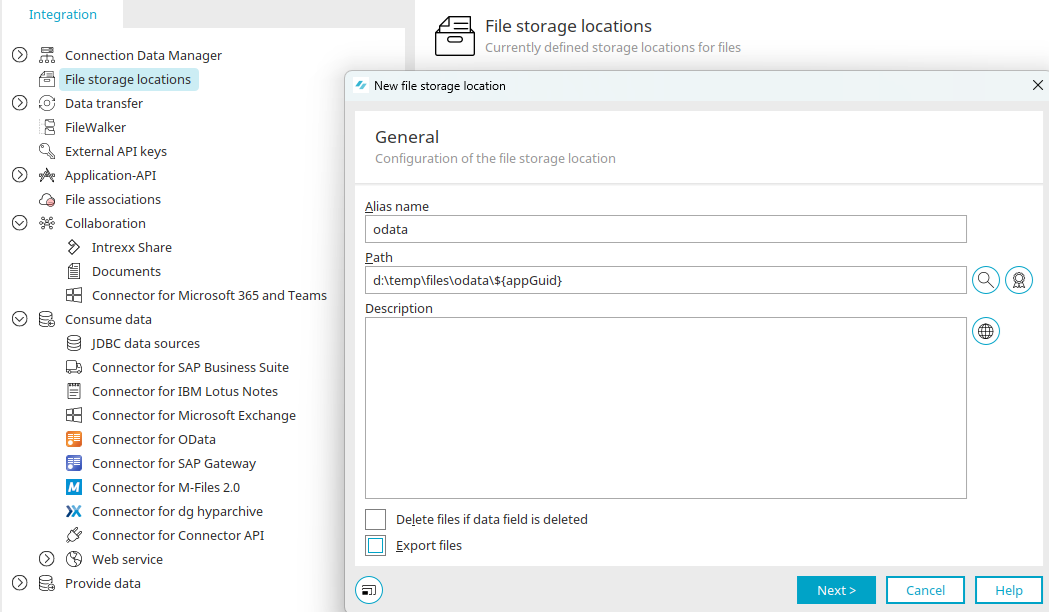
To do this, create a new file location in the "Integration" module and enter the alias name "odata". Any directory with the placeholder "${appGuid}" can be selected as the path (e.g. "d:\temp\files\odata\${appGuid}").
Next, deactivate the "Export files" option and run the function test. If the service to be consumed is a service prepared by the Intrexx OData Provider, the required file metadata is automatically provided for use by the service.
An additional possibility to enable the contents of binary fields as a download is to use the callable method "$ODataMediaResourceCallable.getDownloadURIForBinaryProperty()". This generates an URL that can be inserted into a download link on a view or edit page:
<a target="_blank" href="$ODataMediaResourceCallable.getDownloadURIForBinaryProperty($ProcessingContext, $DC.getRecId(), '<GUID_DATENGRUPPE>', '<BINARY_PROPERTY NAME>', '<FILE_NAME>','CONTENT_TYPE', '<DISPOSITION_TYPE>')">Download File</a>
With this method, it is possible to define the file name and content type dynamically by detecting these values from other fields.
Media Link Entries
For accessing and manipulating files, OData (Version 2.0 or higher) offers Media Link Entries. These are the recommended method for accessing binary data.
An entity type can be defined in an OData service as a Media Link Entry. To do this, the entity type is identified in the service metadata document with the "HasStream" attribute. The fields of a Media Link Entry then describe what is known as a Media Resource, which in turn can be any kind of file type, such as a document, image, or video or audio stream.
An Entity Collection of type Media Link Entry then represents a collection of files, while a Media Link Entry by itself describes exactly one file.
In contrast to BLOB fields, where the complete file is provided as a binary (base 64-encoded) data structure next to the other data fields within the XML reply document, when requesting a Media Link Entry, the requester only receives the URL to the Media Resource (i.e. the file).
Via the URL, then, the file can be requested and downloaded as usual in a browser. Since the file does not need to be encoded in an XML document here, Media Link Entries provide a significantly more efficient mechanism to access files. Since a Media Link Entry describes both the file itself (metadata) and the access path to it on the server, two HTTP requests are required to request the metadata and download the file.
The same applies when newly creating a Media Link Entry, such as when uploading a new file via the OData service or when updating an existing one. In the following, the steps are described how to first show/download files from Media Link Entries in Intrexx, and then how to save other files as Media Link Entries on the OData server.
Viewing/downloading files from Media Link Entries
Since the metadata fields of a Media Link Entry are normal OData data fields, they can be displayed as usual on a view or edit page in Intrexx. To enable the display or download of a media resource, first a link must be generated for the resource that calls up an Intrexx servlet, which then requests the file via the OData service and forwards it to the browser.
To do this, the Connector contains a special Velocity callable that prepares the link in such a way that it can be embedded in view or edit pages. To do so, create a "static text for programming" on a view page under an OData data group for Media Link Entries. For a download link, the call for the Velocity callable is defined as follows:
<a target="_blank" href="$ODataMediaResourceCallable.getDownloadURI($ProcessingContext, $DC.getRecId(), '<GUID_DATENGRUPPE>', $DC.getValueHolder('<Kontroll-Name des Felds mit Dateiname>').getValue(), 'inline')">Download Media Resource</a>
This code generates a link on the view page to download the media resource. The following parameters can be sent along with the callable:
-
$ProcessingContext
The current processing context object.
-
Record ID
The ID of the Media Link Entry data record.
-
Data group GUID
The GUID of the data group that contains the Media Link Entry.
-
File name
Optionally, a file name for the download can be passed on here. This is shown as a preselected name when saving the file in the browser. In the example above, the file name is detected from a field on the view page, that is filled using the metadata of the media resource. If such a field is unavailable, "null" can be passed on.
-
Content Disposition Type
This (optional) value defines the content disposition type of the download, such as whether the file should be directly embedded in the browser (value: "inline") or is only available as a download (value: "attachment"). This value is optional and can also be defined as null.
Since the Velocity callable returns only one URI to the media resource, it can be used flexibly in various HTML controls.
Uploading files as Media Link Entries
Saving/updating files as OData media resources can be achieved with an edit page assigned to the Media Link Entry data group. On it, the data fields can be placed for the media resource metadata as usual.
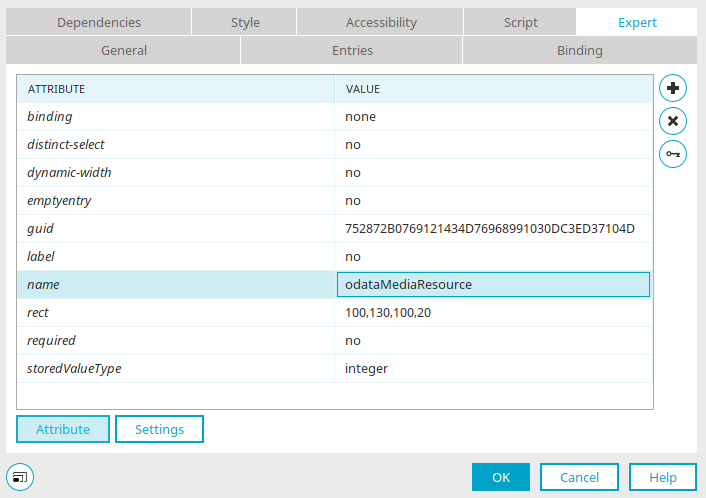
The upload of the actual file is controlled via the "File selection" element. To do so, proceed as follows:
-
Place a new file selection on the input page and select the option "No link" in properties on the "Data field" tab.
-
On the "Expert" tab, change the value for the expert attribute "name" to "odataMediaResource".
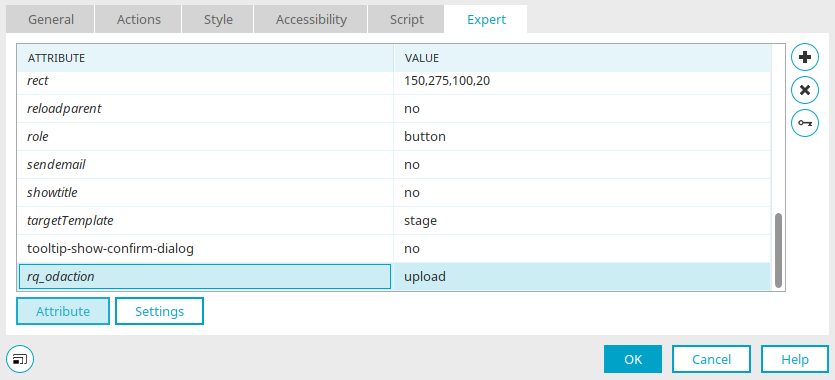
-
On the input page, create the new Expert attribute "rq_odaction" with the value "upload" in the properties of the Save button.
Using this request value, two OData requests are automatically generated when the record is saved. First, a Media Link Entry is generated for the uploaded file through the OData service. Next, with a second request, the values from the data fields on the edit page are saved as metadata for the Media Link Entry.
Depending on the system architecture, the file may need to be stored temporarily on the Intrexx Portal Server both when uploading and downloading files between the browser and the OData server. If very large files are used, this may lead to resource bottlenecks (in particular, in the portal server RAM) and performance problems.
If this occurs, the URIs to the media resources should be determined directly from the OData feed entry and integrated into the application page, ensuring that access to the file occurs directly from the browser via the OData server. Video and audio stream resources in particular should only be integrated in this way.
Files with Intrexx OData provider services
A way to manage files using OData, which is significantly more flexible and provides greater performance, are the "upFile" functions that are automatically available in every Intrexx OData service. They can be used to save and request files, and they provide full support for multiple file fields in Intrexx. The single disadvantage of the functions is that the file controls in Intrexx do not support this approach, which means that uploading and downloading files in Intrexx web applications will need to be realized on a project-specific basis with JavaScript or Groovy. The Intrexx OData service offers the following functions to manage files:
-
upFileList
This function returns a list of all files in a file field. The following parameters are expected:
-
recId: The primary key of the data record with the file field.
-
fieldGuid: The field GUID of the file field.
-
-
upFileAction
This function allows operations to be performed on multiple file fields. The following parameters are expected:
-
recId: The primary key of the data record with the file field.
-
fileId: The ID of the file.
-
fieldGuid: The field GUID of the file field.
-
Operation: The file operation to be performed (either delete, moveUp, moveDown, moveTop, refreshMetadata, or refreshOrder).
-
-
upFileDownload
Returns the contents of a file as a base-64 encoded string. The following parameters are expected:
-
recId: The primary key of the data record with the file field.
-
fileId: The ID of the file.
-
fieldGuid: The field GUID of the file field.
-
-
upFileResource upload
Enables the stream-based upload of a file. This is the fastest and most resource-saving method to transfer files to the service. This method expects the following parameters:
-
recId: The primary key of the data record with the file field.
-
fieldGuid: The field GUID of the file field.
-
fileName: The filename.
-
contentType: The content type of the file.
-
-
upFileResource - download
Enables the stream-based download of a file. This is the fastest and most resource-saving method to access files. This method expects the following parameters:
-
recId: The primary key of the data record with the file field.
-
fileId: The ID of the file.
-
fieldGuid: The field GUID of the file field.
-
disposition (optional): The content disposition header type (either inline or attachment).
-
OData Function Imports
In addition to access to Entity Collections (tables), OData also provides the ability to define what are known as Function Imports and to run them via the service. OData Function Imports In addition to access to Entity Collections (tables), OData also provides the ability to define what are known as Function Imports and to run them via the service. Function imports are comparable to stored procedures in database management systems, and can receive input parameters and return a single record or a set of records as the result. Since Intrexx does not offer direct support for stored procedures, the following procedure must be used to call function imports:
-
By using the service metadata, determine the name of the function to be called(such as with "GetProductsWithRating"), the required input parameters, whether the results consist of a single record (OData entry) or a result set (OData entity set), and the entity type (table in the Intrexx data group) of the results.
-
Create a view page for the parameters of the function and a further view page to view the results of the function call.
-
On the view page for the function parameters, place an edit field for each parameter, but do not link these to a data field, and also create a button and set the link destination to the view page containing the results.
-
On the results page, create a view table (in cases when there is a results set), select the corresponding data group (depending on the function results type), and the data fields to be displayed.
-
Switch to the "Expert" tab in the table properties and define the following settings:
-
odata.functionImport.name
Function name (from the service metadata)
-
odata.functionImport.parameter
Mapping of the field GUIDs for the function parameters on the OData function parameter names (corresponding to the service metadata).
-
Please note that the order of field GUIDs and parameter names in the two lists must match exactly.