Versioning with Git
Create history
A history can be created in the following modules:
be created. A Git repository forms the basis for the history. For each respective module, this is created in the following directory:
-
Application directory (portal directory internal/application/store/<GUID of the application>)
-
Process directory (portal directory internal/workflow/<GUID of the process>)
-
Layout directory (portal directory internal/layout/xml/layouts/<name of layout>)
created. Each entry in the history corresponds to a commit in the Git repository. If you publish an application, a process or a layout via the main menu "File", a dialog opens in which an entry can be created in the history with Git.
Publish with history
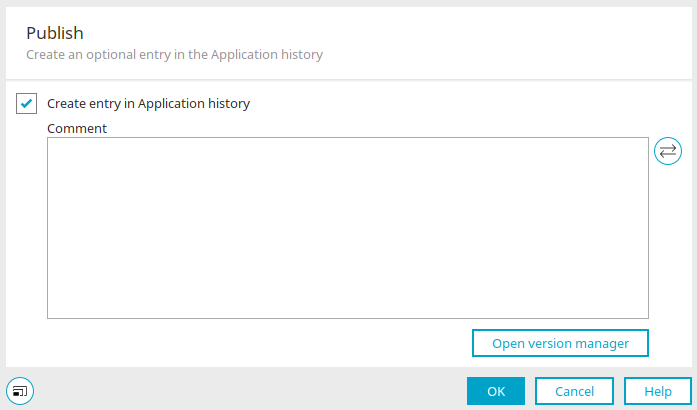
Here, you can see the dialog that opens when you publish an application. In the course of versioning applications or processes, scripts are also versioned.
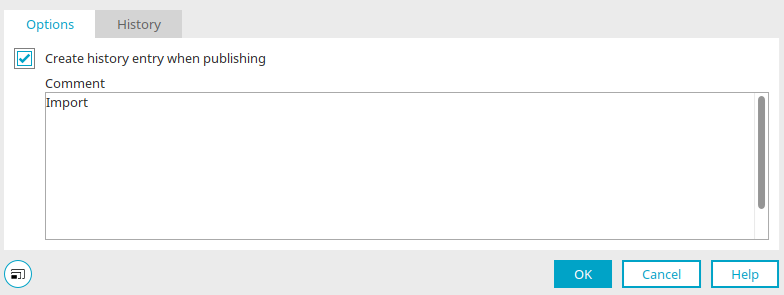
Create entry in application history / process history / layout history
If this setting is set, the current change is entered in the history. The setting is not available if the setting "Always create entry in history when publishing applications, processes or layouts" is set in the portal properties options.
Comment
You can add a comment to document the latest change in the application. If no comment is entered, the default comment from the language constant "COMMIT_DEFAULT_MESSAGE" is used in the default portal language. Here you will find a guide to formatting commit comments.
![]() Compare the currently open version with the last entry in the application history
Compare the currently open version with the last entry in the application history
Opens a dialog in which the changes in the application can be tracked.
Open version manager
Opens a dialog in which the semantic version number can be edited.
Options / Publishing
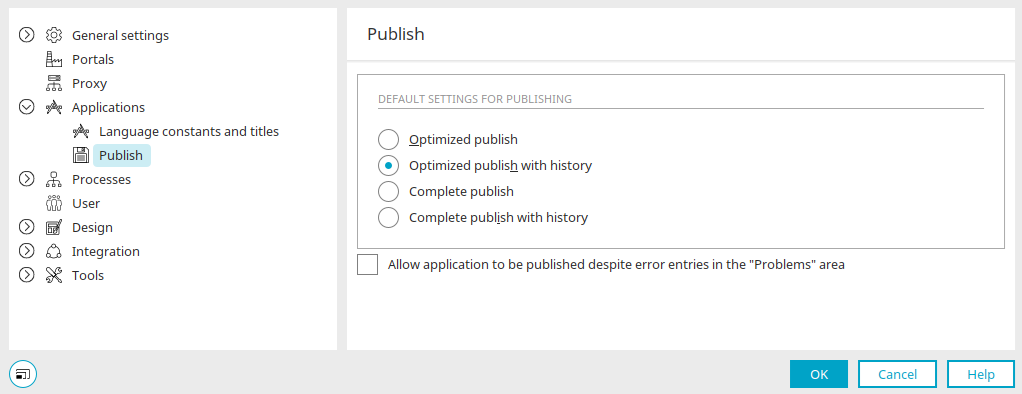
In the main menu "Extras/Options" you will find the setting for publishing applications, processes and layouts with or without history for each module. Regardless of which option is selected here, the different publishing methods can also be selected from the respective File menu. Irrespective of this, you can select any variant in the main "File" menu, i.e. publish without history, even though the setting for publishing with history is set in the options.
Default settings for publishing
Optimized publish
With this option, only the changed objects are published when an application is published. In general, the optimized publish is recommended.
Optimized publish with history
Here as well, only the pages that have been changed will be transformed. In addition, a dialog is displayed when the application is published in which changes can be commented on and an entry can be created in the application history.
Complete publish
When publishing an application, all objects are published. Complete publishing is required, for example, if xsl files have been exchanged in the portal for the transformation - e.g. after applying a patch that contains XSL files or when developing XSL files. In this case, all pages must be republished.
Complete publish with history
Here as well, every page will be transformed. In addition, a dialog is displayed when the application is published in which changes can be commented on and an entry can be created in the application history.
Allow publishing the application despite error entries in the "Problems" view
When an application is opened, Intrexx checks it for errors. Corresponding information is displayed in the Problems area. Entries of the type "Warning" are displayed as a note. The application can still be published despite these. Entries of the type "Error" prevent the application from being published. However, you can allow the application to be published despite these by activating this setting.
This setting may not be available in future versions of Intrexx. The best approach is to always correct reported errors.
Regardless of the options set here, you will also find the different methods for publishing applications in the main "File" menu.
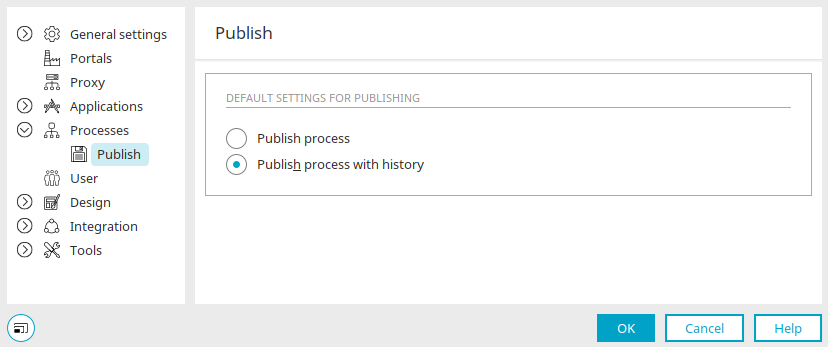
For processes and layouts, you will find the following settings in the "Publish" dialog:
Default settings for publishing
Public process / layout
The process or layout is published without history.
Publish process / layout with history
When publishing the process or layout, a dialog is displayed in which changes can be commented on and an entry can be created in the history.
Regardless of the options set here, you will also find the different methods for publishing processes or layouts in the main "File" menu.
Portal properties / Options
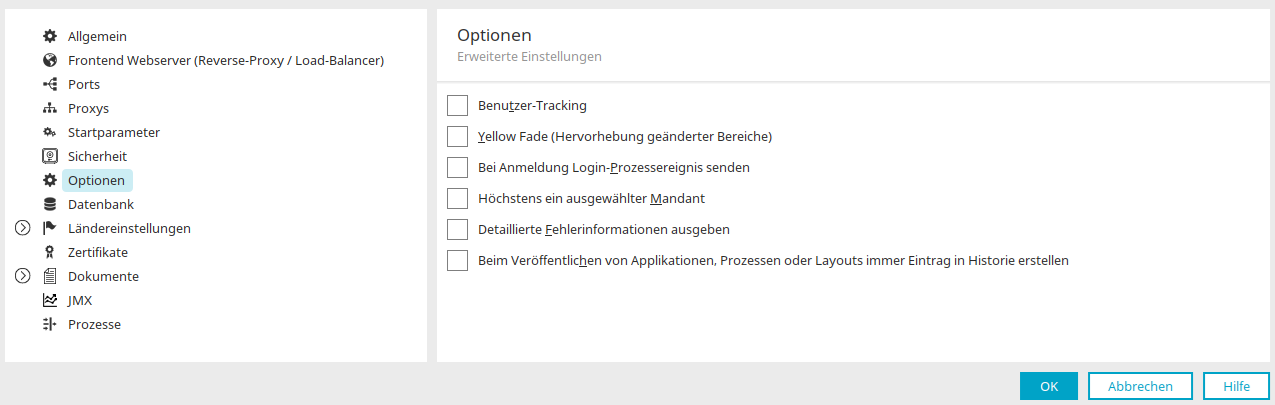
In the "Portal / Portal properties" main menu, you can set the options so that a new entry is created in the history each time applications, processes and layouts are published. This option makes sense, for example, for live systems so that changes in the portal can be tracked. This applies to both user and system actions. Regardless of the setting, all options for publishing are displayed. When executing an action that normally does not require a history (e.g. publish optimized application), the user receives a message that an entry in the history is required, whereupon the dialog for entering a new entry is opened.
New entry in history
A new entry in the history can be created in the following ways:
-
Applications - "File" main menu
-
Publish application
-
Optimized publish with history
-
Complete publish with history
-
-
Create entry in application history
-
-
Processes - "File" main menu
-
Publish process with history
-
Create entry in process history
-
-
Design - Main menu "File"
-
Publish layout with history
-
Create entry in layout history
-
New history entries are also created via user or system actions.
User actions
An entry is created in the following cases:
-
When publishing applications, processes or layouts via the "File" main menu, always if the setting "Always create entry in history when publishing applications, processes or layouts" is set. If there is no repository yet, one will be created.
-
When publishing with history of applications, processes or layouts via the main menu "File", if the setting "Create entry in application history" is set in the dialog. The entry is created after publishing. This setting is hidden in the dialog if the portal property "When publishing applications, processes or layouts always create entry in history" is set.
-
The main menu "File / Create entry in history" opens a dialog in which an entry can be created if there are changes on the server that have not yet been created in the history.
System actions
For certain actions, the system automatically creates a new entry in the history if the corresponding setting is made in the portal properties. If there is no repository yet, one will be created. New entries each receive a static comment in English with the prefix Intrexx:. The user stored in the history entry depends on the action (see below). The following system actions are supported:
-
Process
Activate/deactivate a process (user: current user)
-
Layout
Set the default layout (user: current user)
-
User Manager
Publication of the user application when the schema is changed (user: Intrexx)
-
Script
publishAllApplications, publishAllProcesses (User: Intrexx)
Complete history
The following menus open a dialog where you can find the complete history:
-
For the currently open application in the main menu "Application / Application history"
-
For the currently open process in the main menu "Process / Process history"
-
For the currently open layout in the main menu "Layout / Layout history"
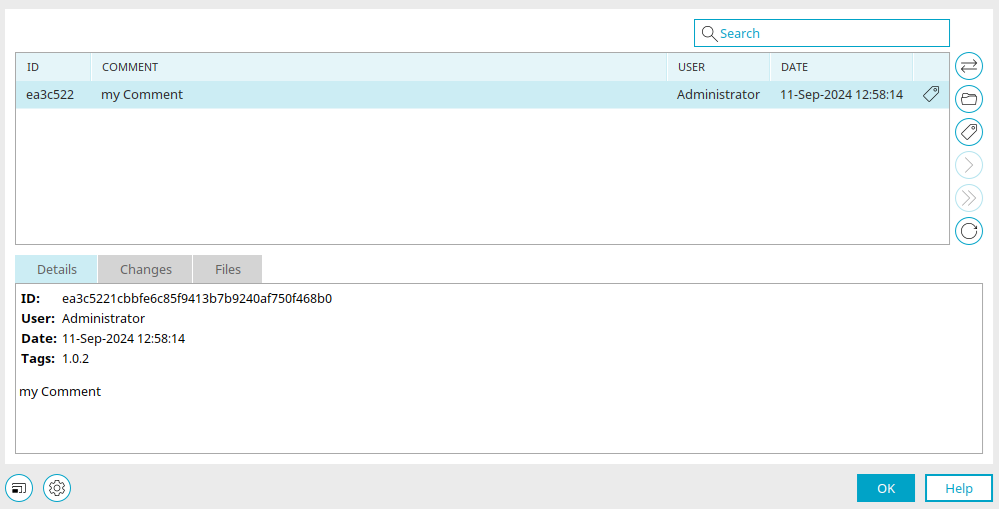
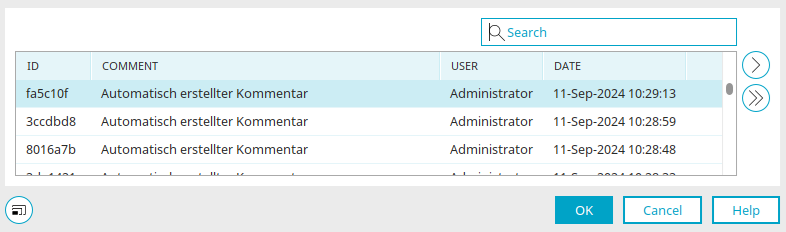
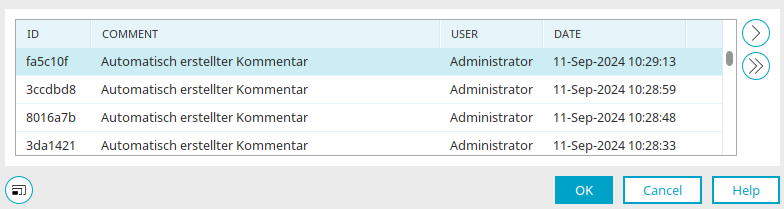
Search
The search filters the list based on the search term entered. Comments, users and tags are searched. Within tags, names, comments and users are search through.
ID" column
The ID of a repository entry is created automatically and displayed in the standard Git abbreviated format.
Comment" column
The comments that you entered when publishing with the history of applications, processes or layouts are displayed here.
User" column
The user who caused the last entry in the history is displayed here.
Date" column
Displays the date on which the history was created.
![]() Open in the Portal Manager
Open in the Portal Manager
Opens the selected version in the corresponding module. In the Applications module, the currently opened application will be closed with this action. For processes and layouts, the selected entry is opened in a new tab. You can only access this function if the expert options are activated. The server will not be changed with this action. If you want to use the selected status, the application (or the process or layout) must be published explicitly via the main menu "File".
When publishing a different status from the history, data may be lost, e.g. if a data field exists in the current status that does not exist in the restored status.
![]() Manage tags
Manage tags
Entries with tags are marked with this ![]() symbol in the last column of the table. Once you have marked such an entry, click on " Manage
symbol in the last column of the table. Once you have marked such an entry, click on " Manage![]() tags" on the right. This opens a dialog in which the tags for the selected entry can be managed.
tags" on the right. This opens a dialog in which the tags for the selected entry can be managed.
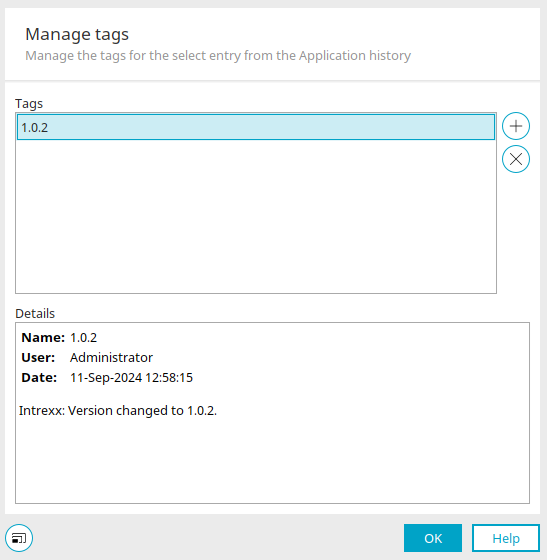
Details
The tag name, the user, who created the tag, the creation date, and - where applicable - the comment are shown automatically here.
![]() Delete tag
Delete tag
Removes the currently selected tag from the history.
![]() Create tag
Create tag
Opens a dialog where a new tag can be created.
New day
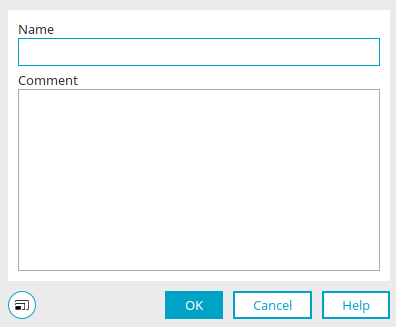
Name
The name of the tag must be unique, meaning it may only appear once per history. Furthermore, the tag name must conform to Git. For example, it may not contain whitespace.
Comment
You can enter one comment for each tag. Click on "OK" to save the new tag and close the dialog.
You are then back in the "Manage tags" dialog. Click on "OK" here too to return to the history.
![]() Load next 25 entries /
Load next 25 entries / ![]() Load all entries
Load all entries
When opening the dialog the last 25 entries of the history are loaded. Click on "Load next 25 entries" or "Load all entries" to load the corresponding number of entries.
![]() Refresh
Refresh
Reloads the current status of the history from the server, e.g. if there are changes that do not yet exist in the history. This situation occurs, for example, if an application has been published on the server without creating an entry in the history. If this is the case, a corresponding message is displayed at the bottom of the dialog.
![]() Advanced options
Advanced options
If the expert options are activated in the current module, the advanced options can be accessed in the lower section of the dialog. The button opens a submenu from which all of the history entries can be deleted. The Git repository will also be deleted at the same time.
Individual history entries cannot be deleted.
![]() Info text
Info text
Is displayed at the bottom in special situations, e.g. if there are changes on the server without an entry in the history.
Details
You will find the details in the lower part of the dialog. The ID, user (QualifiedLoginName), date and comment of the currently selected entry are displayed here.
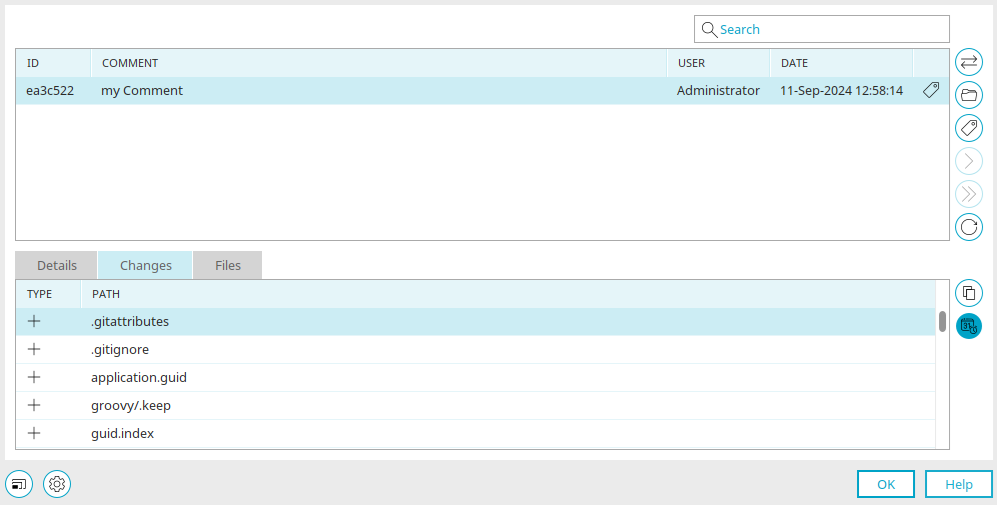
Changes
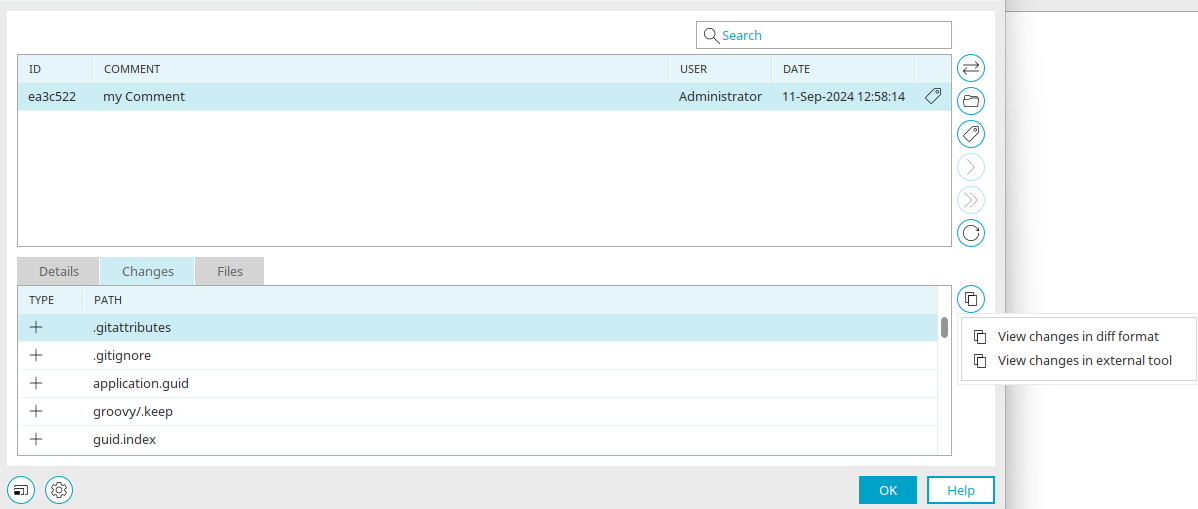
Added, edited and deleted files for the currently selected entry are displayed here.
Type" column
The change type can be recognized from the symbol:
-
 Added
Added -
 Processed
 -
 Deleted
Path" column
The path of the changed file relative to the portal directory internal/application/store/<GUID of the application> is displayed here.
![]() Show changes
Show changes
Opens a submenu with the menu items "Show changes in diff format" and "Show changes in external tool".
View changes in diff format
Opens a dialog where the differences can be viewed in the diff format from Git.
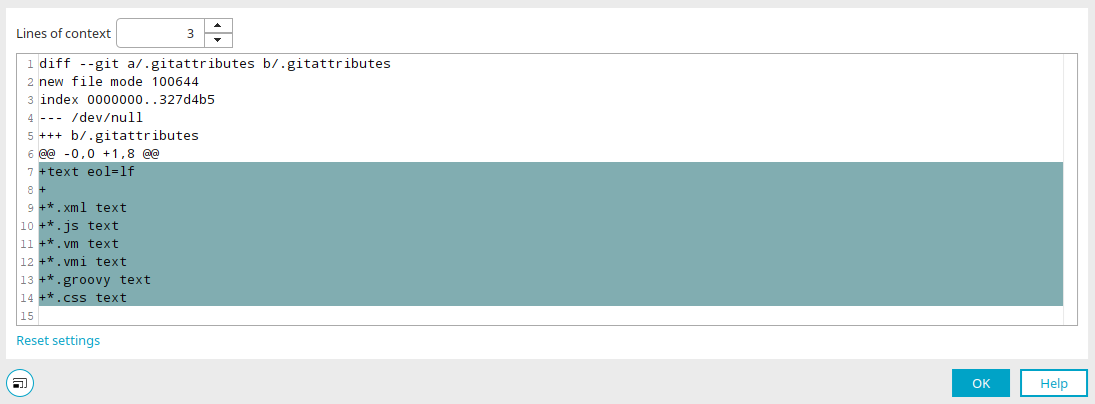
Here, you can view the changes to the file in the diff format typical for Git. For binary files, e.g. images, it will only be shown that there are changes.
Lines of context
Lines of context are the lines that are output before and after the changed lines in the diff. In Git, the default value is 3. The number of lines of context can be modified here.
Reset settings
Resets the number of lines of context to the default value of 3. Click "OK" to close the dialog again.
Show changes in external tool
The file of the selected entry is compared with the file of the previous entry in the external tool.
The external tool is only used for viewing. The external tool is only used for viewing.
![]() Show file history
Show file history
Opens the change history in an additional window which functions analogously to the current dialog. Here, only the entries are shown where changes to the file were made.
Files
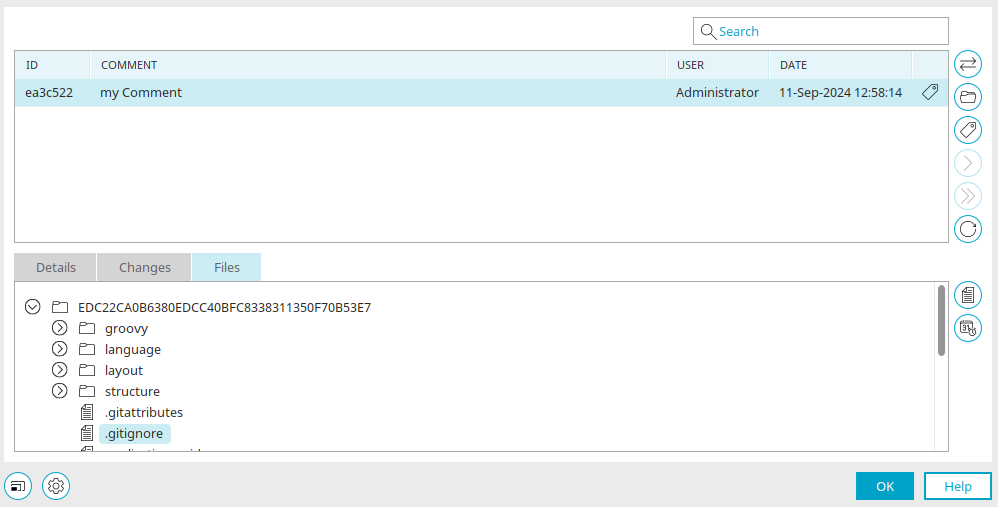
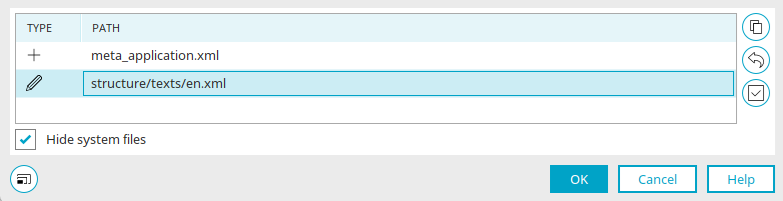
All directories and files from the respective status are displayed in a tree structure for the selected entry. Files which have been deleted are not shown in the file tree. The following buttons are only available for files because only files, but not directories, are versioned in a Git repository.
![]() Show file
Show file

Opens a dialog where the content of the selected file is shown. Syntax highlighting is available for files ending with xml, js, vm, vmi, groovy or css. Image files with the png, jpg, jpeg or gif file extension are shown as an image. Click "OK" to close the dialog again.
![]() Show file history
Show file history
Displays the history for the selected file. Afterwards, the comparison can be made.
Compare versions
The comparison can also be accessed directly via the main menus "Comparison with last entry in the application history" and "Comparison with entry in the application history". The currently open status can also be compared with the last status of an entry in the history when publishing in the dialog in which the history entry can be created. The same applies to processes and layouts.
Select entry from history
Search
The search filters the list based on the search term entered. Comments, users and tags are searched. Within tags, names, comments and users are search through.
ID" column
Displays the ID of the repository entry.
Comment" column
Displays the comments that were entered when saving applications, processes or layouts.
User" column
The user who caused the entry in the history is displayed here.
Date" column
Displays the date on which the history was created.
Select the version for comparison. Click on "OK" to display the differences between the two versions.
Comparison
Type" column
The change type can be recognized from the symbol:
-
Added
-
Processed
-
Deleted
Path" column
The path of the changed file relative to the portal directory internal/application/store/<GUID of the application> is displayed here.
![]() Show changes
Show changes
Opens the following submenu:
-
View changes in diff format
Opens a dialog in which the differences in Git's diff format are displayed.
-
View changes in external tool
The file of the selected entry is compared with the file of the previous entry in the external tool.
The external tool is only used for viewing. The external tool is only used for viewing.
-
Furthermore, the state which should be compared needs to be open in the Portal Manager.
This submenu is only accessible if the expert options are activated. Changed files will be marked in the list with a *. Changes to the selected file can be interactively merged between the currently open version and the selected history entry. Furthermore, the version which should be compared needs to be open in the Portal Manager. Only changes to files from the currently opened version in the local working directory can be applied. The selected file is compared with the two-window view in the external tool.
All changes in this area are carried out under own respsonsibility. Support cannot be provided for the editing of files and the resulting consequences. The action allows you to directly edit files and should therefore only be performed by users with the required specialized knowledge. Validate files in current working directory No support can be provided for editing the files and the resulting consequences.
![]() Reset changes
Reset changes
This action can be used to completely reset changes to the selected file between the open version and another selected history entry. Furthermore, the version which should be compared needs to be open in the Portal Manager. Changed files will be marked in the list with a *. This action is only available if the expert options are activated. Furthermore, the version which should be compared needs to be open in the Portal Manager.
All changes in this area are carried out under own respsonsibility. Support cannot be provided for the editing of files and the resulting consequences. The action allows you to directly edit files and should therefore only be performed by users with the required specialized knowledge. Validate files in current working directory No support can be provided for editing the files and the resulting consequences.
Changes to files may not be compatible with the patch level of the current portal. Please note: The patch level of individual files cannot be modified and may cause errors.
![]() Validate files in the current working directory
Validate files in the current working directory
Opens a dialog in which the files of applications, processes and layouts can be checked.
Validation
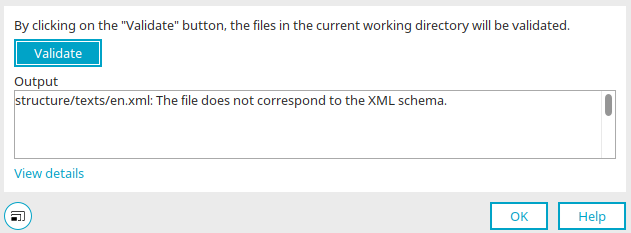
A click on the "Validate" button triggers the validation of the files in the working directory. During this, the schema of XML files is checked. Validation is useful if files have been changed. This action is available for applications and processes.
Output
Displays the result.
Show details
This link is active if an error occurs during validation. Click on it to open a dialog in which the error details are displayed.
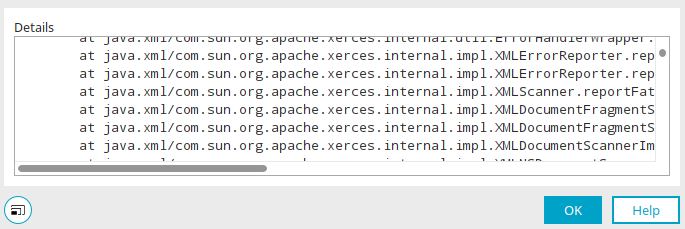
Details
Hide system files
This option filters the table. System files are files that are normally generated automatically by the system, e.g. when creating a new application or when publishing an existing one.
History" area
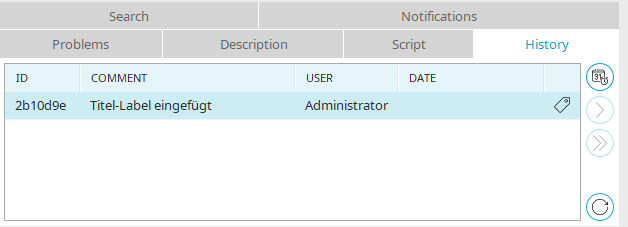
In the "Applications", "Processes" and "Design" modules, you will find the "History" tab at the bottom. The entire history of the currently open application, process or layout is displayed here.
![]() Open detailed history
Open detailed history
Opens a dialog in which the complete history is displayed. The entry selected in the tab is preselected there.
![]() Load next 25 entries /
Load next 25 entries / ![]() Load all entries
Load all entries
When the area is opened, the last 25 history entries are loaded. Click on "Load next 25 entries" or "Load all entries" to load the corresponding number of entries.
![]() Refresh
Refresh
Reloads the history from the server. The view is automatically refreshed after the following actions:
-
Publish by a user
-
Publish during the execution of certain actions
-
When deleting applications, processes or layouts
Use tags
You can use a tag to mark entries in the history as important so that you can easily recognize them in the history. A tag is often used to denote a new version. In principle, every entry that is important for development can be marked with a tag. Intrexx automatically links the Intrexx version numbers with tags in the history. If, for example, a new version number is created in an application and the application is subsequently published, a tag with this version number is created for this commit.
Tags can be created for the history of applications, processes and layouts in the dialog that displays the entire history. Any number of tags can be assigned per entry in the history. Tags can also be deleted. Every tag is constructed as follows:
-
Name
-
User (QualifiedLoginName) - is automatically determined from the "User" module. This is composed of the username and domain.
-
Date
-
Comment (optional)
The name of the tag must be unique, meaning it may only appear once per history. Furthermore, the tag name must conform to Git - for example, it may not contain whitespace. Rules for tag names can be found here. Optionally, each tag can be commented on. If no comment is set, the comment remains empty. A tag is created automatically if it is determined during publishing that the semantic version number has changed. The tag name corresponds to the semantic version number and is used to prevent duplicates if necessary. with a suffix.
Information about current state
You can see which version is currently open in the respective modules in the following places:
-
For applications on the workspace, if the application node is selected.
-
For processes on the process tab and in the details dialog, here with the shortened Git ID and date.
-
For layouts on the layout tab and in the details dialog, here with the shortened Git ID and date.
External tools
External tools, which you can integrate into Intrexx here, can also be used for versioning with Git.
Misc
Applications, processes and layouts can be saved locally via the "File" main menu. A locally saved application does not contain Git information. The same applies to locally saved processes and layouts. If you open a locally saved object in the corresponding module, you can display the history of the object if an application or process with the same GUID or a layout with the same directory name is published on the server.
Git configuration files
Configuration files are created when a Git repository is created. Depending on the object type (application, process, layout), not every configuration file is required.
-
.gitattributes
This file contains the definitions for line endings for different file types.
-
.gitignore
This file contains directories and files that should not be versioned.
Import / Export
When you import or export applications, processes or layouts, you can set how version management is to be handled.
Import

You can access the version management dialog in the import dialog by clicking on ![]() "Version management".
"Version management".
Options
If the setting "Create entry in history when publishing" is set, an entry is created in the history during import. Under "Comment", the "Import" entry can be overwritten with your own comment. Use the guidelines for formatting commit comments as a guide.
History
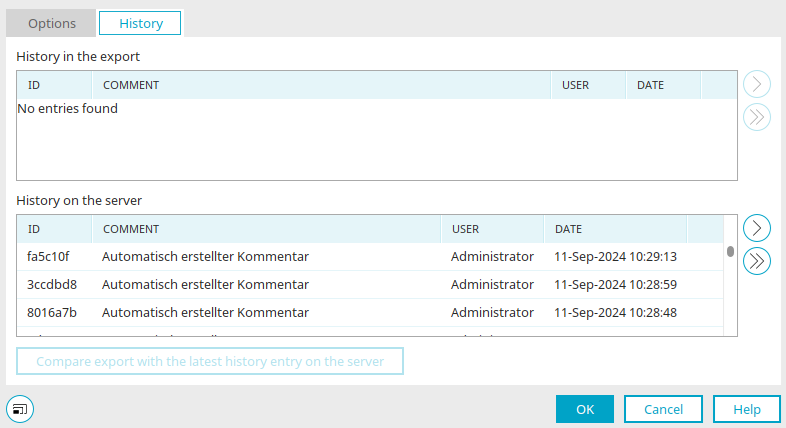
History in the export
All history entries contained in the export are listed here. In the list you will find the ID of the respective entry, the comment, the user who created the entry and the date on which the entry was created.
History on the server
All entries in the history that currently exist for the import object on the portal server are displayed here.
Compare export with last entry in the history on the server
Opens a dialog in which the export is compared with the last entry in the history on the server. This action is only active if there is a history both in the export and on the server.
In the import dialog, information about the version can be opened by clicking on ![]() "Version information".
"Version information".
Version information
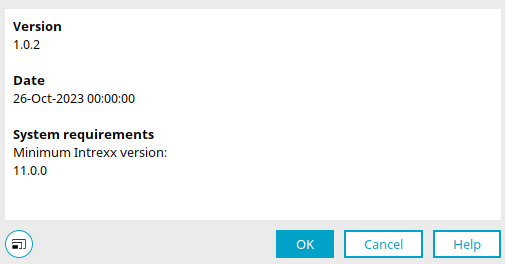
The version number and date are displayed here. Under "System requirements" you will find the Intrexx version that is required as a minimum for using the import object.
Export
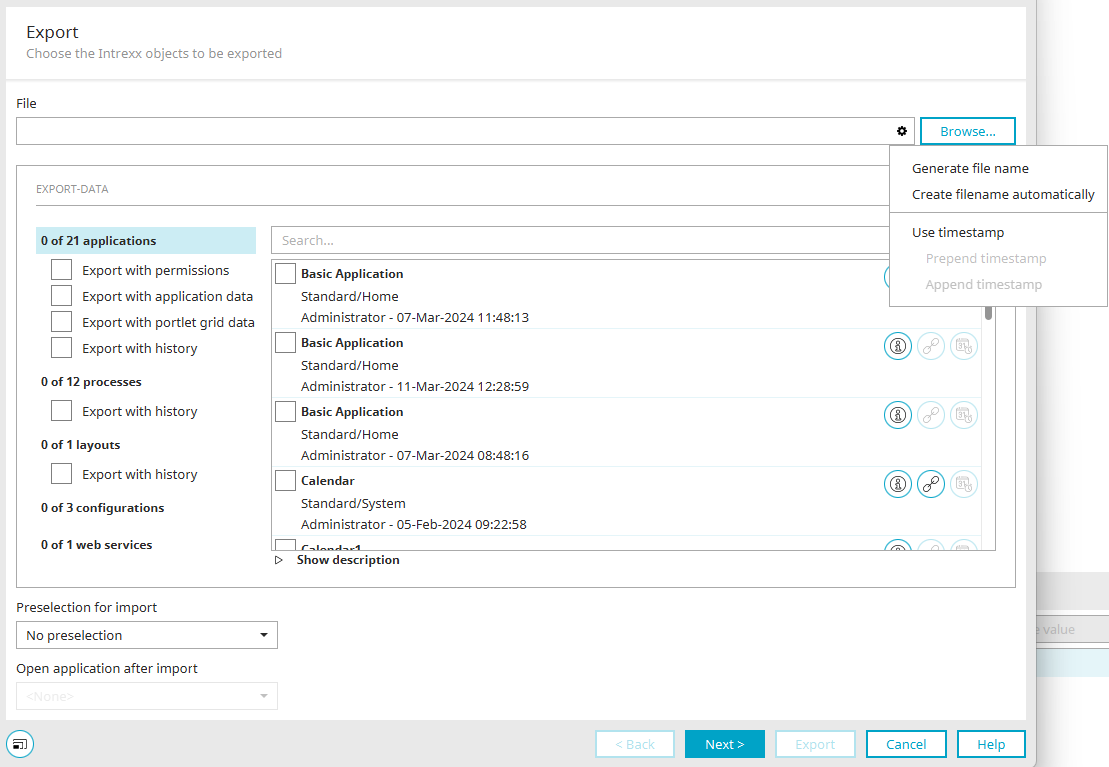
In the export dialog, version management can be opened by clicking on ![]() "Version management".
"Version management".
Version information
The ID, the comment, the user who created the entry in the history and the date on which the entry was created are displayed here. You will also be informed in the lower part of the dialog if there are changes on the server that are not yet included in the history.
Information about the version can also be opened in the export dialog by clicking on ![]() "Version information".
"Version information".
The version number and date are displayed here. Under "System requirements" you will find the Intrexx version that is required as a minimum for using the export object.
Options - History
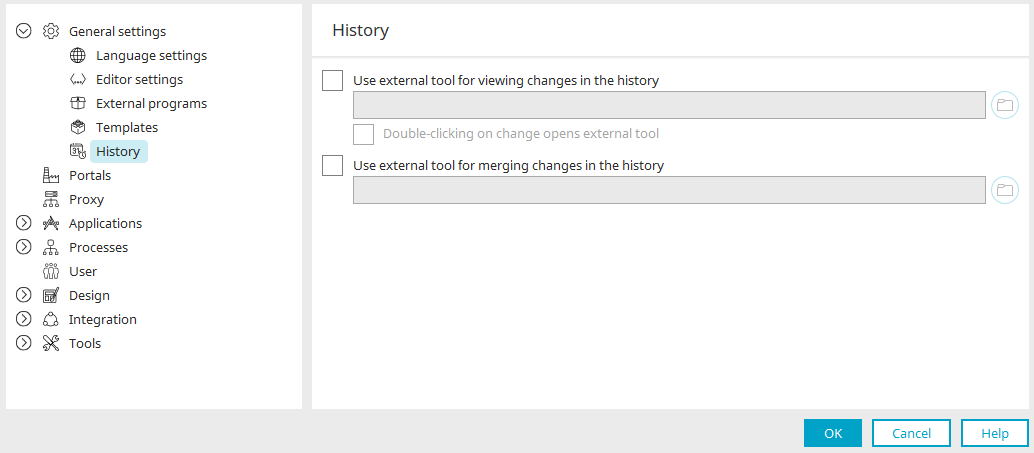
You can access the history options via the main menu "Extras / Options / General".
To view and merge changes in the History, you can enter paths to external tools here. The tools need to be installed on the same server where the Portal Manager is. Tools that can compare and merge two files in a two-window view are supported. The program path must support parameters for the file paths to be compared. The placeholders ${file1} and ${file2} can be used in the program path for this purpose. ${file1} stands for the file that is taken as the basis for the comparison, ${file2} stands for the file with which the comparison is made. The placeholders are optional. If these are not specified, they are programmatically appended to the program path.
The external tool is only used for viewing. Changes to files will not be applied.
Use external tool for viewing changes in the history
With this setting, a path to an external tool for viewing the changes can be entered.
Examples:
-
WinMerge (Windows)
"C:\Program Files (x86)\WinMerge\WinMergeU.exe" /wl /wr ${file1} ${file2}
-
KDiff3 (Windows)
"C:\Program Files\KDiff3\kdiff3.exe" ${file1} ${file2}
-
KDiff3 (Linux)
kdiff3 ${file1} ${file2}
-
KDiff3 (Mac)
/Applications/kdiff3.app/Contents/MacOS/kdiff3 ${file1} ${file2}
-
OpenDiff (Mac)
/usr/bin/opendiff ${file1} ${file2}
![]() Select
Select
Opens a dialog where the tool can be selected.
Double-clicking on change opens external tool
Means that changes can be double-clicked on to view them in the history. If this option is not set, the change is displayed in diff format.
Use external tool for merging changes in the history
With this setting, a path to an external tool for merging the changes can be entered.
Examples:
-
WinMerge (Windows)
"C:\Program Files (x86)\WinMerge\WinMergeU.exe" /wr ${file1} ${file2}
-
KDiff3 (Windows)
"C:\Program Files\KDiff3\kdiff3.exe" ${file1} ${file2}
-
KDiff3 (Linux)
kdiff3 ${file1} ${file2}
-
KDiff3 (Mac)
/Applications/kdiff3.app/Contents/MacOS/kdiff3 ${file1} ${file2}
-
OpenDiff (Mac)
/usr/bin/opendiff ${file1} ${file2}