

Import Portal
You can import an Intrexx portal that you previously exported into Intrexx.
If you are in the Start module, select Portal > Import Portal from the main menu. A portal can also be imported via the main menu under File > New Portal, which creates a new portal. The procedure is basically the same, with one difference:
When you create a new portal, select " Standard" or "Online" in the Portal Template dialog box.
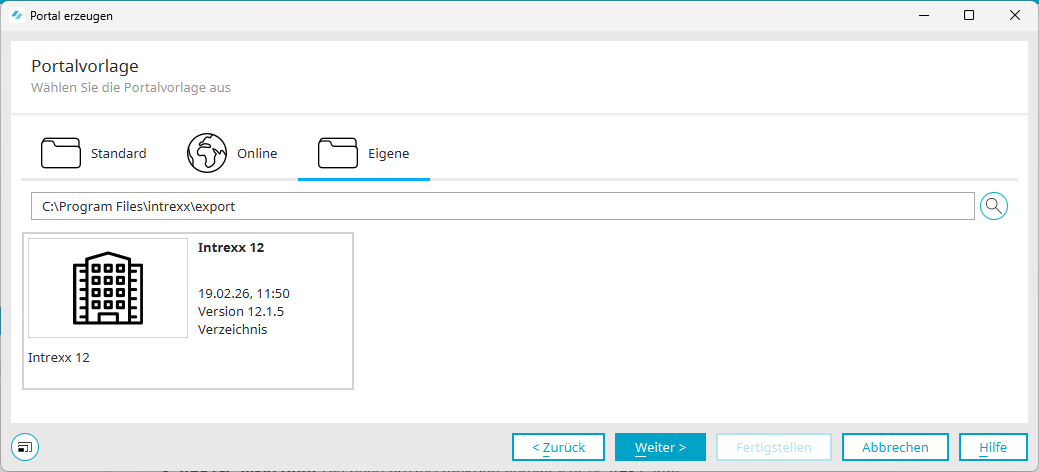
When importing a portal, select "Custom." There, you can select the portal export you want.
Please note that a portal can only be imported using the Integrated Portal Manager.
Start Importing a Portal
-
Select the "Start" module if you haven't already.
-
Click "Portal > Import Portal."
The "Create Portal - General Settings" dialog box appears.
General Settings
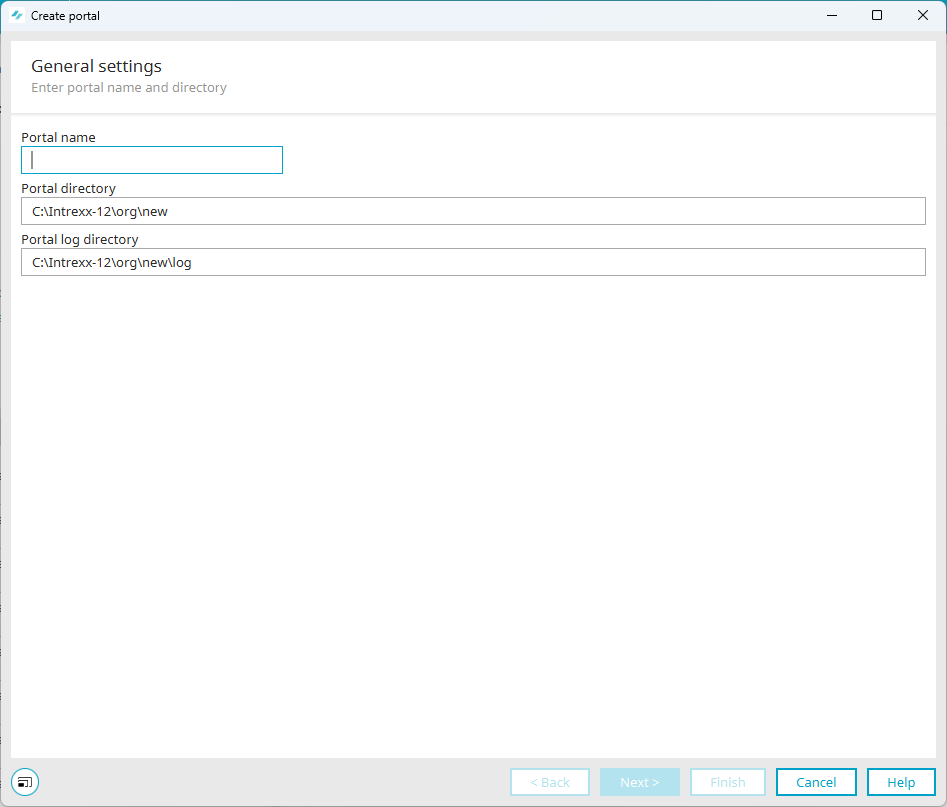
Portal Name
Enter a unique name for the portal here.
When you create a portal, Intrexx uses the name entered here for the portal directory on the portal server. Portal-specific files are stored in the portal directory.
The portal name does not correspond to the URL used to access the portal in the browser. You configure the URL on the front-end web server. (See " Add a Website in IIS" for more information .)
Portal Directory
All of the portal's files can be found in the portal directory on the Intrexx portal server. When you enter a portal name, the name for the subdirectory is automatically formed from the portal name.
Portal log directory
The directory where the portal log files are stored is stated here. The same applies here: When you enter a portal name, the name for the subdirectory is automatically formed from the portal name.
Portal Template
After you click "Next," the Portal Template dialog box will appear.
Switch to the " My" tab.
By default, portal exports are stored in the directory <intrexx-installation-directory>\export.
By clicking "  " ( Browse ), you can navigate to other directories.
If the selected directory contains portal exports, they will be displayed in the lower section of the dialog box, where they can be selected for import.
Click on the portal you want to import.
Starting with Intrexx 12.2.0
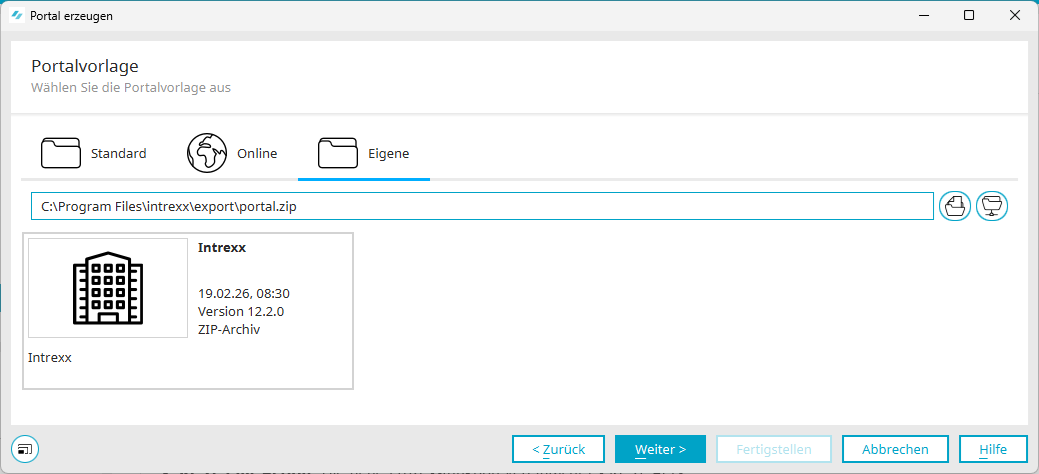
If you want to import a compressed portal export file (ZIP, tar, or tar.gz), click on  Import Portal Export File (ZIP, tar, tar.gz).
If you want to import an unpacked portal export, click on "  " > "Import Portal Export Directory (Unpacked)."
Then select the export file or export directory. The portal will then be displayed at the bottom of the dialog box.
Database server
After you click "Next," the "Database Server" dialog box will appear.
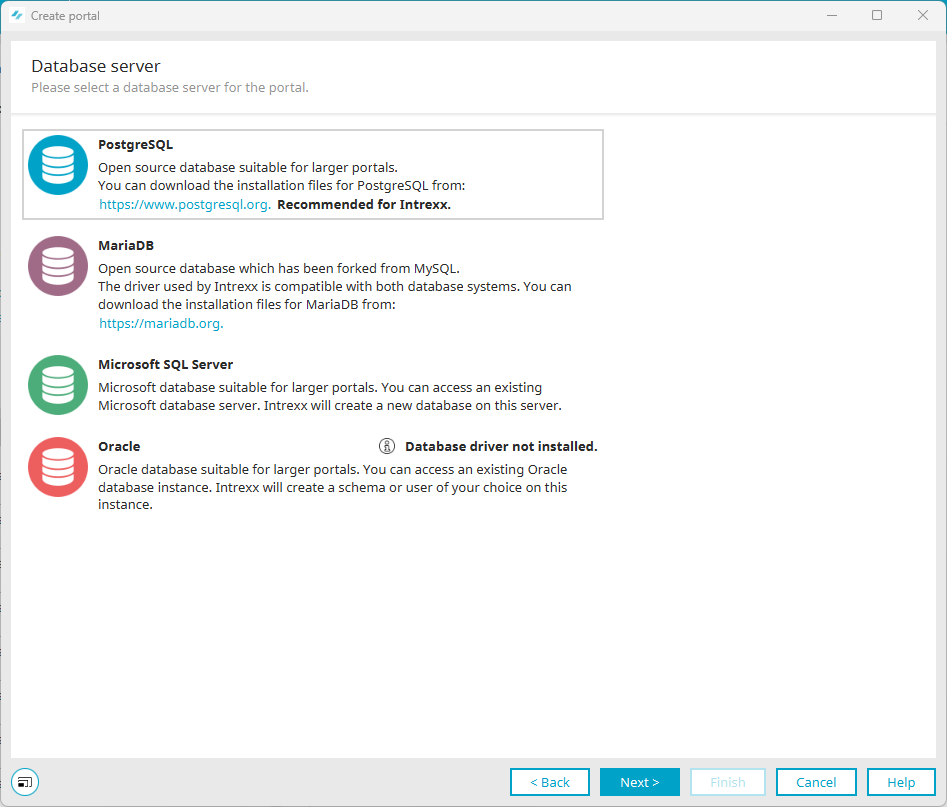
Select the database server for your new portal.
For the Oracle database server, you must obtain the database drivers directly from the manufacturer. Copy your driver to the "/lib" installation directory, and then restart the portal service.
The following dialog boxes, which are used to establish a connection to the database server, vary depending on the type of database.
In the following steps of this guide, PostgreSQL is chosen as an example of a database server.
After you click "Next," the "PostgreSQL - Connection Details" dialog box will appear.
PostgreSQL - Connection Information
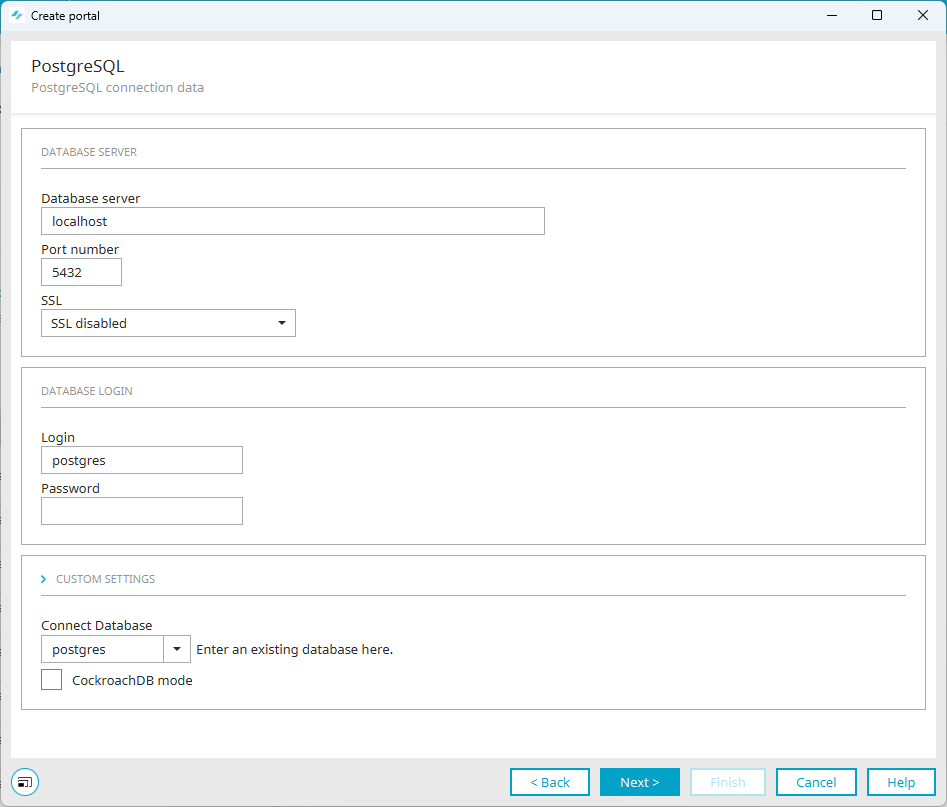
Database name
The name of the database can be edited here.
Port number
Enter the database's communication port here.
SSL
Select here whether the connection to the database server should be unencrypted or encrypted.
During portal setup, you can initially select "No SSL" and, if necessary, set up an encrypted connection to the database server later.
If you set up an encrypted connection and select "SSL with certificate validation," you must store the certificate in the appropriate location on the database server before creating the portal.
Once the portal has been created, you need to add the certificate to the Intrexx portal server for the encrypted connection to the database to work correctly.
Login
Enter the name of the database user here.
Password
Enter the database user's password here.
Connection database
If you do not want to create a new database, you can select an existing database here.
CockroachDB mode
If you are using CockroachDB, you can enable CockroachDB mode here.
PostgreSQL - Database Information
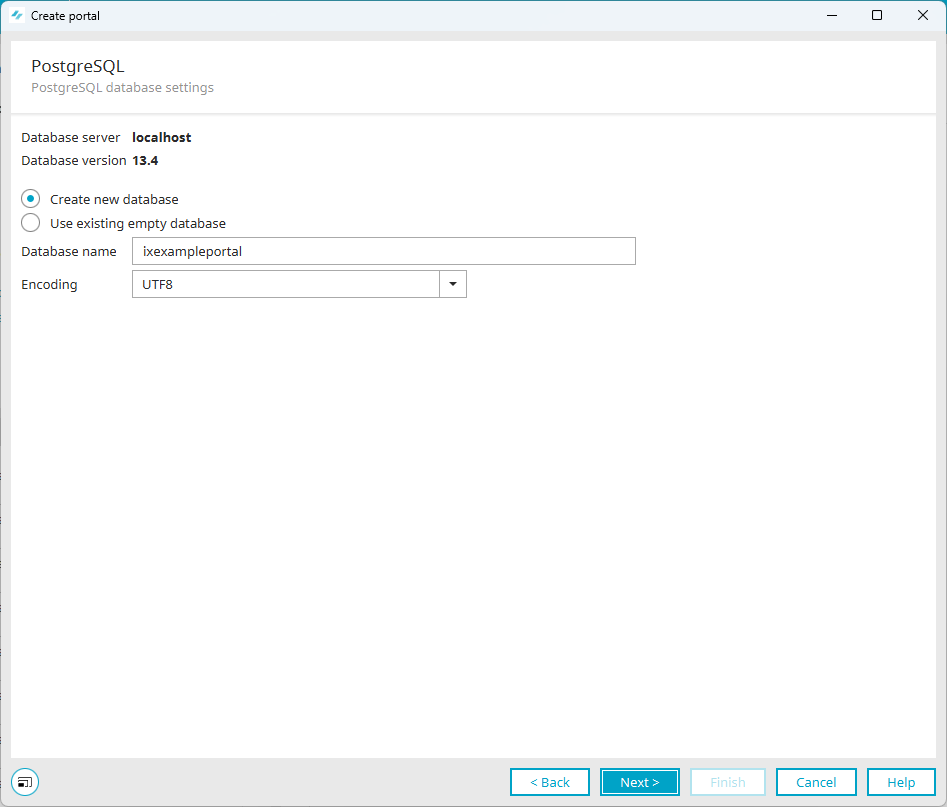
New database
This option creates a new database.
Use an existing empty database
This option uses an existing database.
Database name
The name of the database can be edited here.
Encoding
Select the encoding (character set) for the new database here. The preset (UNICODE - UTF 8) can be kept in most cases.
Front-end Web Server (Reverse Proxy / Load Balancer)
In this dialog, you can define which front-end web server (reverse proxy) should be used for communications between the Intrexx portal server and the browser.
For detailed information on using front-end web servers, see the section " Use a Front-End Web Server (Reverse Proxy)."
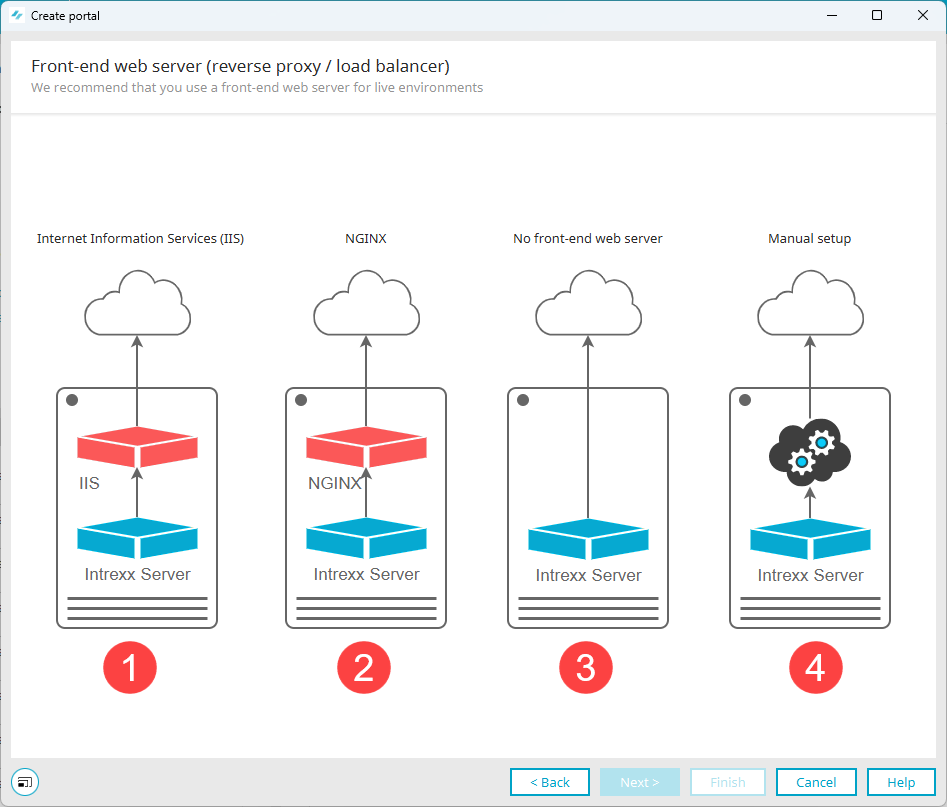
Internet Information Services (IIS)
Intrexx provides a graphical user interface for configuring Internet Information Services.
Use IIS if you are working in a Windows environment.
For detailed information about Internet Information Service (IIS), see the section " Setting Up Windows - IIS (Internet Information Service)."
Please note that when using a front-end web server, you must create an entry in your DNS server (A or AAAA record). For detailed information on this topic, see the section " Configuring Host Names in DNS."
 Field descriptions
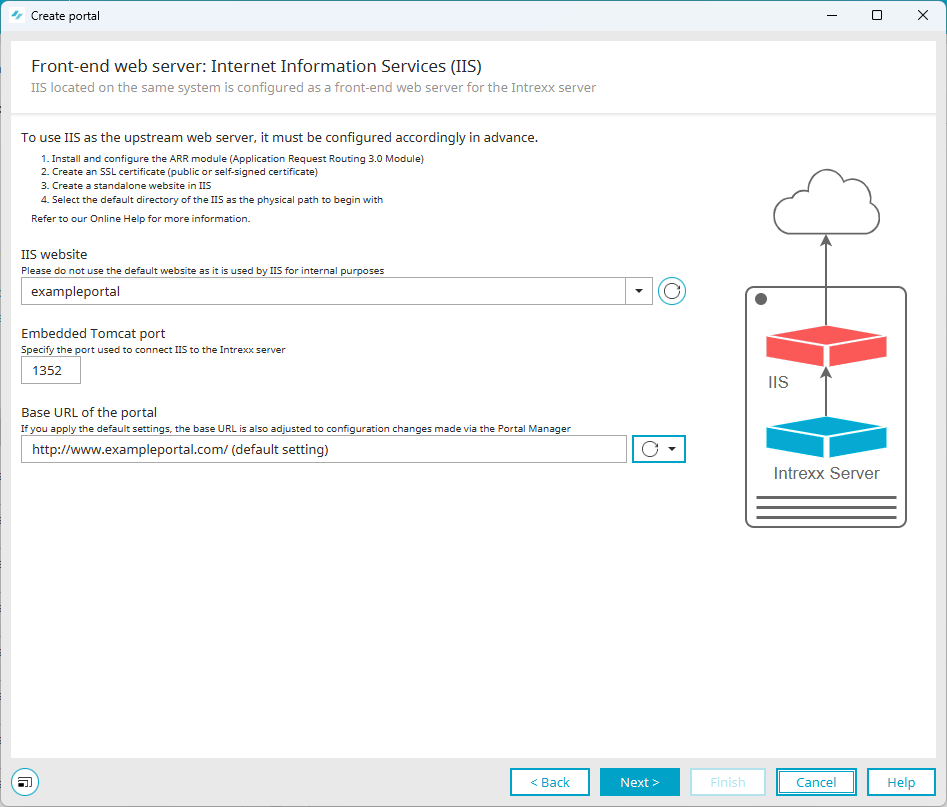
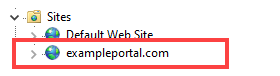
IIS Website
Select the website here that you created in IIS for the portal.
Embedded Tomcat Port
This displays the port you used in the previous version of Intrexx. You can leave this port as is.
Note: For a new installation, a free port—such as 1337—is preset here.
Portal Base URL
The portal's base URL is displayed here.
By default, the displayed base URL is derived from the website binding information in the Internet Information Service (IIS). These are the "Type" and "Hostname" fields. (See the section " Adding a Website in IIS" for more information.)
The base URL displayed here will be copied to the "Base URL" field in the portal properties under "General" after the portal is created.
NGINX
Intrexx provides a graphical user interface for configuring NGINX.
Use NGINX if you are working in a Linux environment.
For detailed information about NGINX, see the section "Linux - Setting Up NGINX."
Please note that when using a front-end web server, you must add an entry to your DNS server (an A or AAAA record). For detailed information on this topic, see the section " Configuring Host Names in DNS."
Field Descriptions
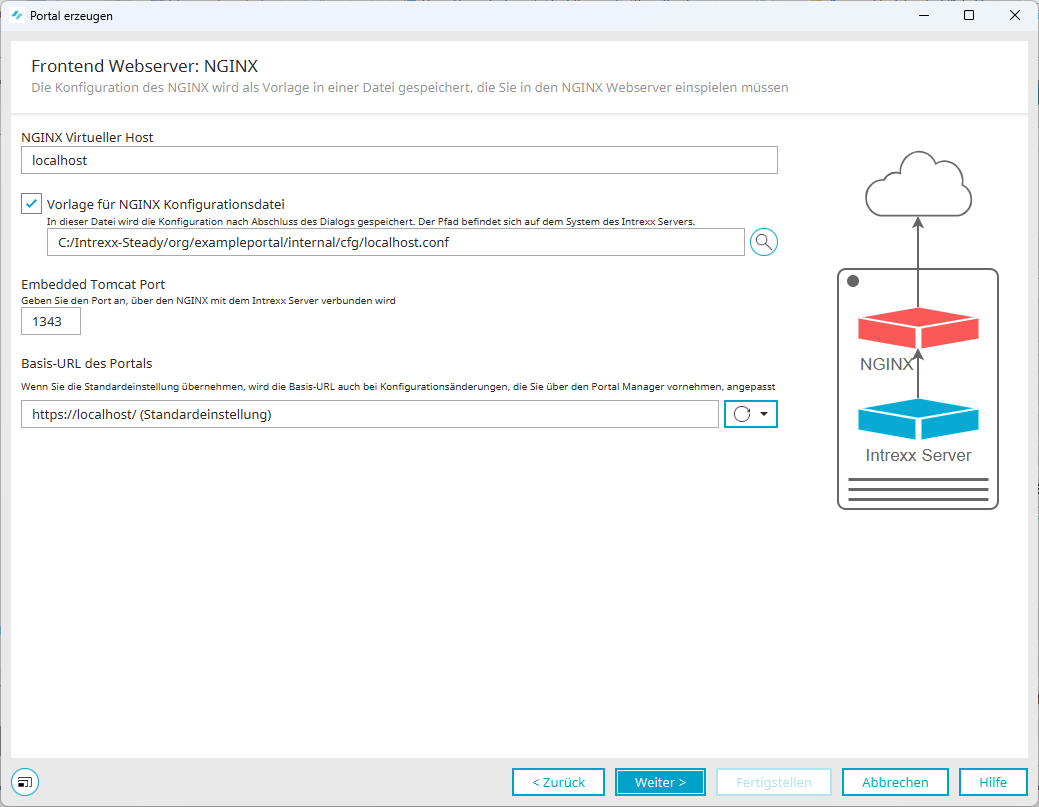
NGINX virtual host
"NGINX Virtual Host" refers to the embedded Tomcat. NGINX establishes a connection to the Intrexx portal service via the virtual host. Usually, you should enter "localhost" here. (An exception may apply if NGINX is installed on a different server than Intrexx. (In that case, the Intrexx server should be specified here.)
NGINX Configuration File
You can generate the NGINX configuration file using Intrexx.
Enter the path to the directory that the NGINX configuration file should be generated in.
Example: /myfolder/portal.example.com.conf
Next, copy the NGINX configuration file to the desired location under "/etc/nginx".
Example: /etc/nginx/sites-available/ portal.example.com.conf
Embedded Tomcat Port
The port for Embedded Tomcat is displayed here. (For a new installation, this is port 1337.)
Base URL of the portal
The base URL needs to be entered here. The first part consists of the minutes. Please note that "https " is specified here. The second part consists of specifying the hostname that you have defined in the NGINX configuration file. Note that a trailing slash (/) is included. It is essential that you enter the correct information so that your portal can be accessed in the browser.
No front-end web server
Select this option to configure a portal without a web front-end server (reverse proxy).
Please note that this option is intended only for test and development portals.
For detailed information about this option, see the section titled " No Front-End Web Server."
Field Descriptions
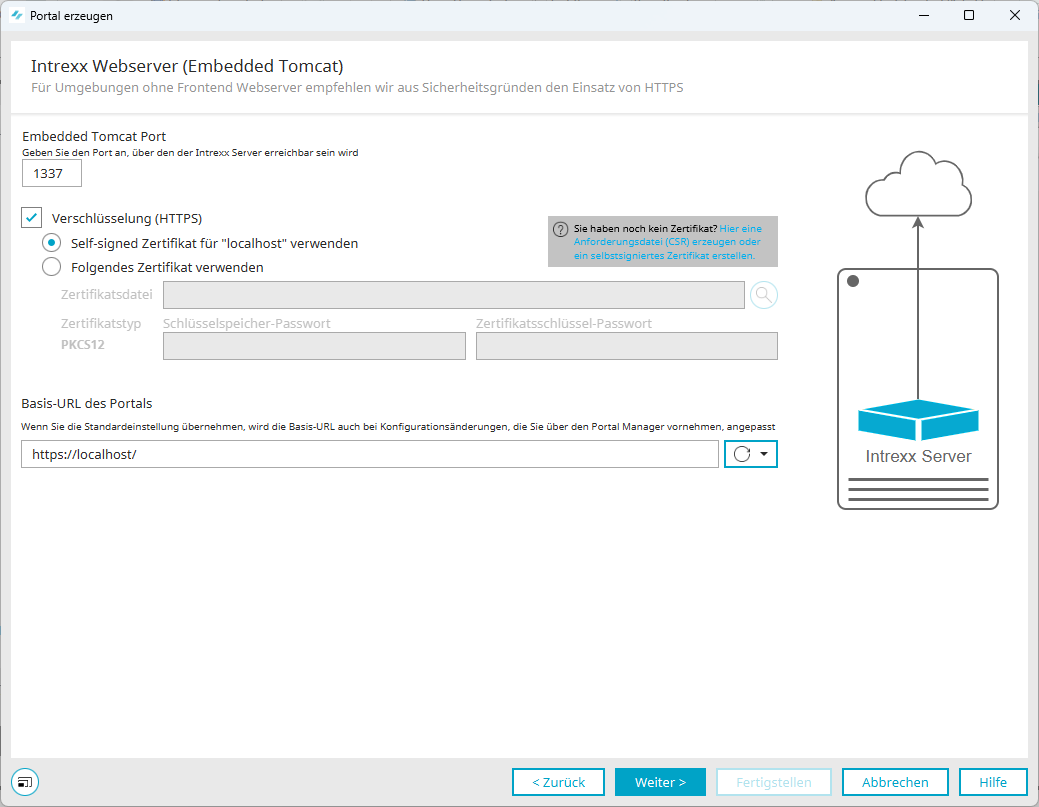
Embedded Tomcat Port
The port for Embedded Tomcat is displayed here. (For a new installation, this is port 1337.)
Encryption (HTTPS)
Select this checkbox if you want to establish an encrypted connection between Intrexx or the embedded Tomcat and the browser.
Self-signed certificate for "localhost"
Select this option if you want communication between the Embedded Tomcat and the browser to be encrypted using a self-signed certificate (for test or development portals).
In this case, Intrexx automatically generates a self-signed certificate and uses it for the encrypted connection.
Certificate file
You can use the " " icon to locate the certificate file.
Certificate Type
Select the type of certificate store (keystore) here where you have saved the certificate file.
Key Storage Password
Enter the password for the keystore that the certificate is saved in.
Certificate key password
Enter the key for the certificate file here.
Note: The keystore password and the certificate key password are often the same.
Portal Base URL
The base URL needs to be entered here. The first part refers to the protocol. Please note that "https " is specified here. The second part consists of specifying the hostname. Please make sure that this ends with a slash (/). It is essential that you enter the correct information so that your portal can be accessed in the browser.
In this dialog box, you can generate a CSR (Certificate Signing Request). For detailed information on this topic, see the " Generating a CSR (Certificate Signing Request) Without Using a Front-End Web Server" section.
Manual Setup
You have the ability to manually configure communications between embedded Tomcat and the browser. By doing so, you are opting out of the wizard-based setup that is available for the "Internet Information Service (IIS)," "NGINX," and "No Front-End Web Server" options.
Further technical specifications for the manual setup can be found in the following files. This are included with Intrexx.
-
<portal directory>\tomcat\conf\server-https-default.xml
-
<portal directory>\tomcat\conf\server-http-default.xml
-
<portal directory>\external\htmlroot\WEB-INF\web.xml
-
<intrexx-installation-directory>\samples\web-tls-configuration\nginx\portal-internet.conf
-
<intrexx-installation-directory>\
-
<intrexx-installation-directory>\samples\web-tls-configuration\nginx\portal-intranet.conf
Field Descriptions
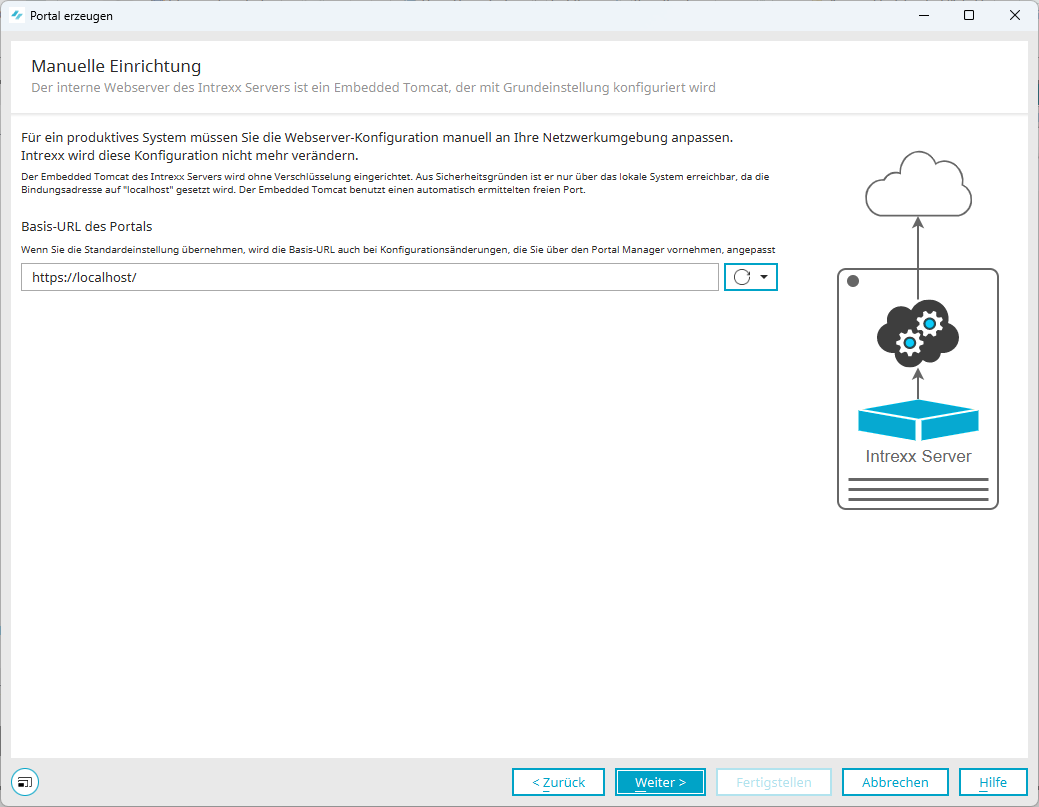
Portal Base URL
The base URL needs to be entered here. The first part consists of the minutes. You have configured an encrypted connection between the Intrexx portal server and the browser. The second part consists of specifying the hostname. Note that a trailing slash (/) is included. It is essential that you enter the correct information so that your portal can be accessed in the browser.
This guide will use Internet Information Services (IIS) as an example of a front-end web server.
After you click "Next," you'll be taken to the "Front-End Web Server: Internet Information Services (IIS)" dialog box.
Front-end Web Server: Internet Information Services (IIS)
IIS Website
Select the website here that you created in IIS for the portal.
Embedded Tomcat Port
This displays the port you used in the previous version of Intrexx. You can leave this port as is.
Note: For a new installation, a free port—such as 1337—is preset here.
Portal Base URL
The portal's base URL is displayed here.
By default, the displayed base URL is derived from the website binding information in the Internet Information Service (IIS). These are the "Type" and "Hostname" fields. (See the section " Adding a Website in IIS" for more information.)
The base URL displayed here will be copied to the "Base URL" field in the portal properties under "General" after the portal is created.
Solr Search Server
Every portal has a search function. This is technically implemented using "Solr," Apache's search server.
In this dialog box, you can choose whether to use the default Solr settings or to configure the system to your own specifications.
Intrexx Version 12.0.0

Default settings for Solr installed via Setup
By default, the Solr search server is installed in standalone mode. The Solr search server is installed on the same server as the Intrexx Portal Server. The default username and password are used for authentication on the Solr search server.
If you are using only one instance of the Solr search server—that is, if you are not using SolrCloud—you can usually select the default setting.
Custom Solr Configuration
Select this option if you want to configure custom settings for the Solr search server. This is especially true if you want to make changes to the authentication settings on the Solr search server.
For detailed information on custom Solr configuration, see the " Custom Solr Configuration" section.
Intrexx Version 12.0.1
Starting with Intrexx 12.0.1, you can use OpenSearch or Elasticsearch as a "preview feature" for the portal search.

OpenSearch/ElasticSearch
Preview Feature
Please note that this is a so-called "preview feature." Preview features may be incomplete or contain errors. Therefore, they may currently be used only in test and development environments in order to evaluate them appropriately.
Before you use a preview feature, we strongly recommend that you back up your data. Intrexx GmbH. makes no warranty whatsoever regarding the functionality or reliability of preview features. The use of preview features is therefore at the user's own risk.
You have the option of using OpenSearch or Elasticsearch for the portal search.
OpenSearch and Elasticsearch are not included in the scope of delivery. We recommend setting up your own installation using the OpenSearch or Elasticsearch Docker image.
For more information on this topic, see the following sections:
File storage locations
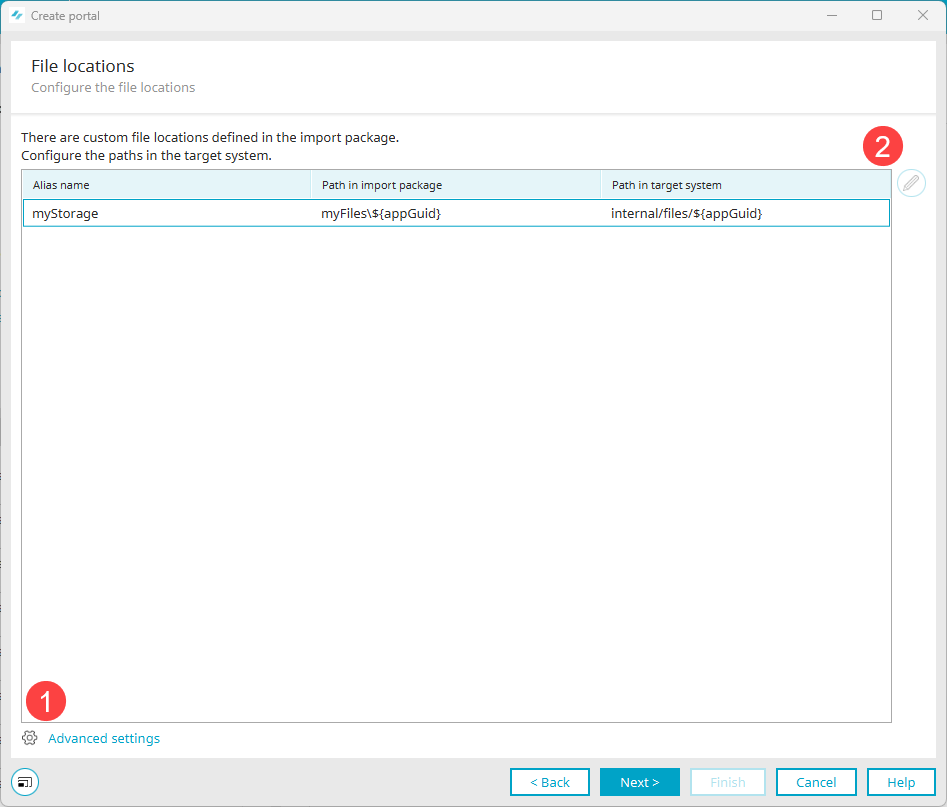
If the portal you are currently importing contains a file location, the alias name and paths in the import package or in the target system are displayed here.
In this dialog box, you can configure additional settings related to file locations ( ) (Advanced Settings).
You can also edit the file locations ( ) (Edit file location).
Advanced Settings
Step-by-Step
To configure advanced settings for file locations, follow these steps:
-
Click the "
 " icon ("Edit Advanced Settings").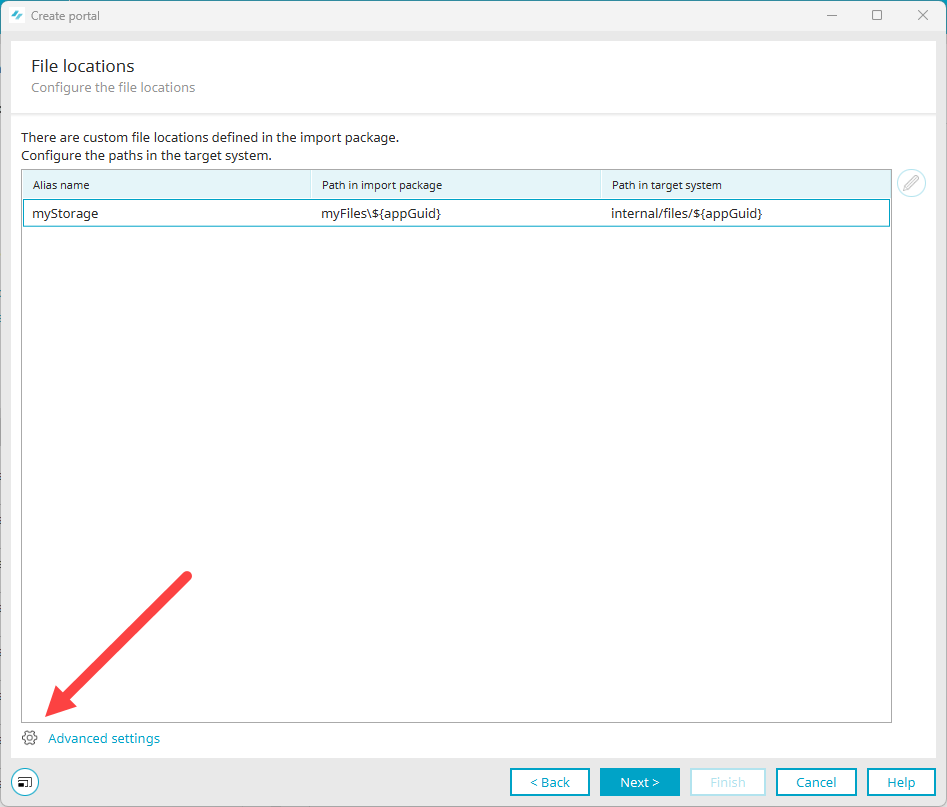
This will take you to the "Advanced Settings" dialog box (1).
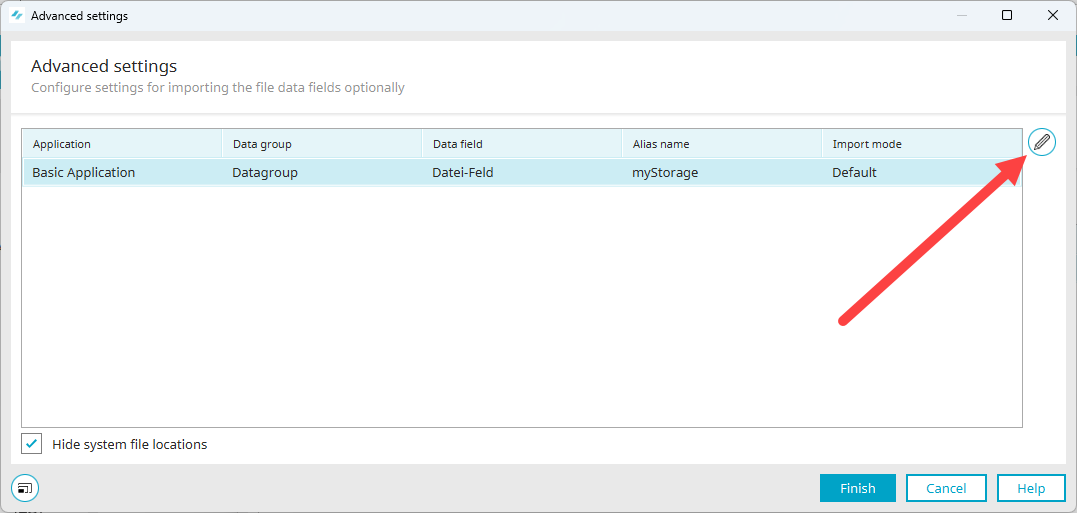
This section displays the applications, data groups, and data fields associated with the file location. The "Alias Name" column displays the name under which the file location will be entered in the "Integration" module after a successful import. You'll also find information about import mode here.
If the "Hide system file locations" setting is enabled, only the user-defined file locations are displayed.
-
Click the "
 " icon.
This will take you to the "Advanced Settings" dialog box (2).
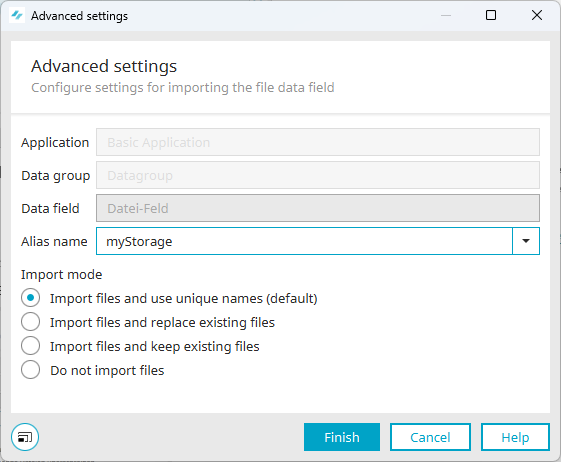
The currently selected application, data group, and data field are shown here. Under "Alias Name," select the desired file location.
Under "Import Mode," you can specify how the files should be imported:
-
Import Files and Name Them Uniquely (Default)
-
Import files and overwrite existing files
-
Import Files and Keep Existing Files
-
Do not import any files
-
-
Click "Finish" to apply the changes and close the dialog box.
Edit File Location
Step-by-Step
To edit a file location, follow these steps:
-
Click the "
" icon.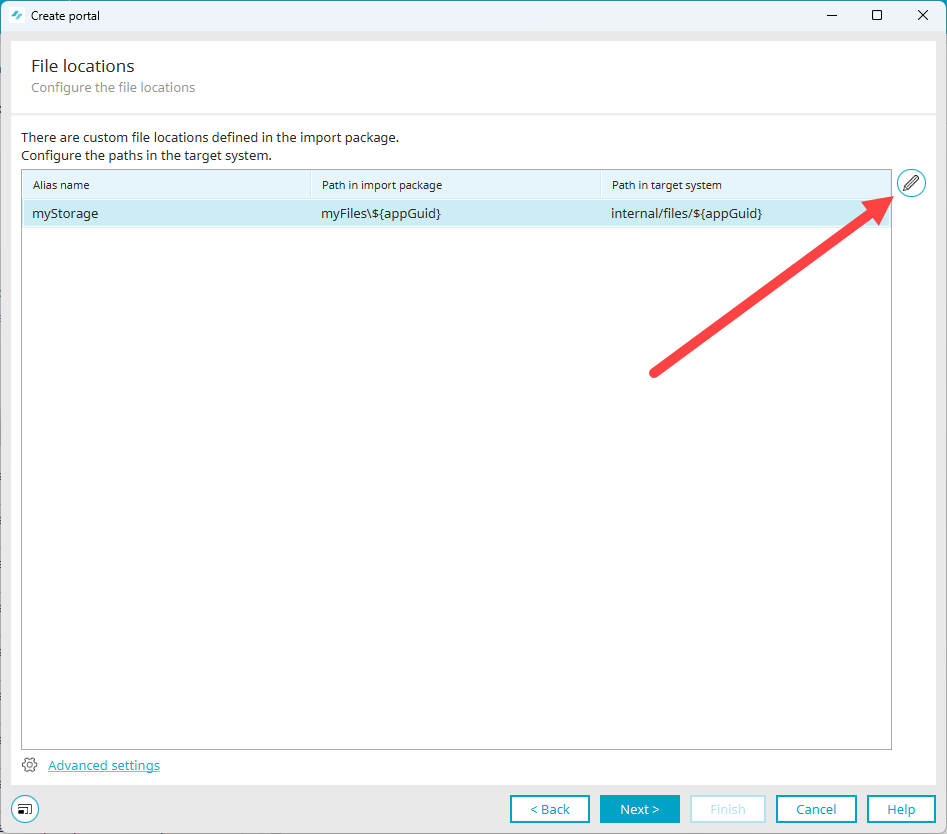
-
The "File Location" dialog box appears.
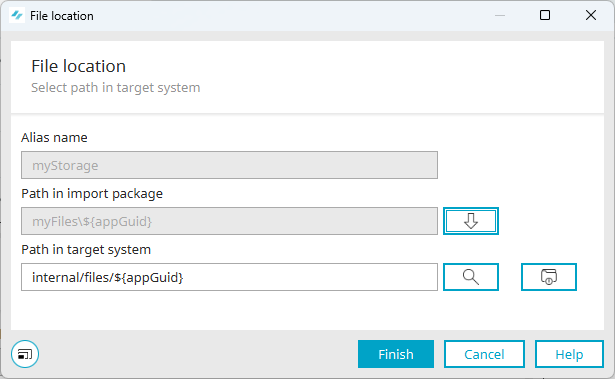
Here, you can edit the path to the file location on the destination system. By default, the path is set to the portal directory "internal/files/${appGuid}".
Click the "
 " icon ("Use path as path in the destination system") to use the path from the import package as the path in the destination directory.
Click the "
 " icon ("Select Path") to select a directory.
Click the "
 " icon ("Restore Default Path") to specify the directory that Intrexx uses by default for storing files.
 -
Click "Finish."
Summary
In this dialog box, you can change the information you entered. To do this, click on the blue headings.
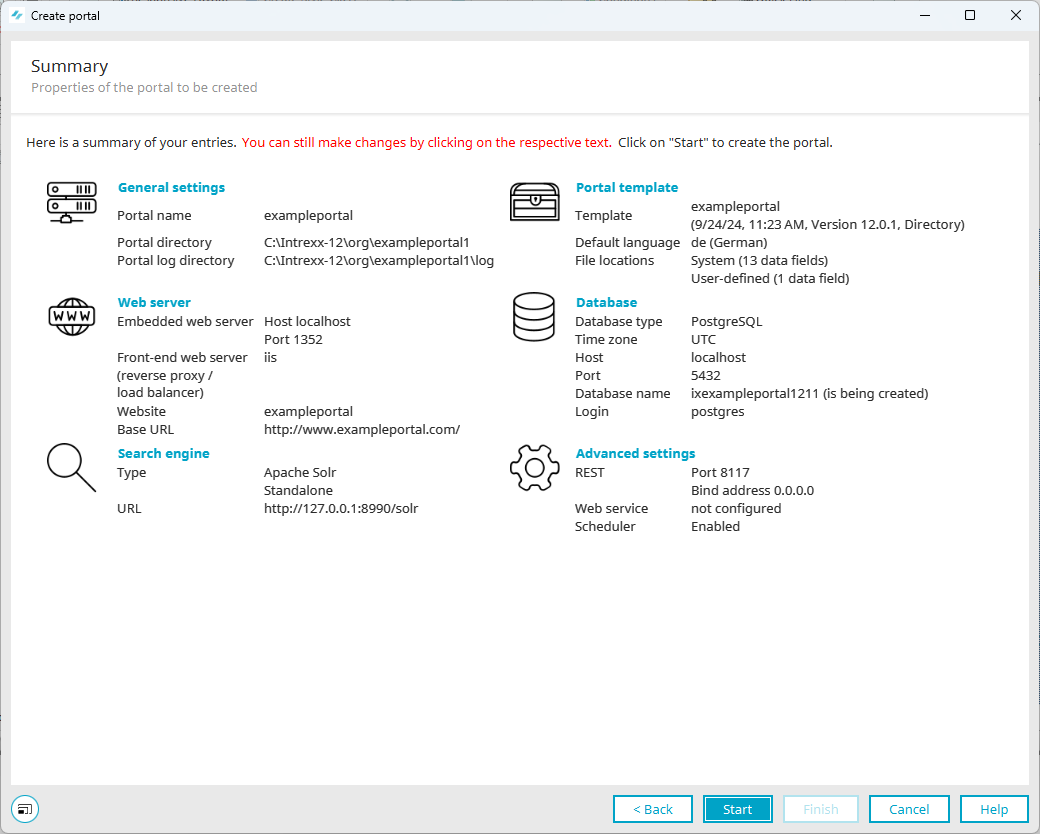
General Information
Opens a dialog where the portal name and directory can be edited.
Web server
Opens a dialog where the web server settings can be edited.
Advanced Settings
Opens a dialog where the ports, search engine and other settings can be modified.
Portal Template
Opens a dialog box where you can change the portal template and the default portal language.
After you click " Portal Template," the "Portal Template" dialog box appears.
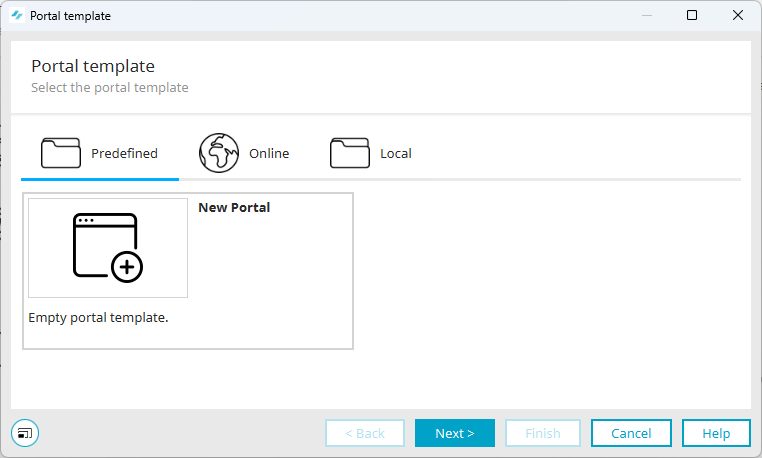
Click "Next."
The "Language" dialog box appears.
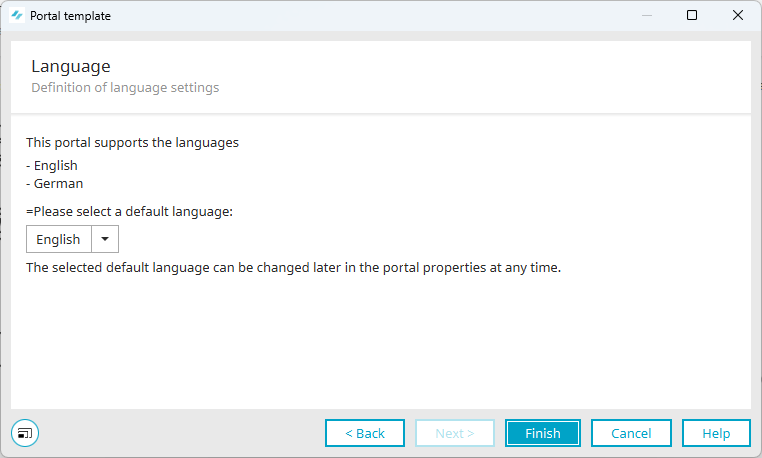
Here you can change the portal's default language.
Database
Opens a dialog where the database can be changed.
Advanced Settings
Opens a dialog where the ports, search engine and other settings can be modified.
You have successfully imported a portal.