

Export Portal
Portals can be exported in three different ways:
-
Manually (once, as needed)
-
Automatic (Schedule)
-
Via the console
Export the portal manually
Step-by-Step
To export a portal manually, follow these steps:
-
Launch the portal you want to export.
-
Click "Start > Export Portal..."
The "Export Portal..." dialog box is displayed.
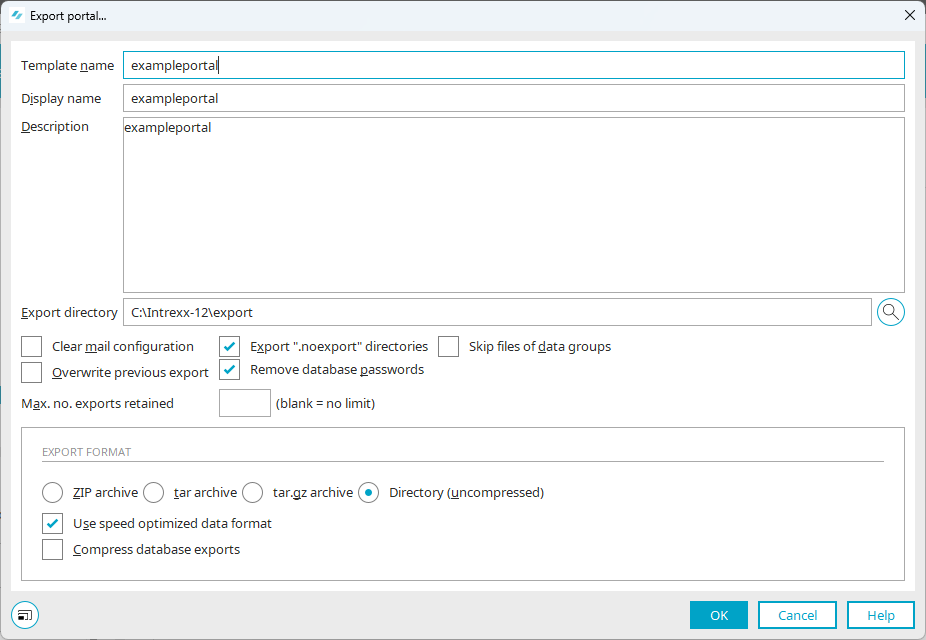
Starting with Intrexx version 12.0.0
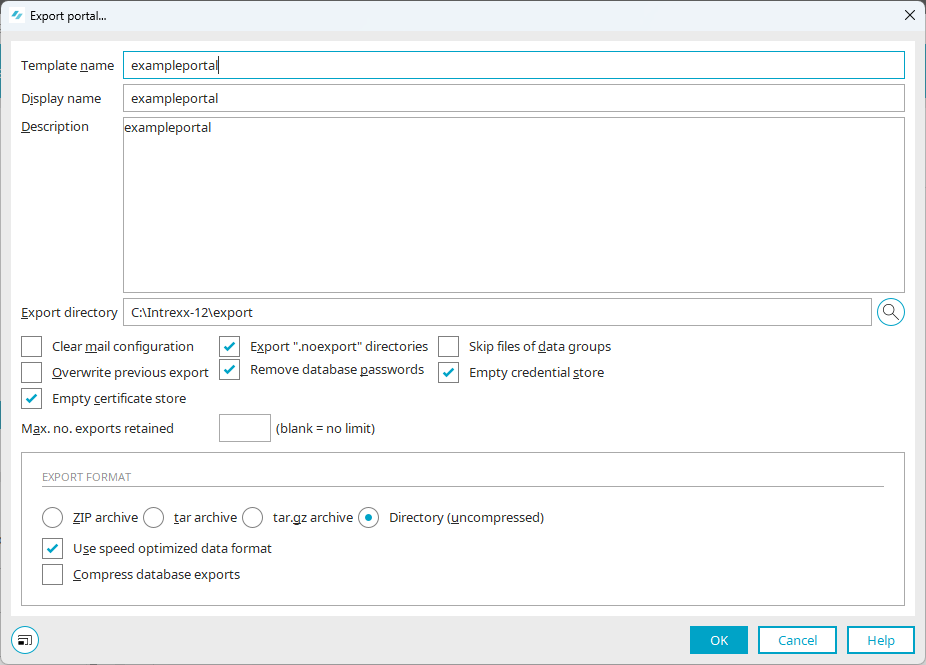
Template name
Template name This corresponds to the filename used for the export file.
Display name
When importing the portal, the display name in the template list (Custom) is used.
Description
You can provide the portal export with a description here.
Export directory
The path where the export file will be saved is shown here.
 Select a directory
Opens a dialog box where you can select a directory.
Clear Email Settings
With this setting, the settings configured in the "Tools" module of the email service in the current portal will not be included in the export.
Overwrite previous export
With this setting, the last export will be overwritten by the new one.
Clear the Certificate Store
With this setting, no certificates are included in the export. You can find more information on this topic here.
Exporting ".noexport" Directories
You can exclude directories from the export by placing a file named ".noexport" in those directories.
If, in certain scenarios, you do not want to exclude directories that contain a .noexport file from the export, you can do so by selecting this checkbox.".noexport" file
By default, temporary directories in Intrexx contain .noexport files, as these are not required for the portal export or the exported portal.
If you exclude directories from export using .noexport files, you should document this.
You can create a .noexport file yourself using a text editor.
You can find a sample file to copy in the following directory: <intrexx-installation-directory>\orgtempl\blank\internal\tmp
".keep" file
In addition to the ".noexport" file, you can also create a ".keep" file in connection with the portal export. If you place a .keep file in an empty directory, it will be included in the portal export. (By default, empty directories are not exported.)
You can find a sample file to copy in the following directory: <intrexx-installation-directory>\orgtempl\blank\internal\tmp
Remove Database Passwords
With this setting, the passwords for authentication to the portal database will be reset in the portal export. Logging on to the database will then be possible without a password.
Number of exports to be retained
Here you can specify how many portal exports should be retained in total. If this number is exceeded, the oldest export is automatically deleted.
Skip files from data groups
With this setting, files from data groups are not included in the export.
(For detailed information about files in file fields or data groups, see the " Data Fields" section
Starting with Intrexx Version 12.0.0: Clear the login information cache
With this setting, credential passwords are not included in the portal export. For more information about credentials, click here.
Export format
Four export formats are available:
-
ZIP archive
-
tar archive
-
tar.gz archive
-
Directory (uncompressed)
Use speed optimized data format
With this setting, the XML in the export file is written in a format that can be read more quickly during import.
Compress Database Exports
With this setting, the database export files (.data) are compressed into gz files (.data.gz). This way, the database export files take up less space in the export directory.
-
<intrexx-installation-directory>\org\<portal-name>\internal\cfg\.
If necessary, you can manually make changes to the file.
Please note that when you export a portal, the portal.wcf file is exported along with it; however, when you subsequently import it, the file will be imported without any manual changes. This means you may need to manually update the portal.wcf file if necessary.
Background: The `portal.wcf` file contains system-specific information, such as paths or ports, which normally cannot be transferred 1:1 from one system to another.
Automatically Export Portal
Step-by-Step
To export a portal automatically, follow these steps:
-
Launch the "Tools" module.
-
In the navigation pane, click "Export."
-
Click "Configure."
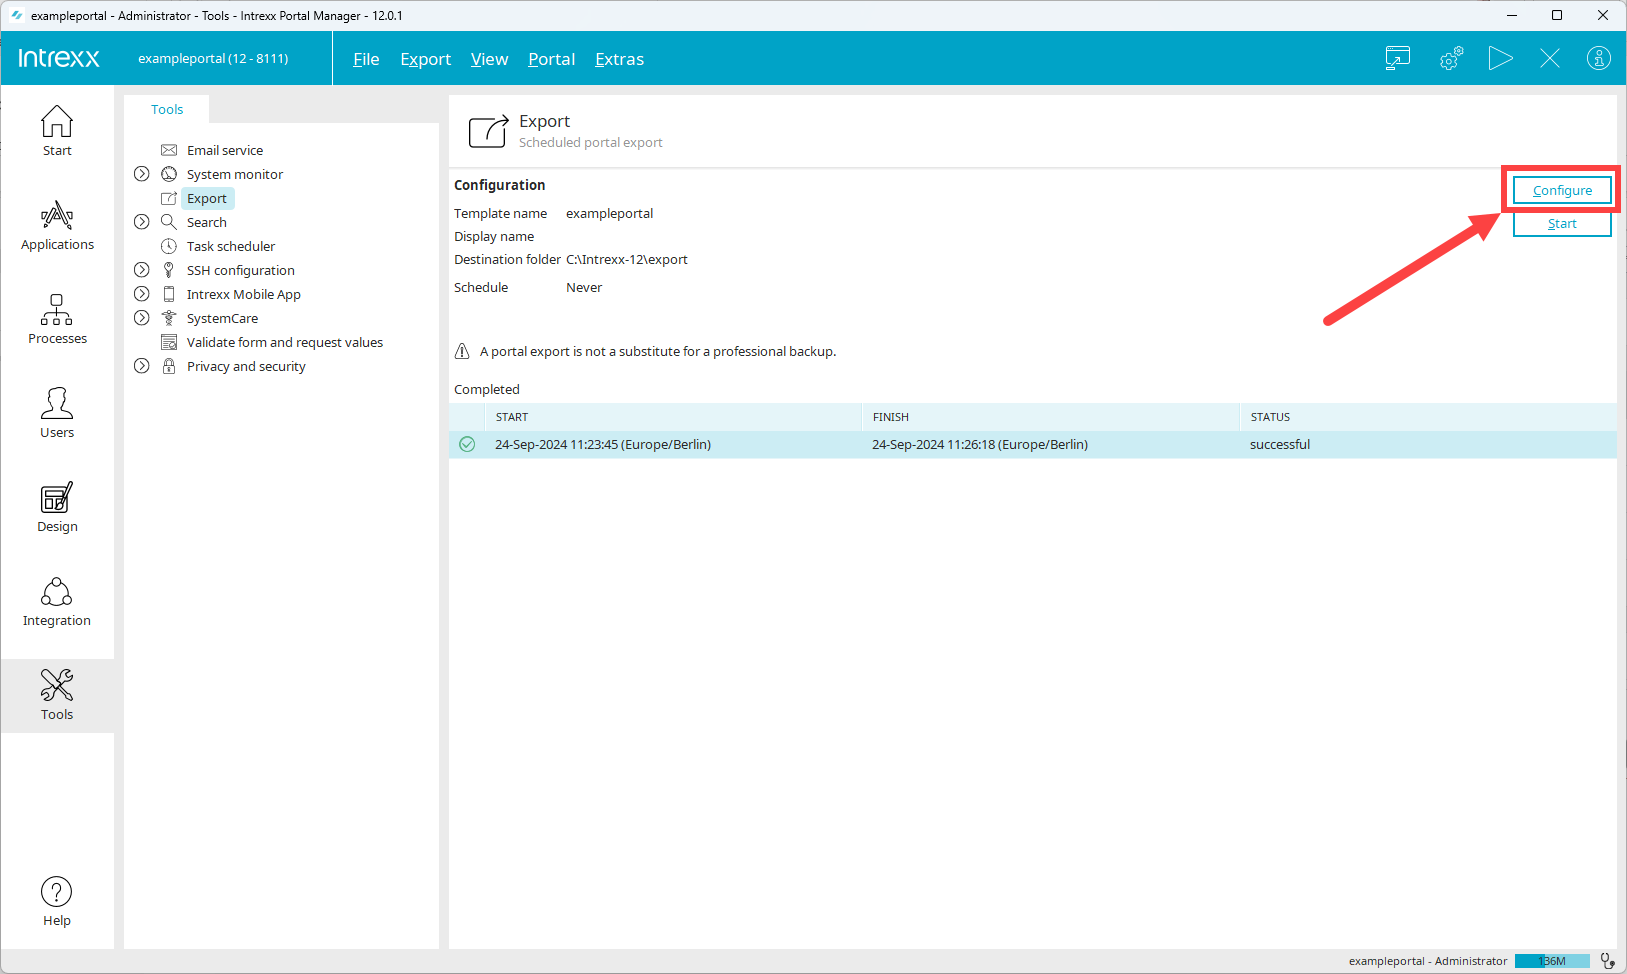
This will take you to the "Export Configuration" dialog box.
Portal Description
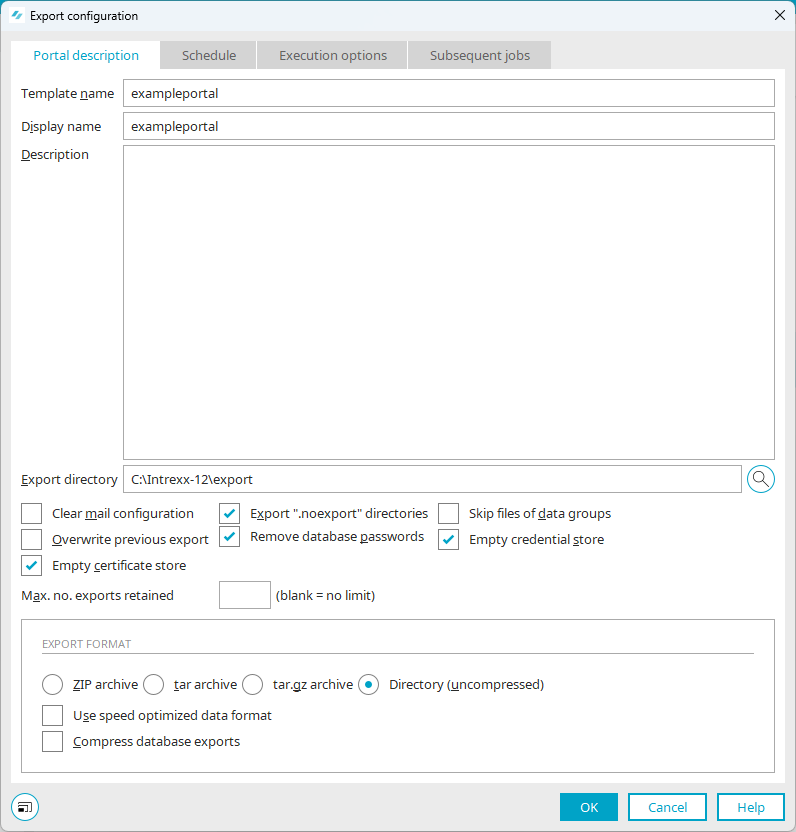
Template name
Template name This corresponds to the filename used for the export file.
Display name
When importing the portal, the display name in the template list (Custom) is used.
Description
You can provide the portal export with a description here.
Export directory
The path where the export file will be saved is shown here.
Select a directoryOpens a dialog box where you can select a directory.
Clear Email Settings
With this setting, the settings configured in the "Tools" module of the email service in the current portal will not be included in the export.
Overwrite previous export
With this setting, the last export will be overwritten by the new one.
Clear the Certificate Store
With this setting, no certificates are included in the export. You can find more information on this topic here.
Exporting ".noexport" Directories
You can exclude directories from the export by placing a file named ".noexport" in those directories.
If, in certain scenarios, you do not want to exclude directories that contain a .noexport file from the export, you can do so by selecting this checkbox.".noexport" file
By default, temporary directories in Intrexx contain .noexport files, as these are not required for the portal export or the exported portal.
If you exclude directories from export using .noexport files, you should document this.
You can create a .noexport file yourself using a text editor.
You can find a sample file to copy in the following directory: <intrexx-installation-directory>\orgtempl\blank\internal\tmp
".keep" file
In addition to the ".noexport" file, you can also create a ".keep" file in connection with the portal export. If you place a .keep file in an empty directory, it will be included in the portal export. (By default, empty directories are not exported.)
You can find a sample file to copy in the following directory: <intrexx-installation-directory>\orgtempl\blank\internal\tmp
Remove Database Passwords
With this setting, the passwords for authentication to the portal database will be reset in the portal export. Logging on to the database will then be possible without a password.
Number of exports to be retained
Here you can specify how many portal exports should be retained in total. If this number is exceeded, the oldest export is automatically deleted.
Skip files from data groups
With this setting, files from data groups are not included in the export.
(For detailed information about files in file fields or data groups, see the " Data Fields" section
Starting with Intrexx Version 12.0.0: Clear the login information cache
With this setting, credential passwords are not included in the portal export. For more information about credentials, click here.
Export format
Four export formats are available:
-
ZIP archive
-
tar archive
-
tar.gz archive
-
Directory (uncompressed)
Use speed optimized data format
With this setting, the XML in the export file is written in a format that can be read more quickly during import.
Compress Database Exports
With this setting, the database export files (.data) are compressed into gz files (.data.gz). This way, the database export files take up less space in the export directory.
-
-
Go to the "Schedule" tab.
Schedule
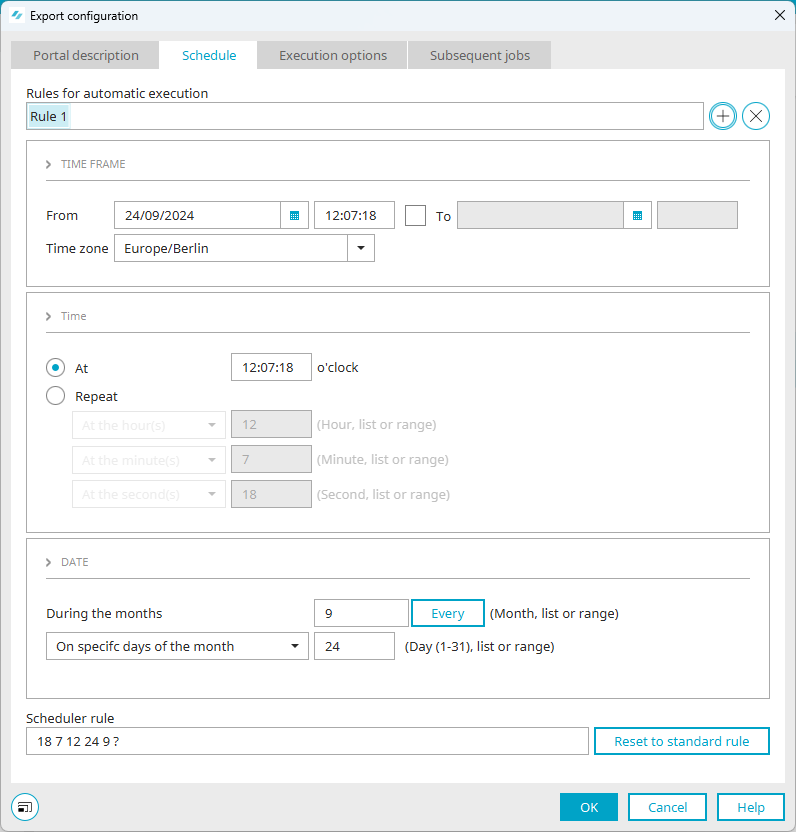
Define the how often the task should be automatically executed.
Rules for Automatic Execution
Here, you can create any number of rules with different schedules. Rules that have already been created can be selected individually and thus activated, which will execute the corresponding schedule. Create a rule, adjust the settings (e.g., the time) in the dialog as desired, and save the rule by selecting another rule or closing the dialog by clicking "OK."
 Add a rule
Adds a new rule.
 Delete Rule
Deletes the rule currently selected.
Validity Period
From
Defines the start of the period. The first time, the task will start at the next full hour following the time entered in the "From" field.
To
Defines the end of the period.
Time Zone
You can set the time zone here.
Time
At
With this option, a specific time can be entered when the task should be executed.
Repeat
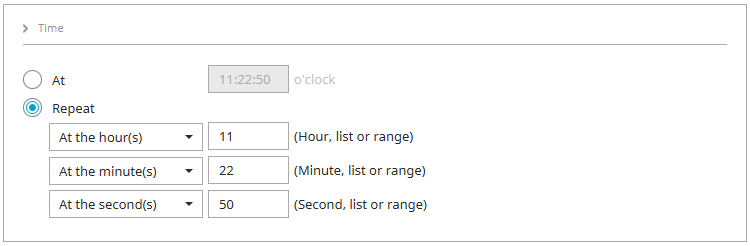
Using the "In hours / minutes / seconds" settings, you can enter a single hour (or minute, or second) as an integer, a list (separated by commas), or a range (e.g., 8–10).
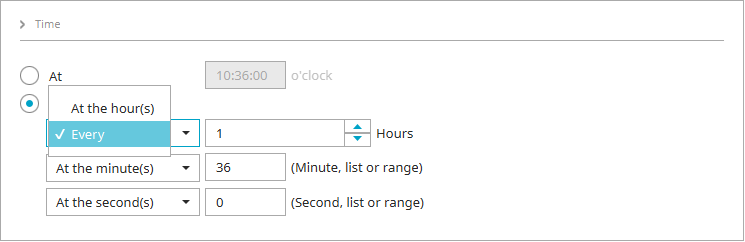
By clicking the arrow button labeled "
 " to the right of the settings listed here, you can select the "All" option. This allows you to set the execution time relative to hours, minutes, and seconds.
Date
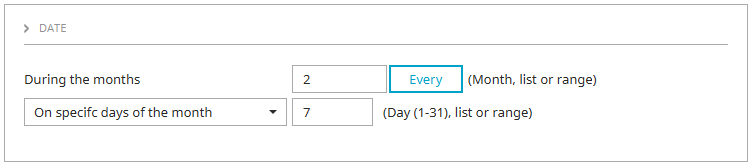
During the months
Here, you can specify a single month, a list of months (separated by commas), or a range (e.g., 3–5) for execution using an integer. Clicking "All" will start the process every month.
On the days of the month
Corresponds to the "By month" setting for the "Day" unit.
Clicking the
arrow button to the right of the setting reveals additional options.Repeat All
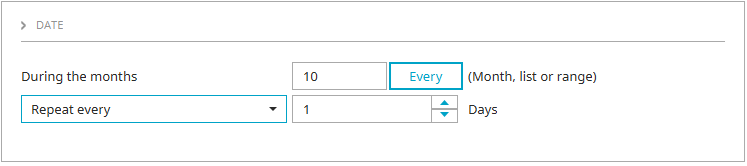
Enter the desired number of days here.
On weekdays
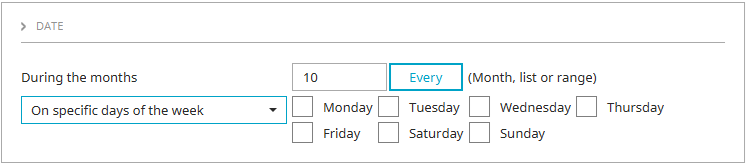
Select the desired days of the week here.
Days Before the End of the Month
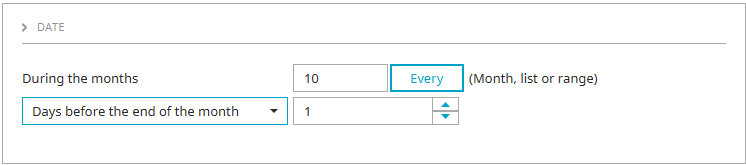
Enter the desired number of days here.
Scheduler Rule

You can enter a scheduler rule manually here. You can find information about the structure of the rules here. You can find a detailed description of CronTrigger expressions here (CronTrigger class).
Reset to Default Rule
When you click this button, Intrexx checks the scheduler rule. If Intrexx detects errors, a rule is automatically created that can be configured using the input fields in this dialog box. Invalid values in the scheduler rule are discarded.
-
Go to the "Execution Options" tab.
Implementation Options
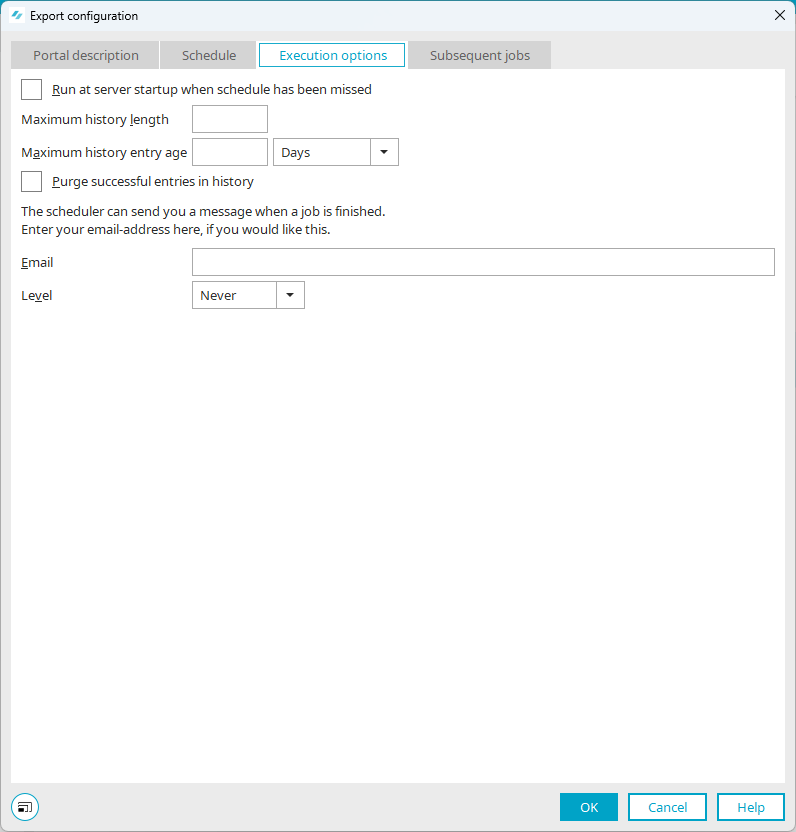
Run at server startup when schedule has been missed
With this setting, task will be executed that have not been carried out while the server was stopped.
Maximum history length
The number of entries is limited to the integer entered here.
Maximum age in the history
Defines how long the history entries are valid in milliseconds, seconds, minutes, hours or days. The entries in the history are only corrected when a new run takes place.
Purge successful entries in history
If you select this checkbox, only the most recent successfully completed job will be displayed in the history.
Email
An email address can be entered that a message will be sent to as soon as the status, which is selected below, applies.
As of Status
You can select the following values:
- Never
A message will not be sent.
- Error
A notification is sent if the operation fails.
- Warnings
A message will be sent when warnings are encountered.
- Always
A message will always be sent.
- Never
-
Go to the "Follow-up Orders" tab.
Follow-up orders
You have the option to have Intrexx automatically execute additional follow-up tasks after the portal export. Follow-up orders can also be defined in the "Tools" module under Task Planning when configuring tasks, and in the "Integration" module when configuring data transfers.
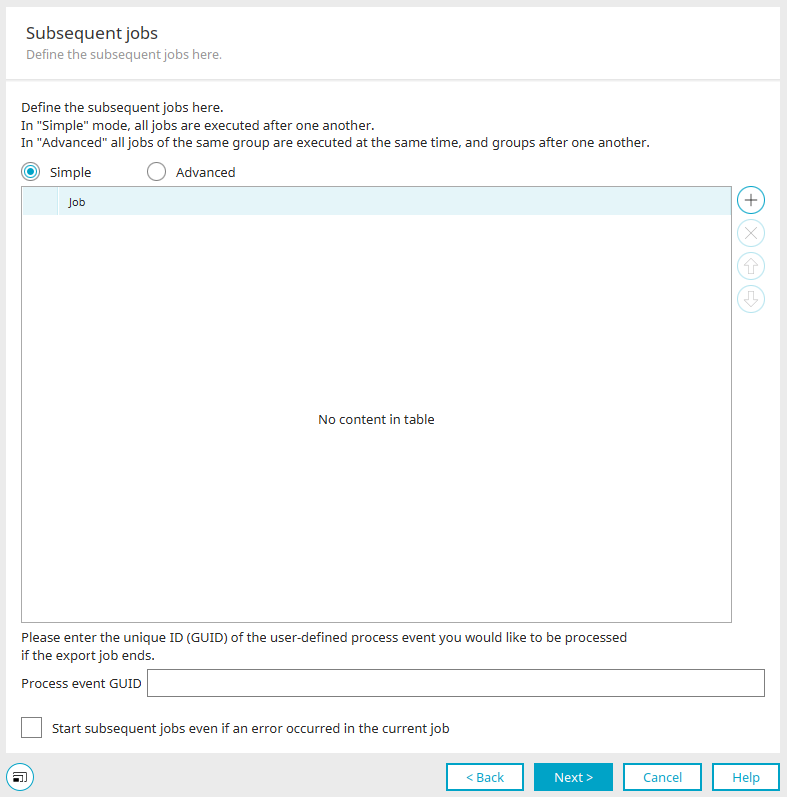
Click the "
" icon to add a new follow-up order.You can run follow-up jobs in "Simple" and "Advanced" modes.
Simple
After the initial order is completed, all subsequent orders are processed one after another.
Advanced
This option allows you to organize follow-up orders into groups. Jobs within the same group are executed simultaneously after the actual job; the groups are executed one after the other.
Process Event GUID
Once the subsequent tasks have been successfully completed, a process can be executed. Enter the process GUID here.
Start the following processes even if an error occurs
If you select this checkbox, all entered jobs will be executed, even if one of the jobs was canceled due to an error.
-
Click "OK" to complete the configuration.
<intrexx-installation-directory>\org\<portal-name>\internal\cfg\.
If necessary, you can manually make changes to the file.
Please note that when you export a portal, the portal.wcf file is exported along with it; however, when you subsequently import it, the file will be imported without any manual changes. This means you may need to manually update the portal.wcf file if necessary.
Background: The `portal.wcf` file contains system-specific information, such as paths or ports, which normally cannot be transferred 1:1 from one system to another.
Export Portal via the Console
The console export of a portal works on any operating system and can be performed from the console using exportportal.bat or Launch exportportal.sh. The following optional parameters can be used:
USAGE:
  portalexport [options]
    Options:
      --destination=<destination>,
      -d <destination>             destination directory,
                                   Default is <IntrexxDir>/export.

      --format=<format>,
      -f <format>                 output format. Possible values are
                                  zip, tar, tgz and plain.
                                  Default format is zip.

      --ignoreNoExport, -e        Ignore the .noexport flag in folders

      --cleanMailConfig, -m       Clear mail configuration

      --exportPassword, -p        Database passwords will exported.
                                  On default no database passwords will exported.

      --exportCredentialStore, -c  Expors the credentials store with passwords.
                                   On default the credential store will exported
                                   without passwords.

      --exportTrustStore, -t      The certificate store will be exported.
                                  On default the original credential store from the
                                  blank portal will exported.

      --skipFiles, -s             Skip files of data groups

      --optimize, -o              Use speed optimized data format

      --compress, -z              Compress database exports

      --verbose, -v               Verbose mode
Exclude database tables from the export
The instructions described below are intended for Intrexx administrators.
When exporting a portal, you have the option to exclude database tables from the export. To do this, you must enter the names of the tables in the configuration file ` exportexcludetables-custom.cfg ` located in the installation directory ` internal\cfg `.
You must create the configuration file exportexcludetables-custom.cfg.
Each line in the configuration file contains a regular expression that matches excluded tables. Lines that begin with # are treated as comments. Whitespace at the beginning and end of a line is ignored. Blank lines and lines consisting only of whitespace are ignored.
Sections can be defined in the file that begin with [schema+data], [data], or [schema]. Regular expressions in these sections then prevent the export of matched tables—whether for the schema and data, just the data, or just the schema. The default is the schema and data.
Example 1
# All tables starting with "CRITICAL_TABLE_"
CRITICAL_TABLE_.*Example 2
# Completely ignored tables
[schema+data]
CRITICAL_TABLE

# Export without data
[data]
HUGE_TABLE
GDPR_.*.
More Information
https://help.intrexx.com/apidocs/jdk21/api/java.base/java/util/regex/Pattern.html
Anonymize Exported Portals
You have the option to anonymize exported portals. As a result, data in the portal is replaced with meaningless information. This way, you can, for example, submit portals to Intrexx Support without disclosing personal or sensitive data.
Anonymizer
Exported portals are anonymized using what is known as the "anonymizer." This is an integral part of Intrexx and does not have a graphical user interface.
To obfuscate the portal, the anonymizer performs the following steps:
-
Replace words with three or more letters with random words of the same length, such that within the portal, a word is always replaced with the same random word. This replacement also applies to constants and static titles.
-
Replace numbers with random numbers of the same length, such that within a portal, a number is always replaced with the same random number.
-
Replacing images and other files with empty dummy files. The files are randomly renamed to make it impossible to deduce their contents.
-
Replace usernames with random usernames; remove passwords.
-
Remove the history of applications and processes by deleting the associated Git repositories.
-
Deleting temporary files, emails, uploads, etc.
Run the anonymizer
The anonymizer is run via a script.
Windows anonymizeportal.bat
Linux/Mac anonymizeportal.sh/
You can find the script in the following directory: <Intrexx installation directory>/bin
The anonymizer requires a portal export in the form of a directory, ZIP file, or TAR file. A portal that is currently in operation cannot be anonymized.
The anonymizer is launched from the bin directory using anonymizeportal.sh or anonymizeportal.bat. During the anonymization process, a log of the steps taken is created and saved in log/anonymizeportal.log.
Options
The anonymizer offers the following options:
anonymizeportal.sh <source> <destination> [options]
The <Source> and <Destination> fields must be set to the portal to be anonymized (as a directory or ZIP archive) and the destination directory or name of the ZIP archive to be created, respectively.
The anonymizer offers the following optional parameters:
--config=<xml-file> allows you to use an XML file to configure the anonymizer.
--workDir=<directory> specifies the working directory to which the portal is copied beforehand. If this parameter is not specified, the operating system's temporary directory is used by default.
--replaceFiles=<directory> Here, you can specify a directory containing images and other files to be used for the replacement. If this parameter is not specified, default (empty) images and documents are used to replace files in the portal.
--zip causes the anonymized portal to be compressed into a ZIP archive. If a ZIP archive is specified as <target>, this flag must be included.
--logLevel=<value> specifies the level of detail with which the steps are logged. Possible values are INFO (default) and DEBUG. If this parameter is not set, the default Inxtrexx log level is used, so that only warnings and errors are logged in addition to the processing steps. If you specify DEBUG , the procedure is described in detail. For example, the log can also display filenames before they are renamed.
Because the file operations involved in extracting and compressing files take a relatively long time, it is recommended—especially on Windows—to make a portal anonymous as a directory and, if necessary, create a ZIP file only after that.
Note: After anonymization, the portal should definitely be imported into a test system and checked again to ensure that all content has been sufficiently altered.
Please also note that, due to the complex replacements involved, an anonymized portal may not always function properly in all areas. In such a case, the anonymized portal can only be used on test systems for troubleshooting.