

After upgrading to Track , set up Intrexx Steady Track —Front-End Web Server (Reverse Proxy/Load Balancer)
Internet Information Services (Windows)
Upgrade from Intrexx 19.03 to Intrexx Steady Track
Starting with Intrexx 21.03, the dialog for configuring the front-end web server has changed. Data from Intrexx 19.03 is automatically carried over during an upgrade.
| March 19 |
|
| |
|
Step-by-Step
To configure the front-end web server in
-
Run Portal Manager as a Windows administrator.
-
Launch your portal.
-
Open the portal properties ("Portal > Portal Properties").
You will be taken to the "Edit Portal" page.
-
Click the "Frontend Web Server (Reverse Proxy / Load Balancer)" menu item.
Name
Description
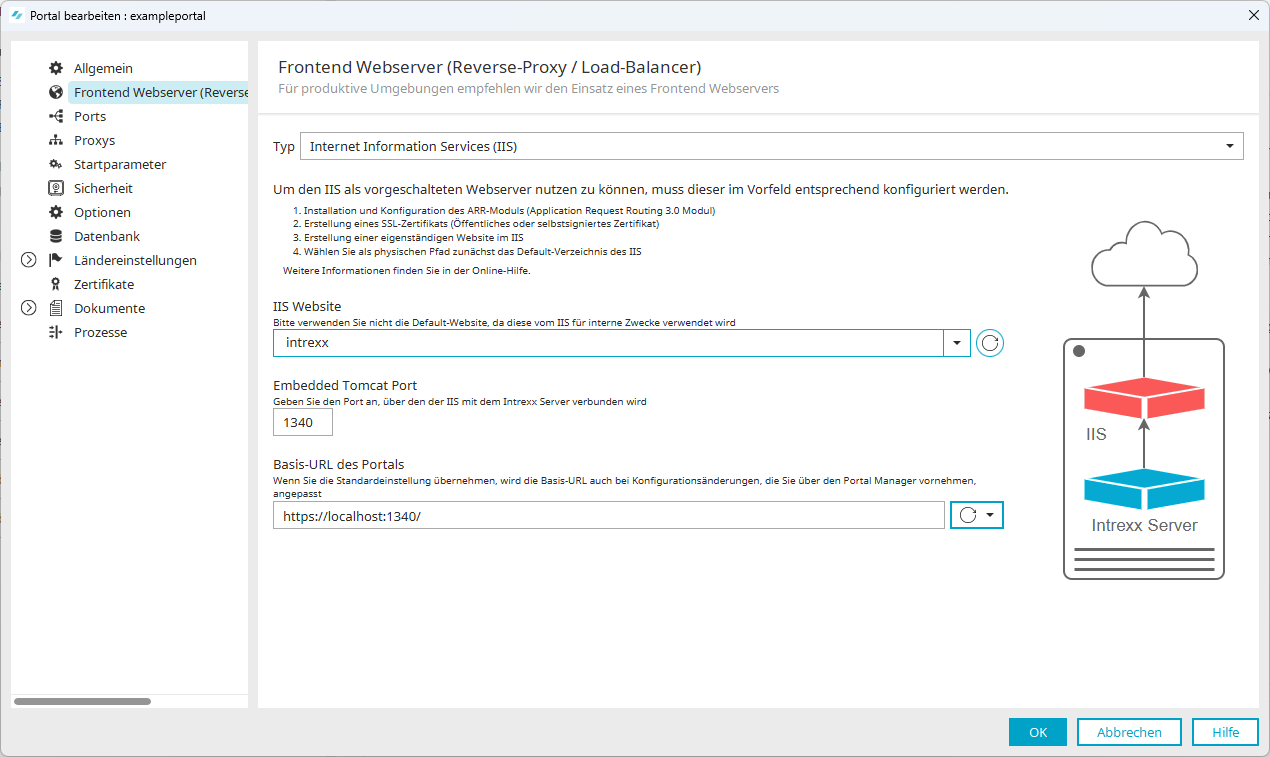
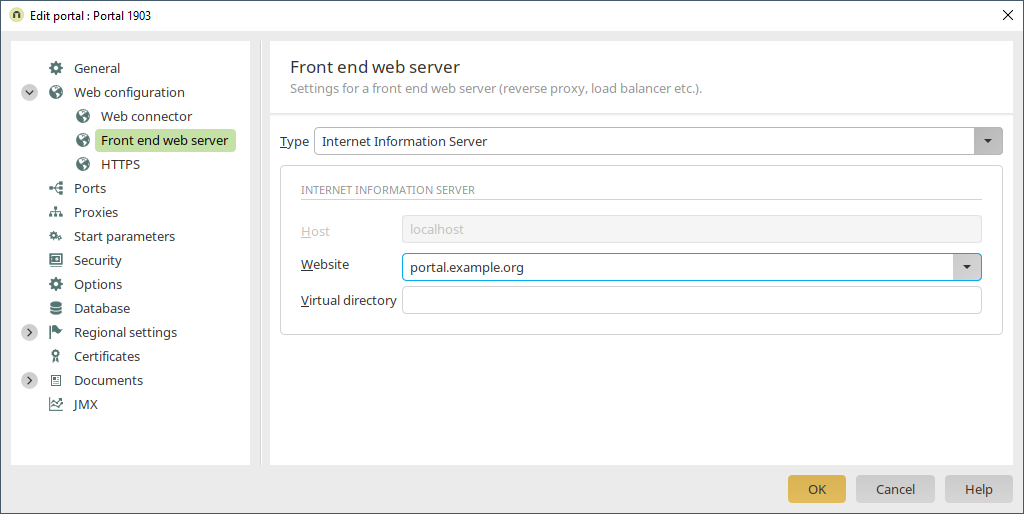
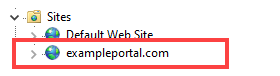
Type Select "Internet Information Service (IIS)" here. IIS Website Select the website here that you created in IIS for the portal. Do not use the Default Web Site in IIS.
Embedded Tomcat Port This displays the port you used in the previous version of Intrexx. You can leave this port as is.
Note For a new installation, port 1337 is set by default here.Portal Base URL The base URL must be specified here.
The first part consists of the minutes. Please note that "https" is specified here. The second part consists of specifying the host name that you have configured in IIS. Note that a trailing slash (/) is included. It is essential that you enter the correct information so that your portal can be accessed in the browser. -
Click "OK."
You have configured the front-end web server (IIS) atIf necessary, you may need to restart the Intrexx Portal service. (Launch the Windows Services app to restart the Intrexx Portal service.) Open the connected portal in your browser to verify that the portal properties are configured correctly and that the upgrade was successful.
Note: There are some features you should generally check after upgrading to
NGINX (Linux)
Upgrade from Intrexx 19.03 to Intrexx Steady Track
Starting with Intrexx 21.03, the dialog for configuring the front-end web server has changed. Data from Intrexx 19.03 is automatically carried over during an upgrade.
|
March 19 |
|
|
|
|
Step-by-Step
To configure the front-end web server in
-
Run Portal Manager as a Windows administrator.
-
Launch your portal.
-
Open the portal properties ("Portal > Portal Properties").
You will be taken to the "Edit Portal" page.
-
Click the "Frontend Web Server (Reverse Proxy / Load Balancer)" menu item.
Name
Description
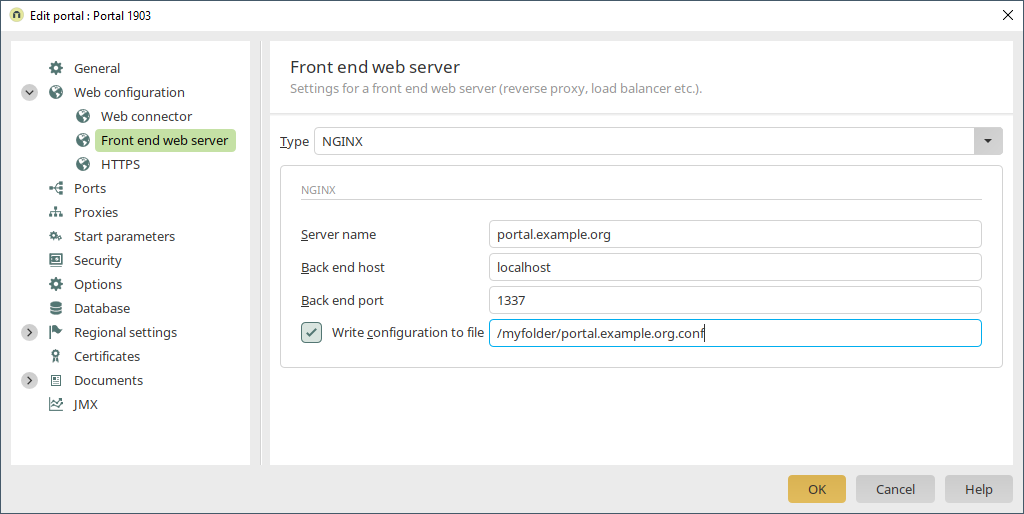
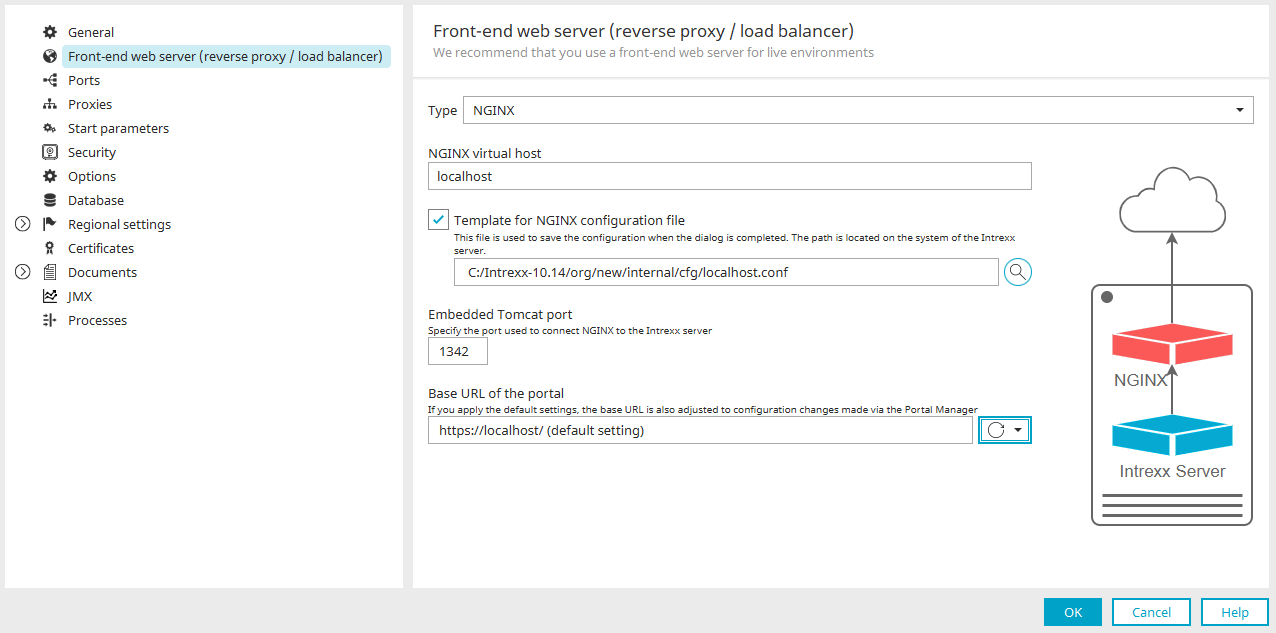
Type Select "NGINX" here. NGINX Virtual Host "NGINX Virtual Host" refers to the embedded Tomcat. NGINX establishes a connection to the Intrexx portal service via the virtual host. Usually, you should enter "localhost" here. (An exception may apply if NGINX is installed on a different server than Intrexx.) (In that case, the Intrexx server should be specified here.) NGINX Configuration File You can generate the NGINX configuration file using Intrexx.
Enter the path to the directory where you want to create the NGINX configuration file.
Example: "/myfolder/portal.example.com.conf"
Next, copy or link the NGINX configuration file to the desired location under "/etc/nginx".
Example: "/etc/nginx/sites-available/ portal.example.com.conf"Embedded Tomcat Port This displays the port you used in the previous version of Intrexx. You can leave this port as is.
Note: For a new installation, port 1337 is set by default here.
Portal Base URL The base URL must be specified here.
The first part consists of the minutes. Please note that "https" is specified here. The second part consists of specifying the hostname that you have defined in the NGINX configuration file. Note that a trailing slash (/) is included. It is essential that you enter the correct information so that your portal can be accessed in the browser. -
Click "OK."
You have configured the front-end web server (NGINX) at
If necessary, you may need to restart the Intrexx Portal service.
Open the connected portal in your browser to verify that the portal properties are configured correctly and that the upgrade was completed successfully.
Note: There are some features you should generally check after upgrading to
No front-end web server
A front-end web server (reverse proxy) is typically used in conjunction with Intrexx. In most cases, these are Microsoft IIS or NGINX.
There are many reasons why using a reverse proxy is recommended. In particular, an existing Windows authentication can be used for portal access via a reverse proxy.
In principle, a portal can be accessed even without a reverse proxy. However, this is only recommended for test and development portals.
Step-by-Step
To avoid using a front-end web server for a portal, follow these steps:
-
Run Portal Manager as a Windows administrator.
-
Launch your portal.
-
Open the portal properties ("Portal > Portal Properties").
You will be taken to the "Edit Portal" page.
-
Click the "Frontend Web Server (Reverse Proxy / Load Balancer)" menu item.
Name
Description
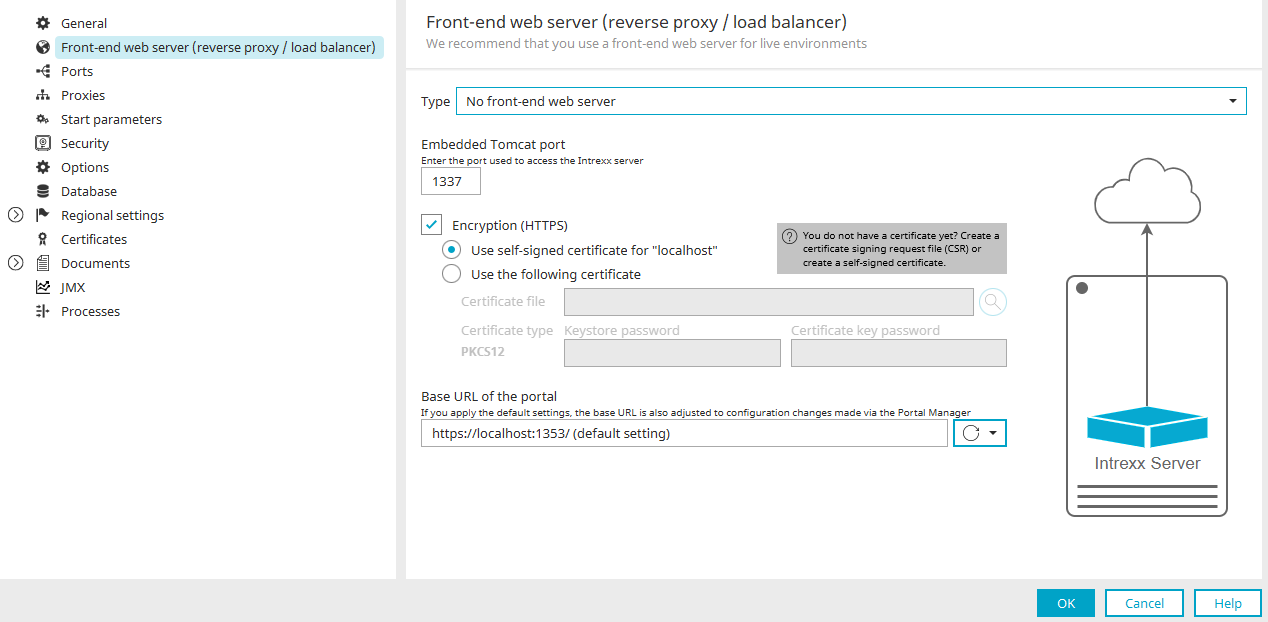
Type Select "No front-end web server" here. Embedded Tomcat Port Enter the port here through which Embedded Tomcat should be accessible. This is usually port 1337. Encryption (HTTPS) Select this checkbox if you want to establish an encrypted connection between Intrexx or the embedded Tomcat and the browser. Self-signed certificate for "localhost" Select this option if you want communication between the embedded Tomcat and the browser to be encrypted using a self-signed certificate (for test or development portals).
In this case, Intrexx automatically generates a self-signed certificate and uses it for the encrypted connection.Certificate File You can use the "  " icon to locate the certificate file.
Certificate Type
Select the type of certificate store (keystore) here where you have saved the certificate file.
Key Storage Password
Enter the password here for the keystore where you have stored the certificate file.
Certificate Key Password
Enter the key for the certificate file here.
Note: The keystore password and the certificate key password are often the same.
Portal Base URL
The base URL must be specified here.
The first part consists of the minutes. Please note that "https" is specified here. The second part consists of specifying the hostname that you have defined in the NGINX configuration file. Note that a trailing slash (/) is included. It is essential that you enter the correct information so that your portal can be accessed in the browser. -
Click "OK."
You have set up a portal without a front-end web server (reverse proxy).
Manual Setup
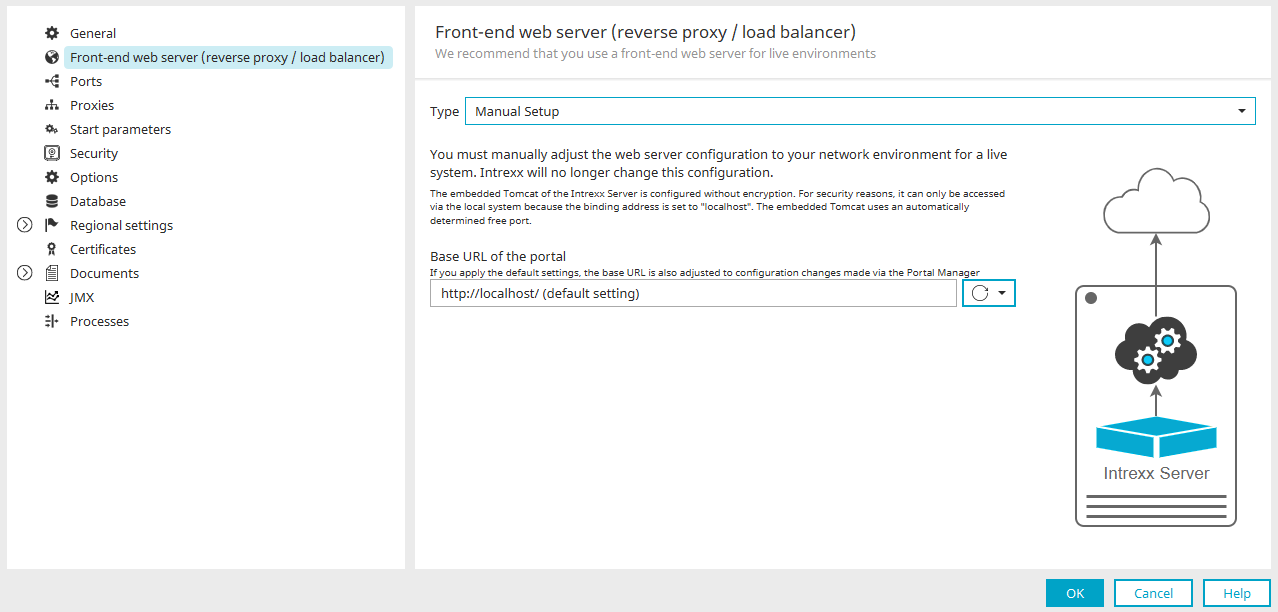
Use the "Manual Setup" option if you want to manually configure communication between the embedded Tomcat and the browser.
By doing so, you are foregoing the wizard-based setup available for the "Internet Information Service (IIS)," "NGINX," and "No Front-End Web Server" options.
Further technical specifications for the manual setup can be found in the following files. This are included with Intrexx.
-
<portal directory>\tomcat\conf\server-https-default.xml
-
<portal directory>\tomcat\conf\server-http-default.xml
-
<portal directory>\external\htmlroot\WEB-INF\web.xml
-
<intrexx-installation-directory>\samples\web-tls-configuration\nginx\portal-internet.conf
-
<intrexx-installation-directory>\
-
<intrexx-installation-directory>\samples\web-tls-configuration\nginx\portal-intranet.conf
|
Name |
Description |
|---|---|
| Portal Base URL | The base URL must be specified here. The first part consists of the minutes. Please note that "https" is specified here. The second part consists of specifying the hostname that you have defined in the NGINX configuration file. Note that a trailing slash (/) is included. It is essential that you enter the correct information so that your portal can be accessed in the browser. |