On this page you will find detailed information on the implementation of the guidelines and success criteria in alphabetical order.
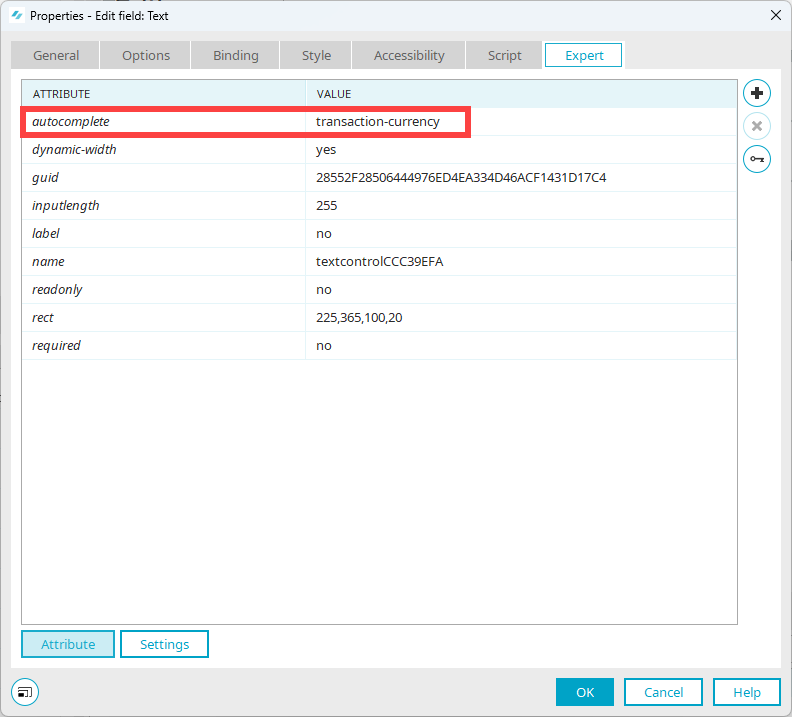
Autocomplete
For the "Input field" element, you have the option of entering the "autocomplete" attribute and giving it a (suitable) value.
Attributes can only be input in Expert Mode.
More information

Establish relationship of form element and label with "aria-labelledby"
In Intrexx, you have the option of manually establishing the relationship of a (form) element and label With the ARIA attribute "aria-labelledby".
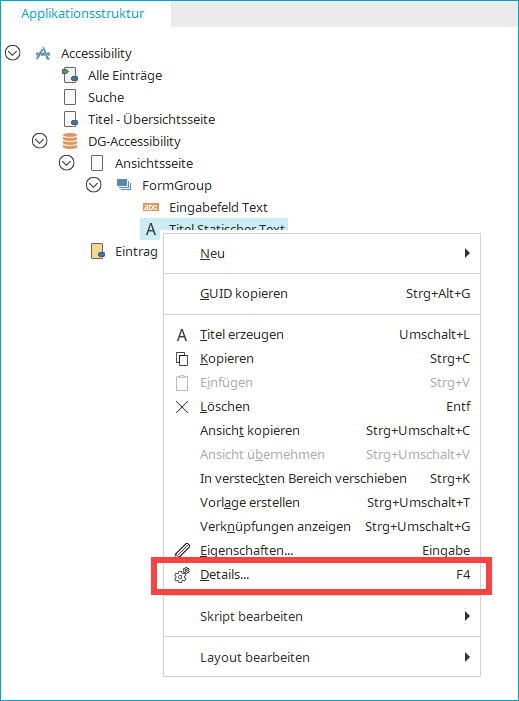
Step 1: Determine the name of the label you want to reference.
Step 2: Enter the name in the element from which you want to reference.
Note that you can determine the name in Expert mode only.
Step 1: Determine the name of the label
Step-by-step guide
To determine the name of an element, proceed as follows:
-
Select the page where the element is located.
-
Right-click on it.
-
Select the "Show elements" option.
-
Select the element whose name you want to determine.
-
Right-click on it.
-
Select the "Details" option.
The "Details" dialog box is displayed.
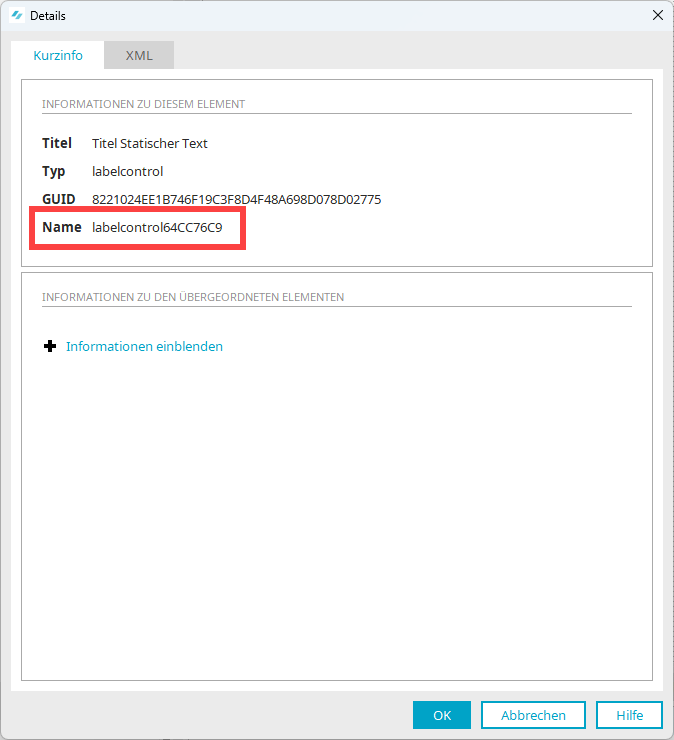
The name is displayed.
Step 2: Enter names
Step-by-step guide
To establish the reference to another element, proceed as follows:
-
Open the element where you want to save the reference to another element.
-
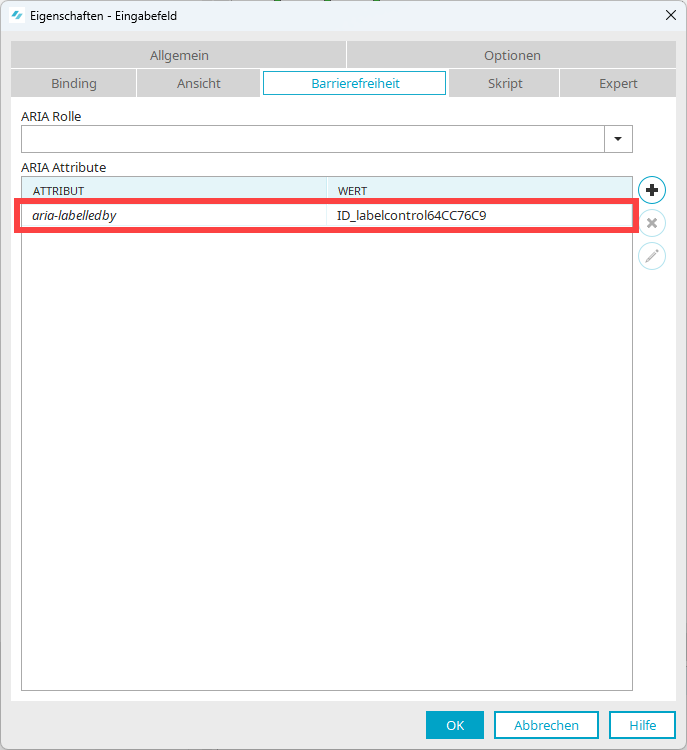
Switch to the "Accessibility" tab.
-
Click on the
 icon.
icon.A new empty record for ARIA attributes is displayed.
-
Select the value "aria-labelledby" in the "ARIA Attributes" drop-down list.
-
Enter the following in the "Value" field: "ID_" + name of the element you wish to reference.
In the example shown, the value is as follows: "ID_labelcontrol64CC76C9"
Relationship between form element and label
One important aspect of accessibility is the correct relationship between input or form fields and their labels.
(The terms caption, label, title, or field title are often used synonymously)
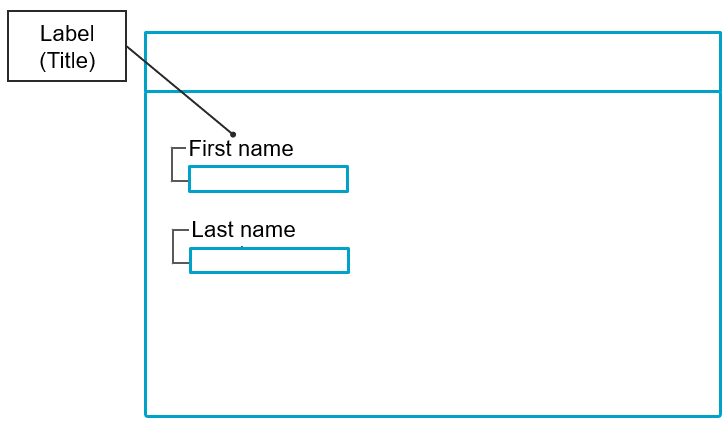
While for sighted people, the relationship between field and label is obvious by their spatial proximity, for blind people this relationship must be programmatically producible. The source code must be interpreted in the browser for assistive technologies to convey this relationship to the blind person.
(This aspect of accessibility is less related to the visual structure of a page and more to the relationship between elements)
![]() 9.1.3.1h Labeling of form elements can be determined programmatically
9.1.3.1h Labeling of form elements can be determined programmatically
Elements with labels
If you use elements in Intrexx that can be associated with a label, you always have the option of creating the label at the same time as the element. The label is then automatically associated with the element and the relationship can be determined by assistive technologies.
Example: Input field
When creating an input field, activate the "Generate field title" checkbox. The field title is used as a label for the input field.
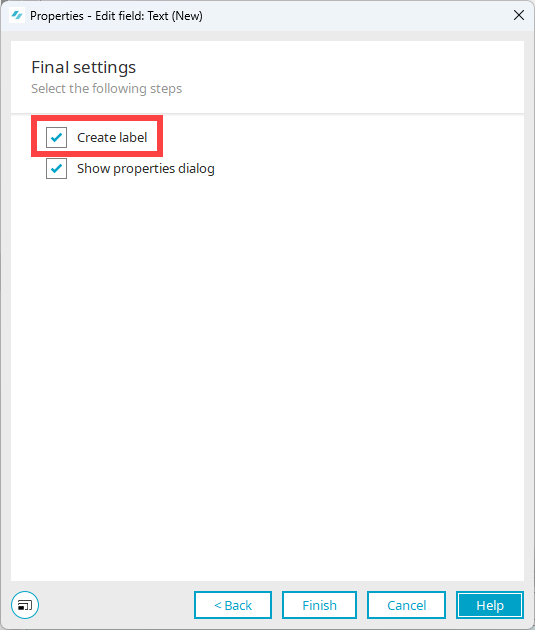
Example: Form Wizard
When you use the Form Wizard, the title (label) and its data field are displayed.
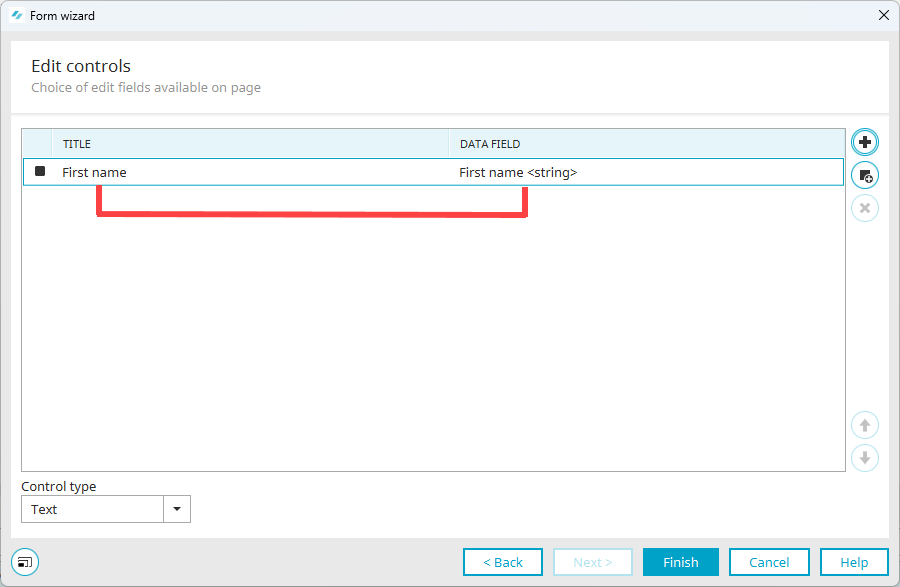
After the Form Wizard is closed, the relationship between the label and field is signaled by visual proximity in the application designer.

Orientation
Screen orientation is controlled through the use of responsive pages.
All information about creating responsive pages in Intrexx can be found in section Responsiveness
![]() 9.1.1.1d Alternatives for CAPTCHAs
9.1.1.1d Alternatives for CAPTCHAs
Currently, the CAPTCHA element in Intrexx does not have an accessible design. If you need to use CAPTCHAS, you should implement a text-based alternative.
Structure data tables correctly
![]() 9.1.3.1e Correct structure of data tables
9.1.3.1e Correct structure of data tables
![]() 9.1.3.1f Assignment of table cells
9.1.3.1f Assignment of table cells
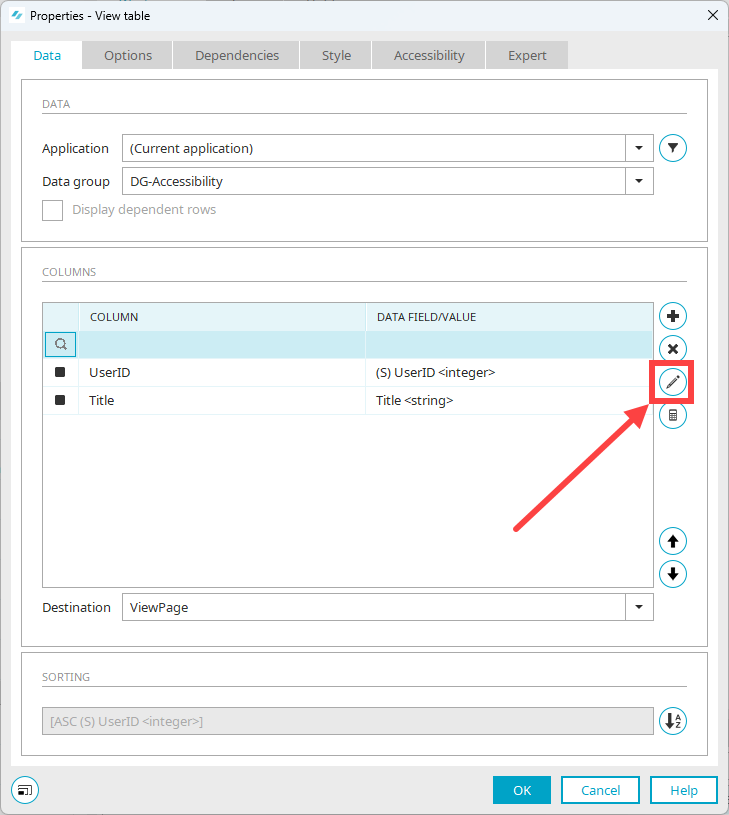
If you use the "View Table" element in Intrexx, the table is automatically marked with the appropriate HTML tags.
Be sure to give the view table a title and check the "Show title" checkbox.
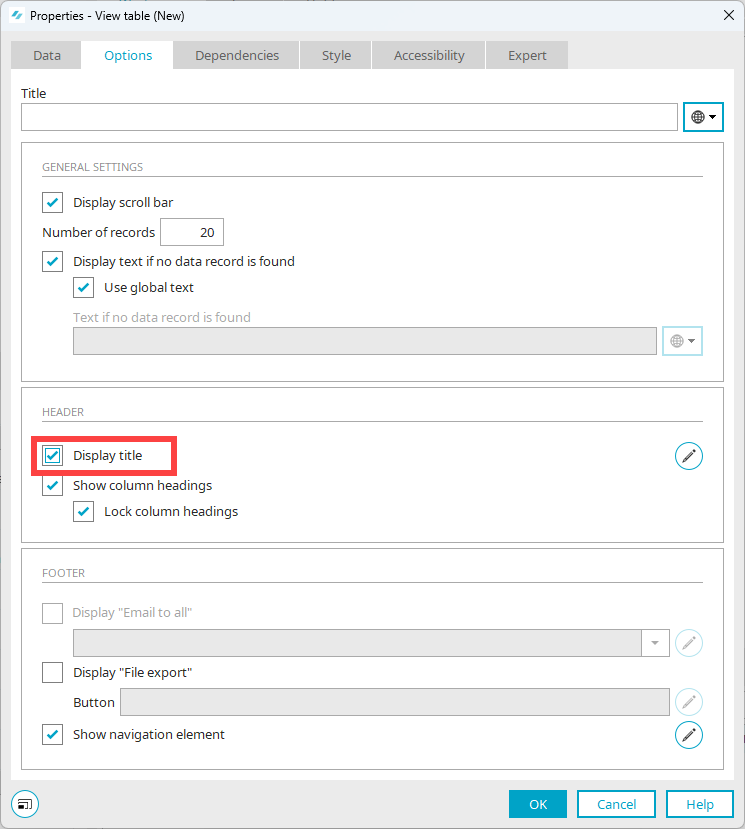
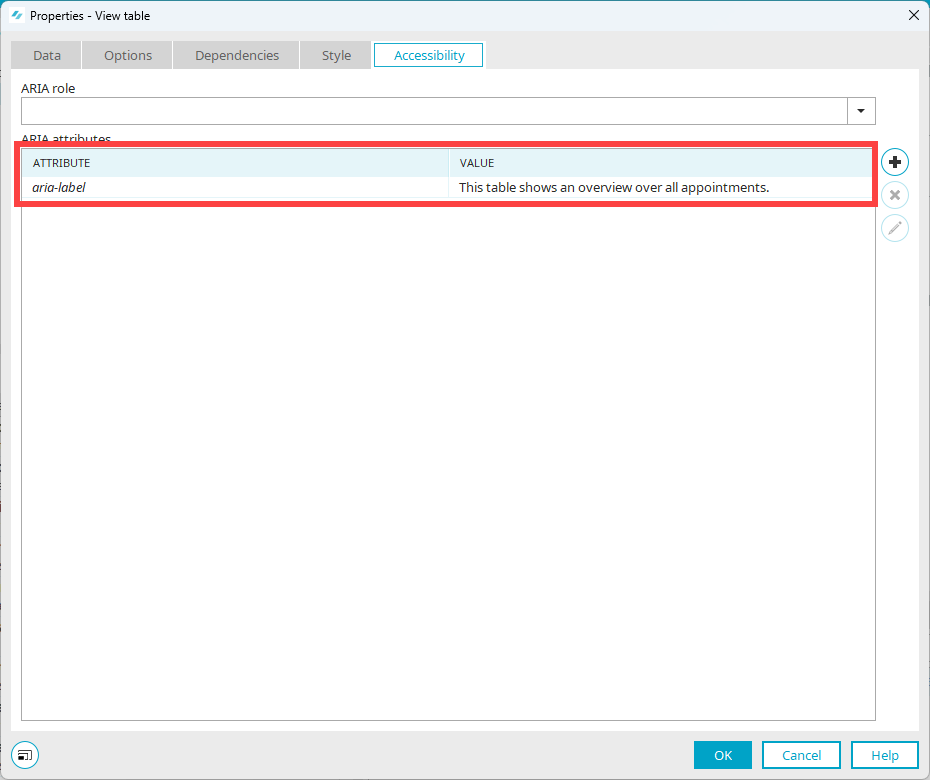
ARIA attribute "aria-label" for view tables
For view tables, it is helpful to use the ARIA attribute "aria-label". You can enter a text that describes the table content.
Duration of the portal session
You can set the duration of the portal session In Portal properties. You can access this via "'Portal' main menu > Portal properties > Start parameters".

Before the session duration expires, the portal user is notified by a dialog and can extend the session further.
More information
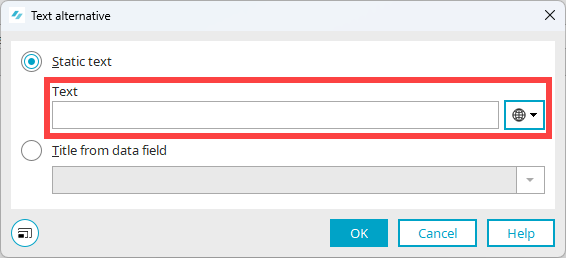
Element – Image
![]() 9.1.1.1b Alternative texts for graphics and objects
9.1.1.1b Alternative texts for graphics and objects
Images or graphics are among the most common use cases for saving text alternatives.
Step-by-step guide
To enter a text alternative for the "Image" element, proceed as follows:
-
On the General tab, click the
 icon (Edit Text Alternative).
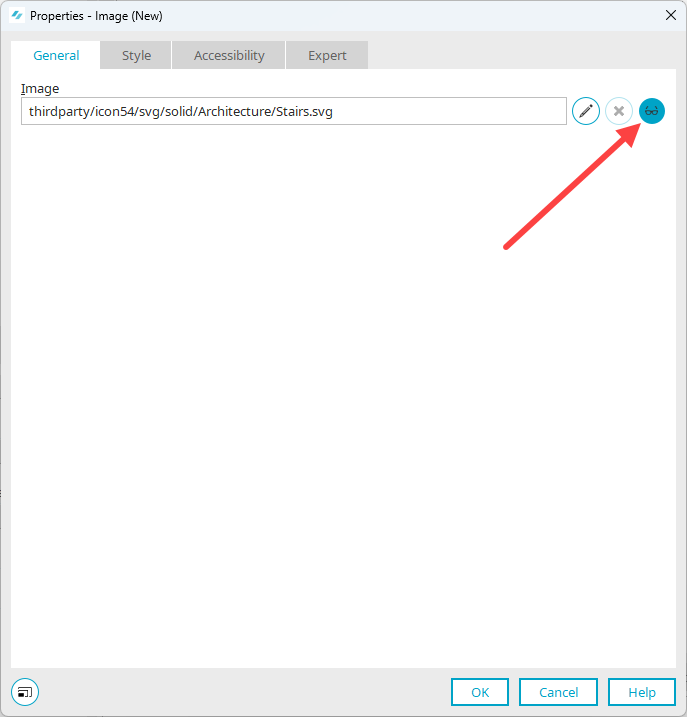
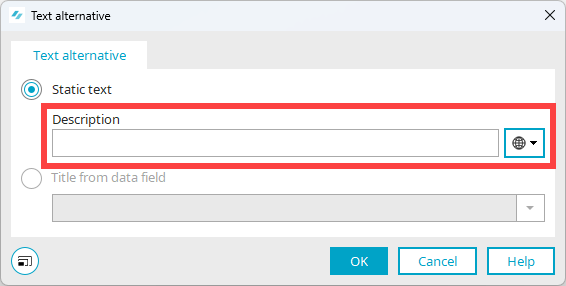
The "Text alternative" dialog box is displayed.
-
Enter the text alternative in the "Description" field.
Assign a field title (label) to an element retroactively
You can choose not to create an associated field title when creating an element.
To assign a field title (label) retroactively, proceed as follows:
-
Create a static text field.
-
Select the static text field and the element to which you want to assign it as a field title.
-
Right-click on it.
-
Click on the "Assign Label" menu item.
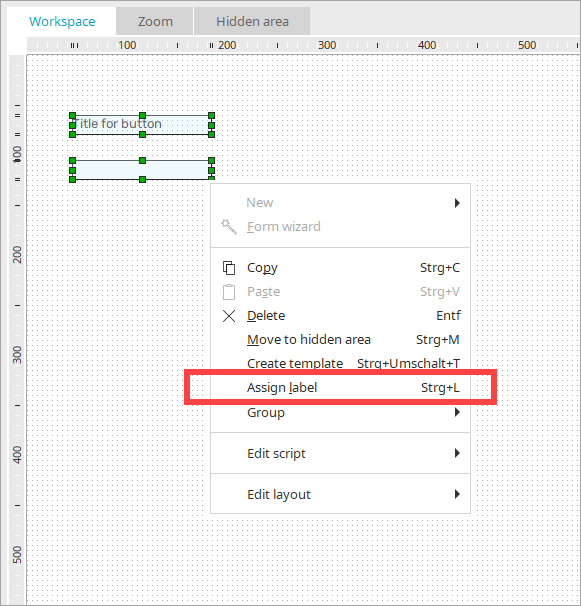
The context menu is no longer displayed.
You have assigned a field title (label) to an element.
Elements that are not "input elements" are not given a label by Intrexx. For these elements, it would be appropriate to use an "aria-labelledby attribute". See section Overview of detailed implementation A–Z. )
You cannot enter a text alternative for the "Diagram" element. However, you can specify the graphic in more detail with ARIA roles and attributes.
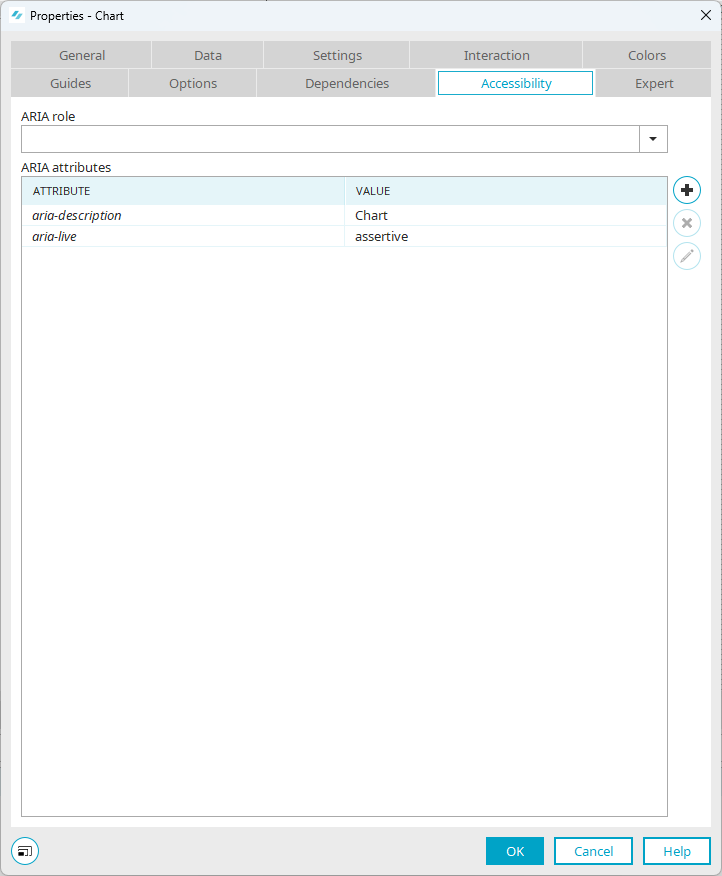
If you do not manually enter an ARIA role, the "graphics-datachart" role is stored in the published application page by default.
More information
If you use elements in Intrexx that can be associated with a label, you always have the option of creating the label at the same time as the element. The label is then automatically associated with the element and the relationship can be determined by assistive technologies.
Example: Input field
When creating an input field, activate the "Generate field title" checkbox. The field title is used as a label for the input field.
Example: Form Wizard
When you use the Form Wizard, the title (label) and its data field are displayed.
After the Form Wizard is closed, the relationship between the label and field is signaled by visual proximity in the application designer.
![]() 9.1.1.1a Alternative texts for operating elements
9.1.1.1a Alternative texts for operating elements
Choose between three types of button when creating a button:
-
Button
-
Text
-
Image
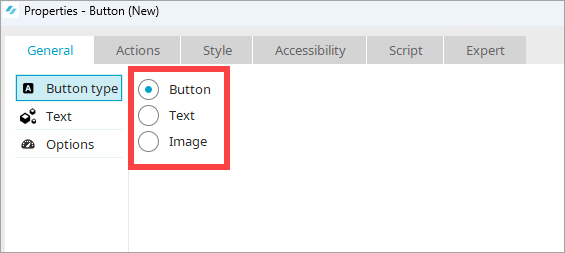
In terms of accessibility, the "Image" option is especially important.

|
For example, if you use an image with the text "New", a screen reader cannot identify this text. |

|
A picture or an icon with a symbol cannot be interpreted by a screen reader either. |
In both cases it is necessary to save a text alternative. This text alternative should not only repeat the text on the button or indicate the meaning of the symbol. Rather, the action that is initiated by pressing the button should be described.
For example, the text alternative could be "Create new customer" or "Create new project".
Step-by-step guide
To add a text alternative to an "Image" button, proceed as follows:
-
Select the "Image" button.
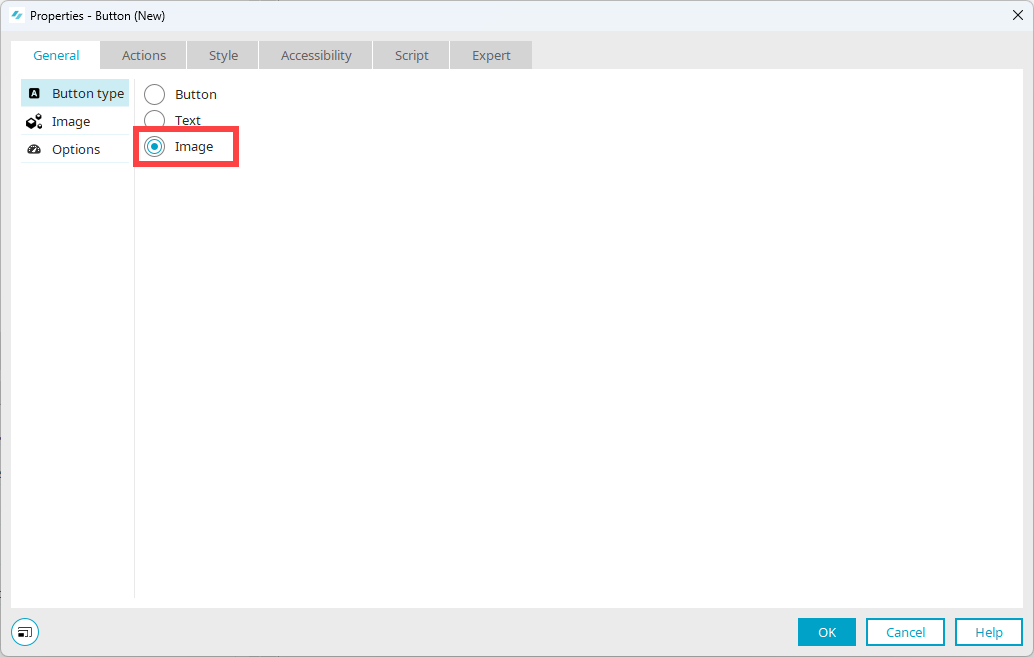
-
In the Navigation pane, switch to the "Image" item.
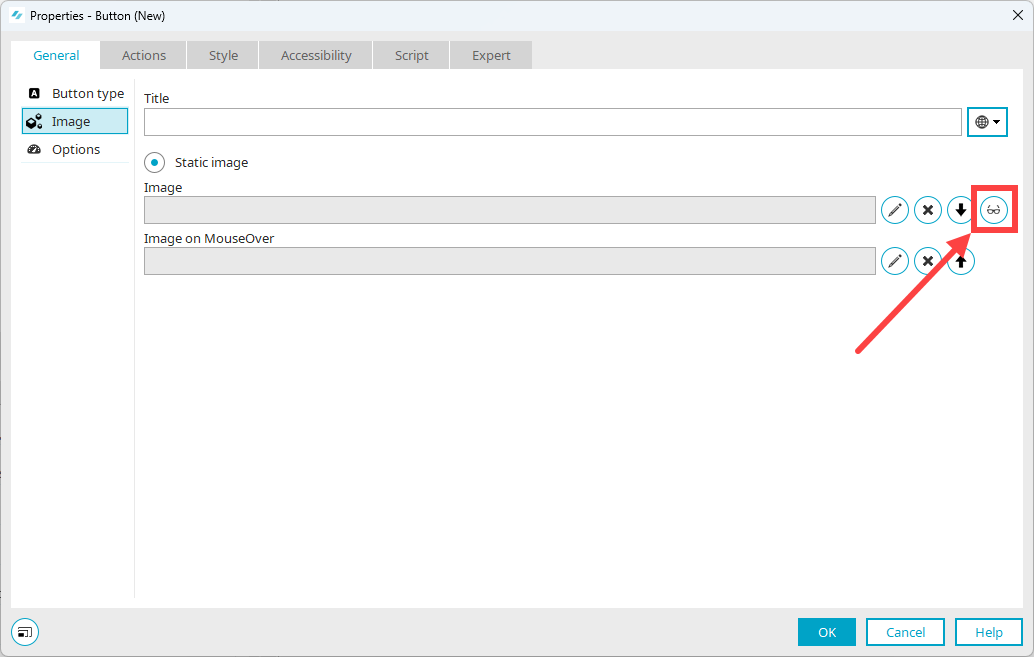
Note that the text stored in the "Title" field is not used as a text alternative. It is not interpreted by screen readers.
-
Click on the
icon (Edit text alternative).The "Text alternative" dialog box is displayed.
-
Enter the alternative text in the "Description" field.
More information
Give field groupings (fieldset) a heading
You can group elements and provide the grouping with a heading.
Step-by-step guide
-
Add the "Grouping" element to the page.
-
Switch to the "Options" tab.
-
Select the value "Fieldset (e.g. group of input elements)" in the "HTML element" selection box.
-
Activate the "Show title" checkbox.
-
Switch to the "View" tab.
-
Click on the pencil icon. (Do not click on the down arrow icon)
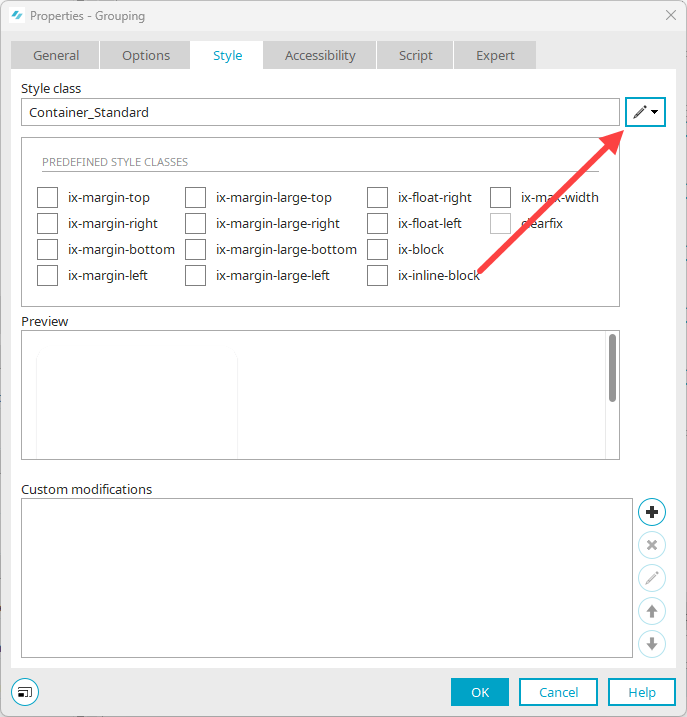
The "Select Style Class" dialog box is displayed.
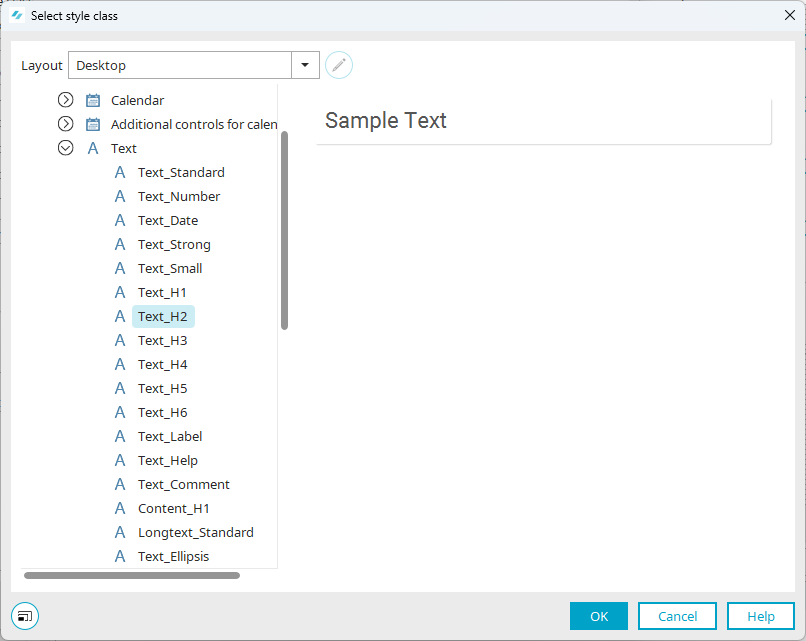
-
Select the style class you want to use.
-
Click on "OK".
Set focus – Input fields and buttons
You can give focus to an element when opening the page via the "Edit"/Set focus main menu or the context menu input fields and "Button" or "Text" type buttons. One or more elements of the page can be set with "Set focus". When the page is opened, the focus is set to the first visible element.
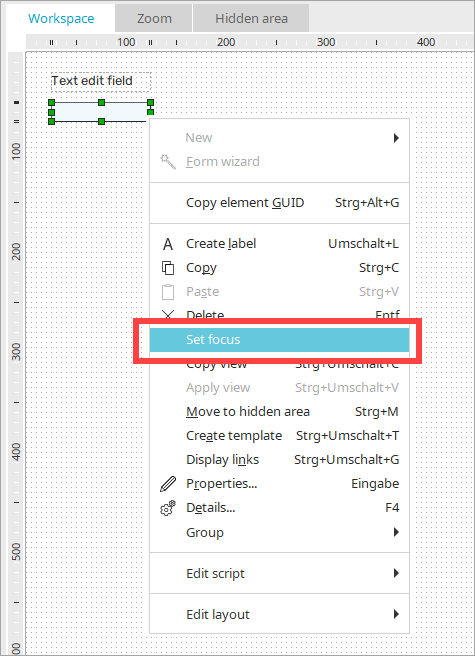
You can define that a page should not set a focus in the Page properties. If "Set focus" has not been defined for any elements on a page, the initially focused element on the page is determined automatically. The following exceptions apply:
-
The focus is not set on fields in free layout tables
-
The focus is not set within portlets
-
If a page has a tab index, the focus is set on the element with "Tab index 1"
Focus
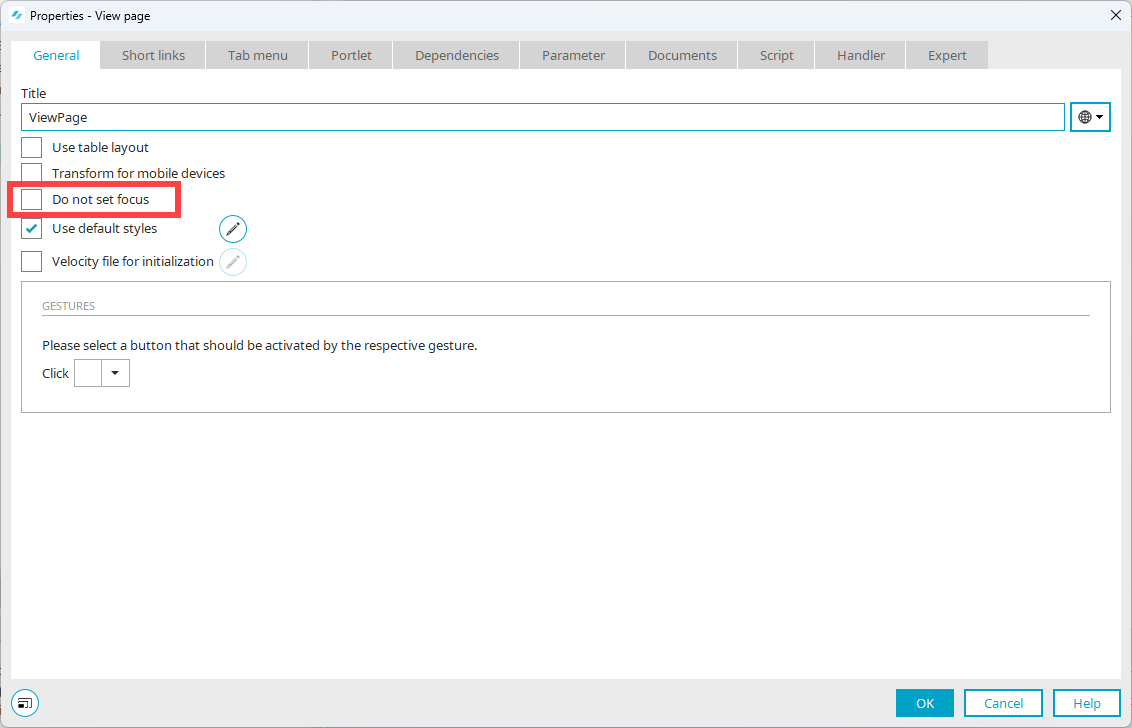
You should not set focus for pages that open in the main window. This means you should activate the "Do not set focus" checkbox.
For pages that open as a tooltip (popup dialog), you should set a focus. This means you should not activate the "Do not set focus" checkbox. Note that you should generally refrain from using tooltips if possible.
Free-layout table as list
Please note that the use of the "Freely designed table" element adds a certain degree of complexity to a page and therefore does not fully comply with the principle of designing an application as simply as possible (see Make your applications as simple as possible).
You have the option of displaying the "Free-layout table" element as an unordered list on a page.
Step-by-step guide
-
Switch to the "Options" tab.
-
Select the value "Unordered List (e.g. list of view elements)" in the selection field "Display records".

Note that the included page does not have a heading with an H1 tag, as the page containing the free-layout table would then contain two H1 tags.
The embedded page should be responsive.
More information
Foreign language text
Words or passages in other languages must be marked with a lang attribute. So lang="en" must be inserted for an English language text. This is the only way to ensure that the passage is read with English pronunciation to a blind user. Other foreign language words should also be distinguished.
You can use any HTML structural elements in the static text field element.
HTML structural elements for citations
![]() 9.1.3.1c HTML structural elements for quotations
9.1.3.1c HTML structural elements for quotations
Example - Static text field
You can use any HTML structural elements in the static text field element.
To use these elements, select the "HTML" option on the "Options" tab.
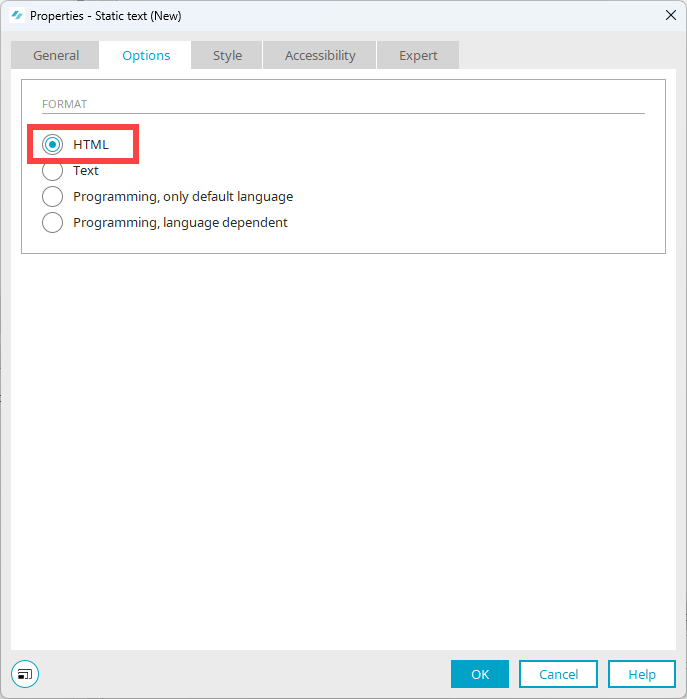
Select (Title).
In the "Title" input field, you can now enter text with the HTML structural elements you want to use.
The text is displayed accordingly on the portal or application page.

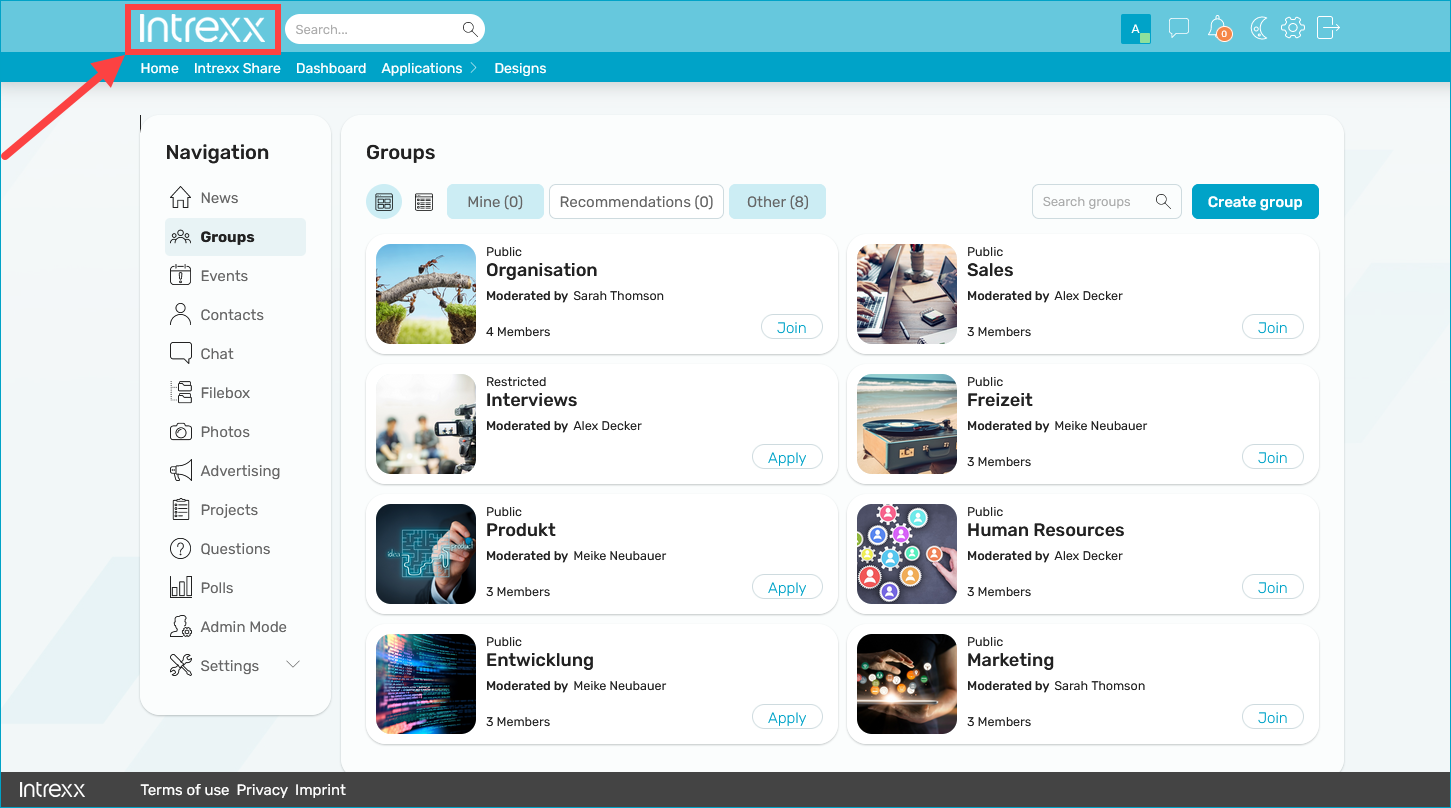
A company logo is often found in the upper left corner of a portal. It is usually linked to the portal home page. It is helpful to include this information in the link text. For example, a link text could read: "Intrexx - To homepage".
Step-by-step guide
To manually adjust the link text for the home logo, do the following:
-
Start the "Design" module.
-
Open the layout.
-
In the tree view, select the element "Link"
 ("Surrounding Container > Container Header > Grid Header > Column Homelink / Actioncontrols")
In Element Settings, the "Link title" field
 is displayed.
 -
Adjust the link text.
You can use icons in tables. The magnifying glass icon and the pencil icon are often used.
Text alternatives for the icons used in tables must also be saved.
Step-by-step guide
To add a text alternative to an icon in a table, proceed as follows:
-
Select the icon to add a text alternative.
-
Click on the
 icon.
icon.The Image button dialog box appears.
-
Select the "Image" item in the Navigation pane.
-
Click on the
icon (Edit text alternative).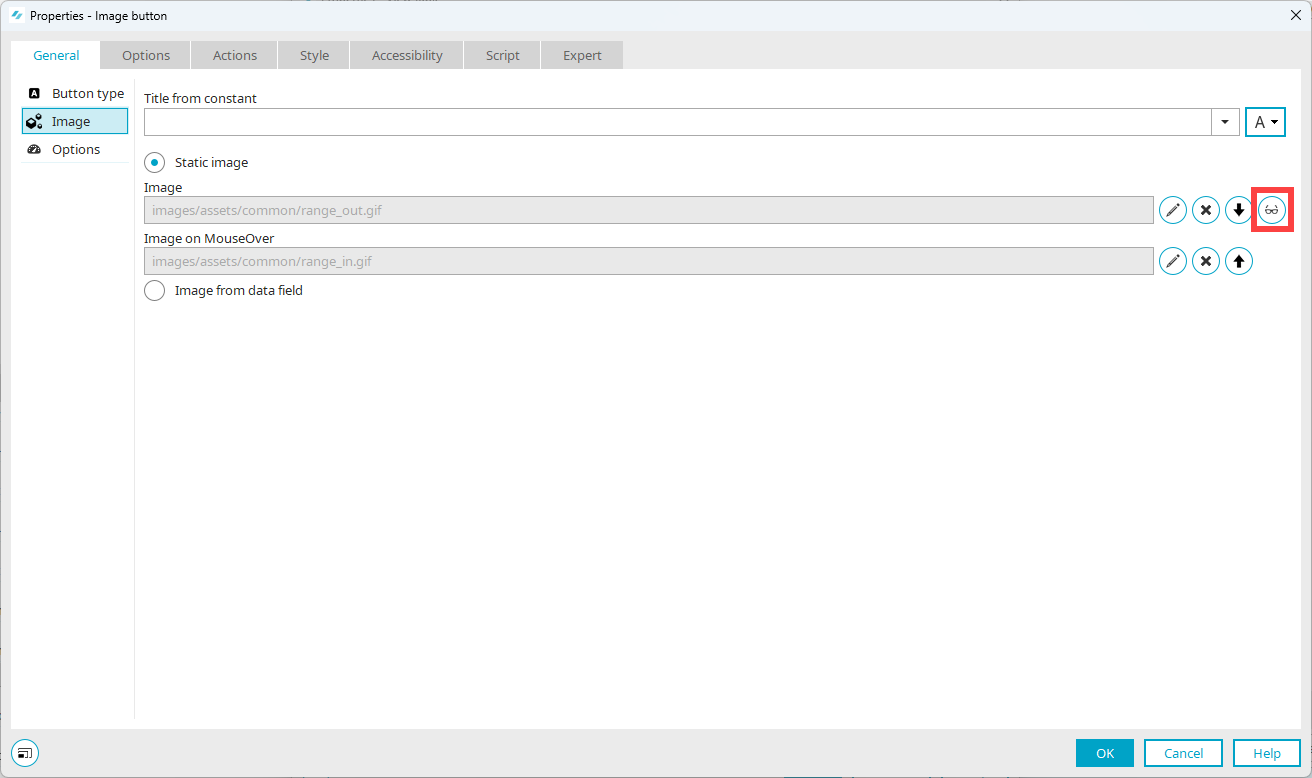
The "Text alternative" dialog box is displayed.

-
Enter the alternative text in the "Description" field.
More information
Certain areas of portal and application pages can be marked with landmarks or roles. The main landmarks include banners, navigation, main and content info.
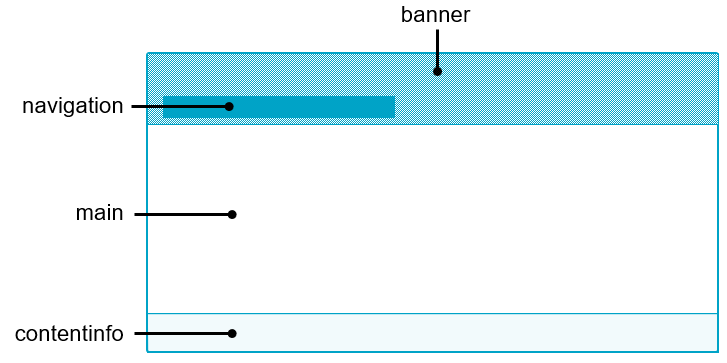
When using the Accessible Layout, key landmarks are preconfigured.
You can also assign landmarks manually.
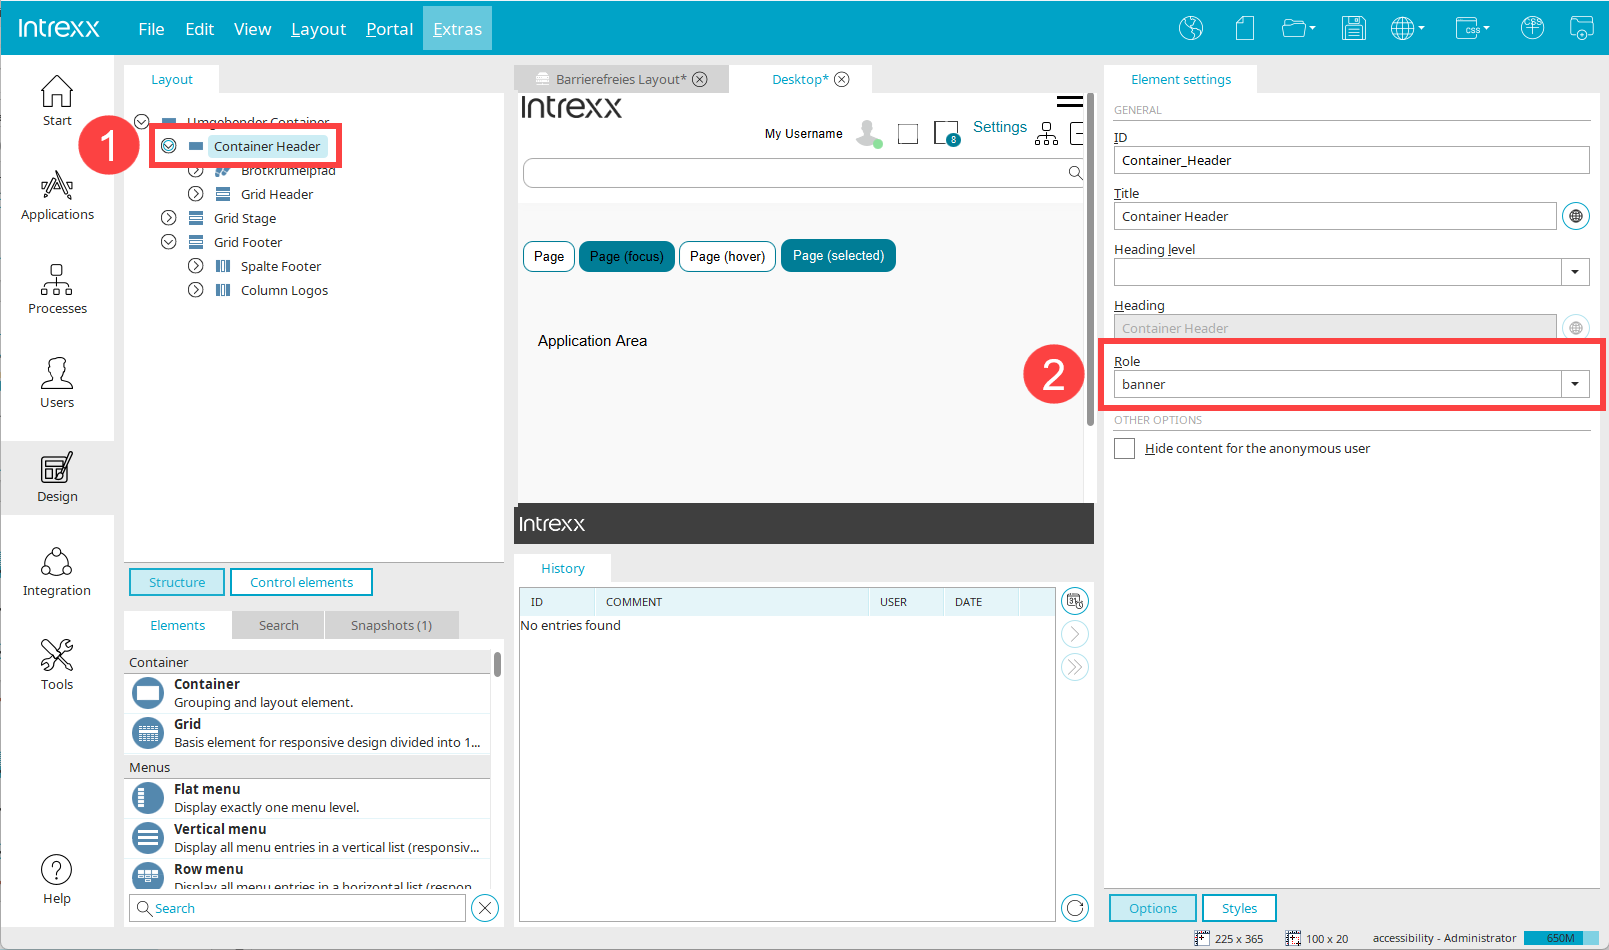
Step-by-step guide
-
Start the "Design" module.
-
Open the layout you want to use.
-
In the tree view, select the element being assigned a landmark (
). -
Select this landmark in the "Role" selection field in the element settings (
).
More information
Listbox
Create lists with the "list field" element.
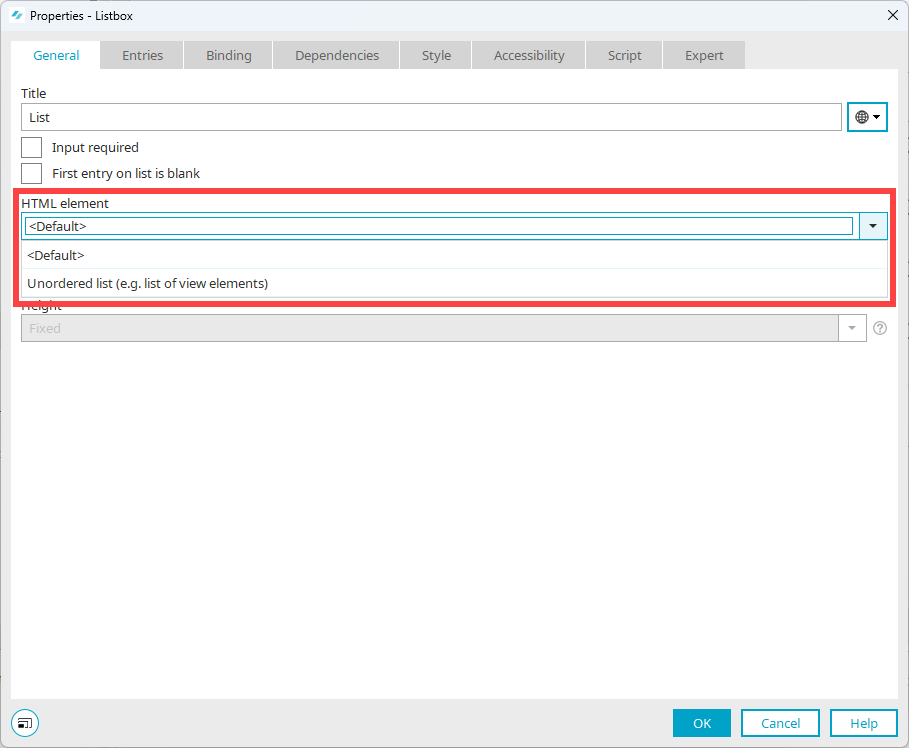
We recommend using the "Standard" selection.
"Unordered List (e.g. list of view elements)" selection
If you select the value "Unordered List (e.g. list of view elements)" for the HTML element, then you must select the ARIA attribute "aria-labelledby" in the "Accessibility" tab and save the ID of its text field. That ensures the title is read out loud correctly.
Detailed information on the use of "aria-labelledby" can be found in section ARIA attribute "labelledby".
More information
Decorative images (layout graphics)
![]() 9.1.1.1c Empty alt attributes for layout graphics
9.1.1.1c Empty alt attributes for layout graphics
Decorative images or decorative pictures do not have an informative function and should not contain text alternatives. Decorative images can include spacers, color areas, patterns or purely decorative graphics, for example. An empty alt attribute should be used to mark decorative images.
Any decorative images used by Intrexx are marked with an empty alt attribute. If you want to use other decorative images, be careful not to use text alternatives.
Adapt page title for the portal home page
By default, the title of the portal start page is "Intrexx".
It is helpful to give the portal start page a descriptive title that is suitable for screen readers, such as "Start page - Intrexx".
Step-by-step guide
To adapt the page title for the portal home page, do the following:
-
Start the "Edit menu structure..." dialog box (Main menu item "Portal" > Edit menu structure...").
-
In the portal menu, first create a new empty folder.
-
Assign a descriptive title to the folder, e.g. "Homepage".
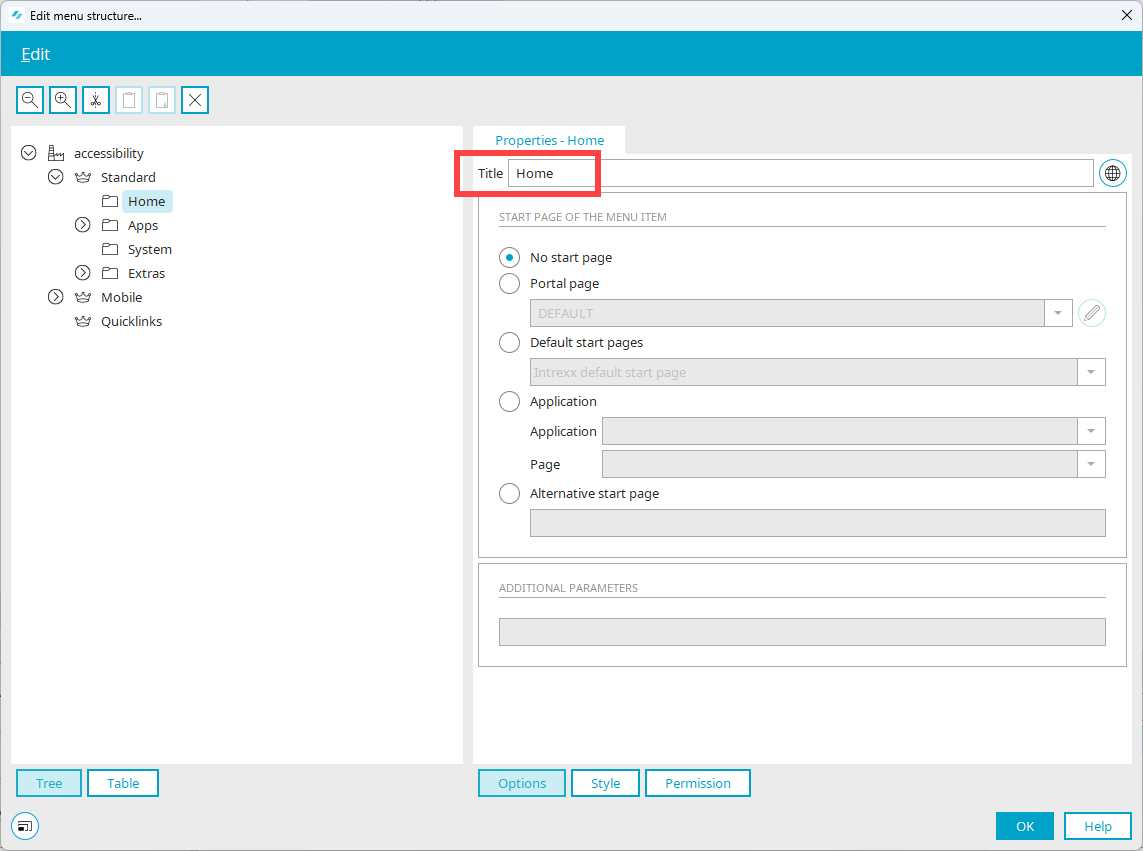
The text entered in the "Title" input field is displayed in the browser tab.
-
Grant the user "Anonymous" rights to this page.
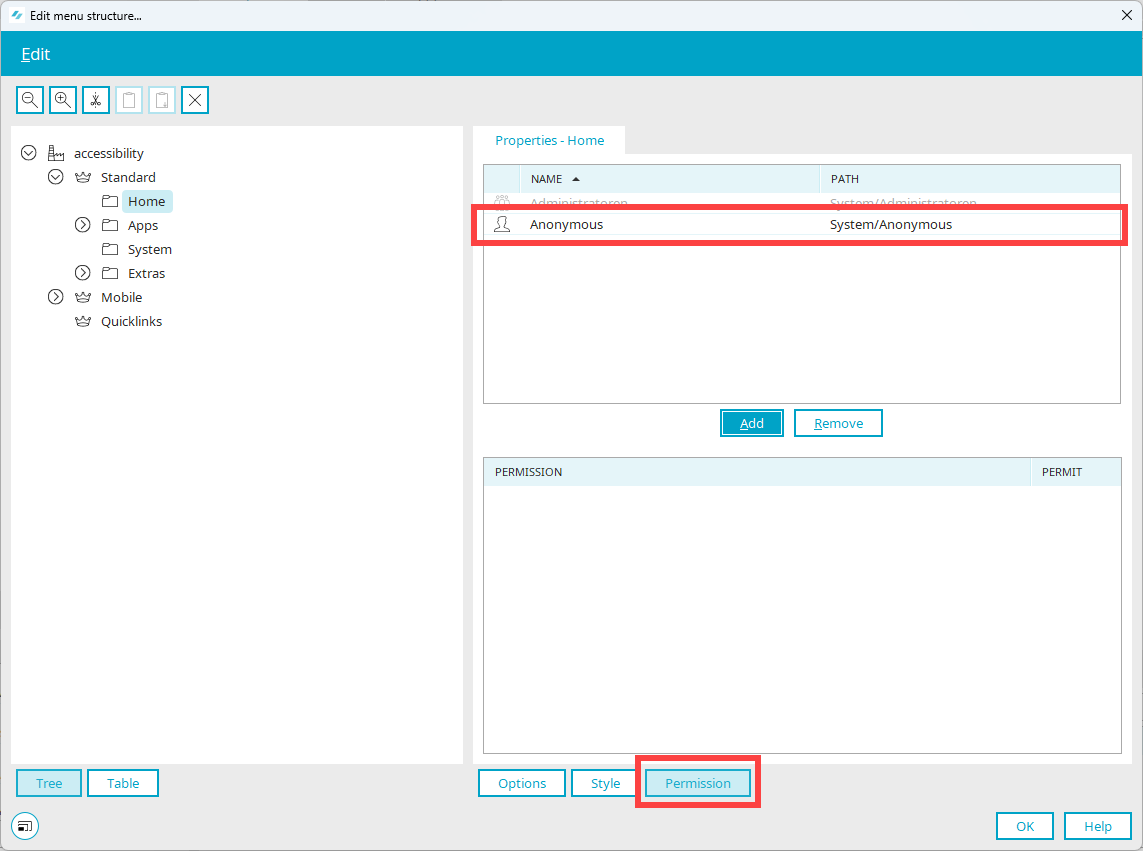
Since the folder does not contain any applications, the page works like a "Home" button in portal mode. The appearance of the page can be further adapted, for example, through a portal page.
More information
Set tab index
You can specify the tab order with the tab index, i.e. the order in which users move from one input element to the next on a page using the TAB key.
Step-by-step guide
-
Select the page you want to use to set the tab index.
-
Right-click on it.
-
Select the "Set tab index..." entry in the context menu menu.

The "Set tab index..." dialog box is displayed.

-
Move the elements which you want to use to set the tab index from the "Elements without tab index" section to the "Elements with tab index" section.
-
Sort the elements in the "Elements with tab index" section.
-
Click on "OK".
Create headings with "Static Text" element
You can place headings on a page by placing the static text element on the page.
Step-by-step guide
-
Switch to the "View" tab.
-
Enter one of the values from "Text_H1" to "Text_H6" in the "Style class" input field.
These correspond to the html tags <h1> to <h6>.
Or
-
Click on the pencil icon. (Do not click on the down arrow icon)
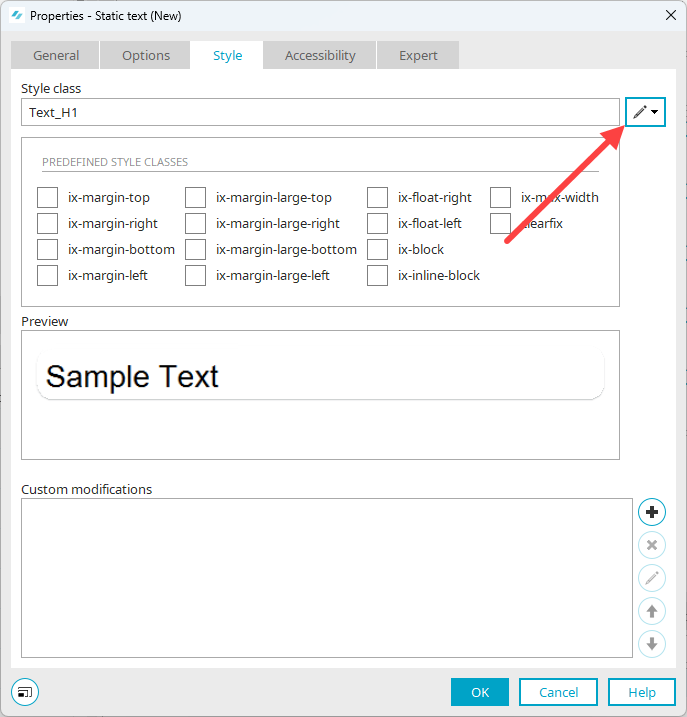
The "Select Style Class" dialog box is displayed.
-
Select the style class you want to use.
-
Click on "OK".
![]() 9.1.3.1g No structure markup for layout tables
9.1.3.1g No structure markup for layout tables
When you manually create a new blank page, the "Use table layout" checkbox is selected by default.
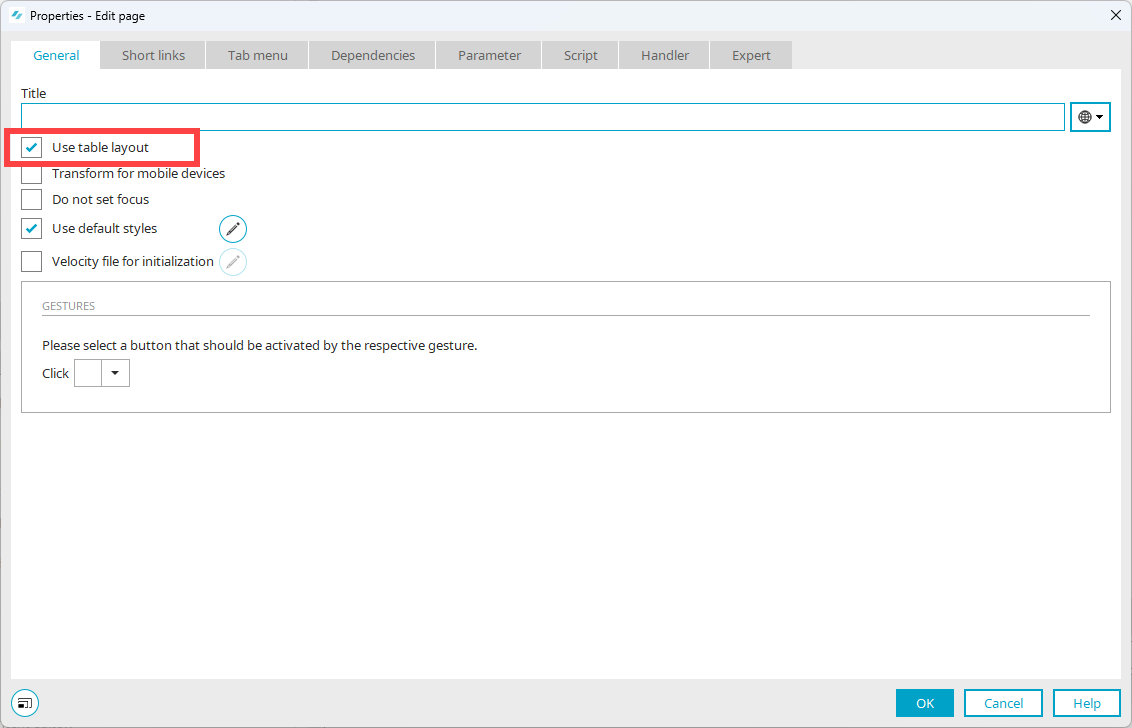
You should deactivate the checkbox so that the table layout is not used. Then you can insert the "Grid" element to make the page responsive.
When you create a new page using the Page Wizard, the "Use table layout" checkbox is not selected by default. Instead, a responsive grid layout is automatically used.
