(A)
![]() 1.3.1 Information and relationships
1.3.1 Information and relationships
Information, structure, and relationships conveyed through presentation can be programmatically determined or are available in text.
Description
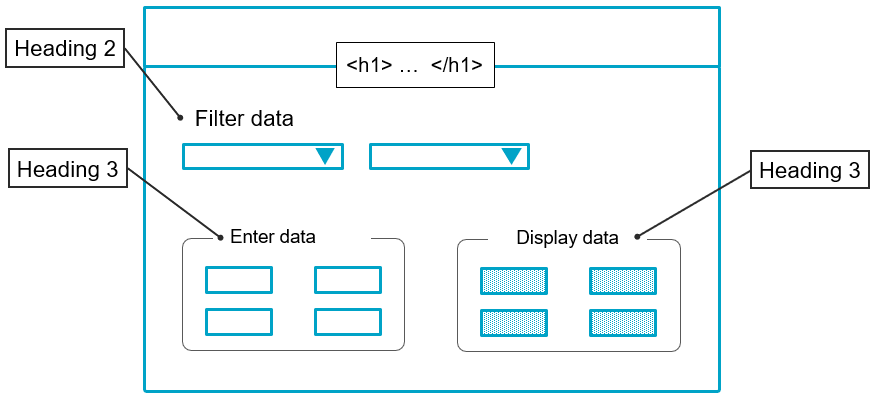
The design and structure of a portal or application page helps people to understand its functionality and operation. Organizing portal and application pages by headings helps users get a feel for how the page is organized.
Grouping content or fields is also helpful.
Just as with images and other non-textual elements, the page structure is not visually perceptible to blind people. Therefore, it is necessary for a page to have markers that make this structure accessible to screen readers. This ensures that the site is accessible to people with visual impairments.
By adding headings and structuring the page, people with visual impairments can get a good overview of the content and understand the relationships between the content based on the section headings.
It is crucial that headings are actually tagged with the correct HTML tags, as screen readers analyze source code to determine the structure of a page and then make it accessible.
If the underlying code for a page's headings is correct, screen reader users can also benefit from the headings. Screen reader users can navigate a page based on headings, listen to a list of all headings, and jump to any heading they want, to begin reading at that point. Screen readers can use headers to skip repetitive blocks of content such as headers, menus, and sidebars.
Relevance and applicability
General implementation
-
Order the headings from <h1> to <h6. Use headings hierarchically, with <h1> representing the main idea on the page and subsections organized with <h2> level headings. These subsections can in turn be structured with <h3> level headings etc.
-
Do not select heading layers according to their appearance. Select the appropriate heading rank in the hierarchy.
-
Do not use a bold font instead of a heading. One of the most common accessibility mistakes is using bold text instead of proper heading formatting. Although, visually the text looks like a heading, the underlying HTML code is not properly tagged, so screen reader users cannot benefit from it.
Detailed implementation - Headings
![]() 9.1.3.1a HTML structural elements for headings
9.1.3.1a HTML structural elements for headings

Create headings with "Static Text" element
You can place headings on a page by placing the static text element on the page.
Step-by-step guide
-
Switch to the "View" tab.
-
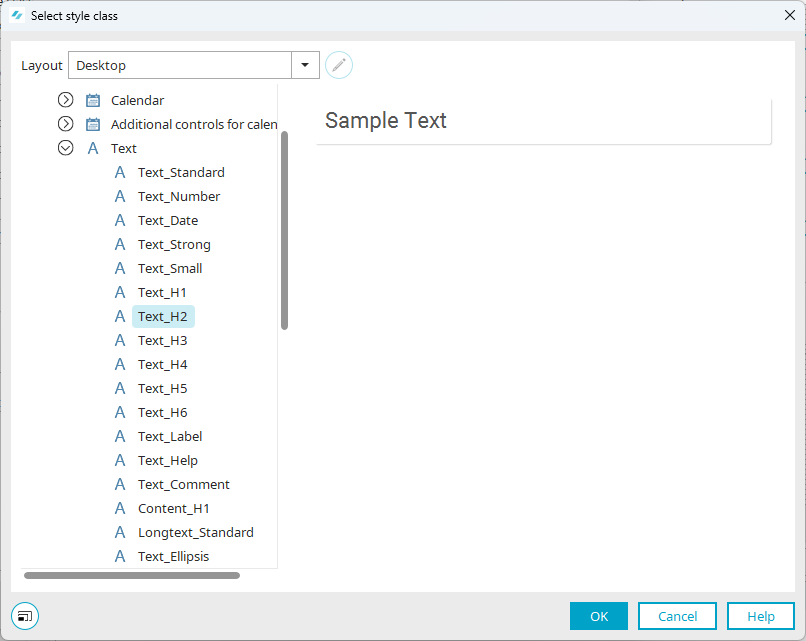
Enter one of the values from "Text_H1" to "Text_H6" in the "Style class" input field.
These correspond to the html tags <h1> to <h6>.
Or
-
Click on the pencil icon. (Do not click on the down arrow icon)
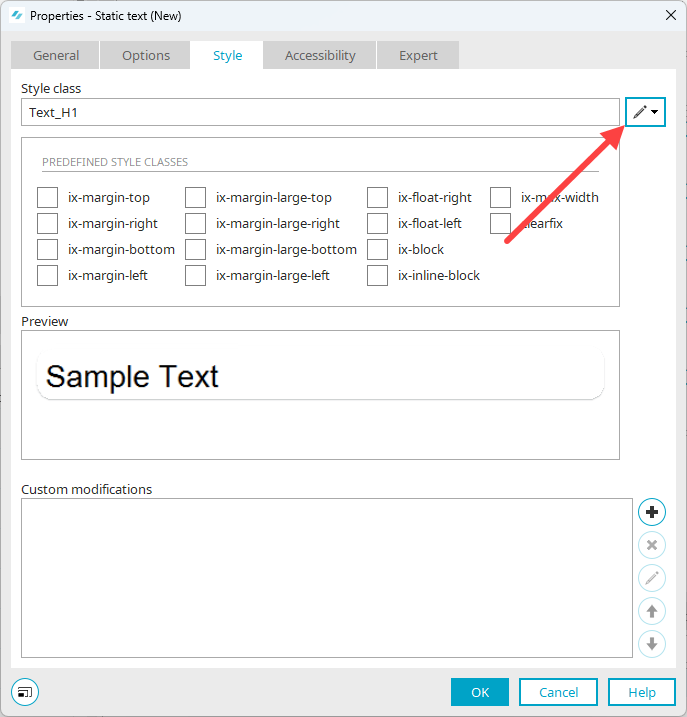
The "Select Style Class" dialog box is displayed.
-
Select the style class you want to use.
-
Click on "OK".
Give field groupings (fieldset) a heading
You can group elements and provide the grouping with a heading.
Step-by-step guide
-
Add the "Grouping" element to the page.
-
Switch to the "Options" tab.
-
Select the value "Fieldset (e.g. group of input elements)" in the "HTML element" selection box.
-
Activate the "Show title" checkbox.
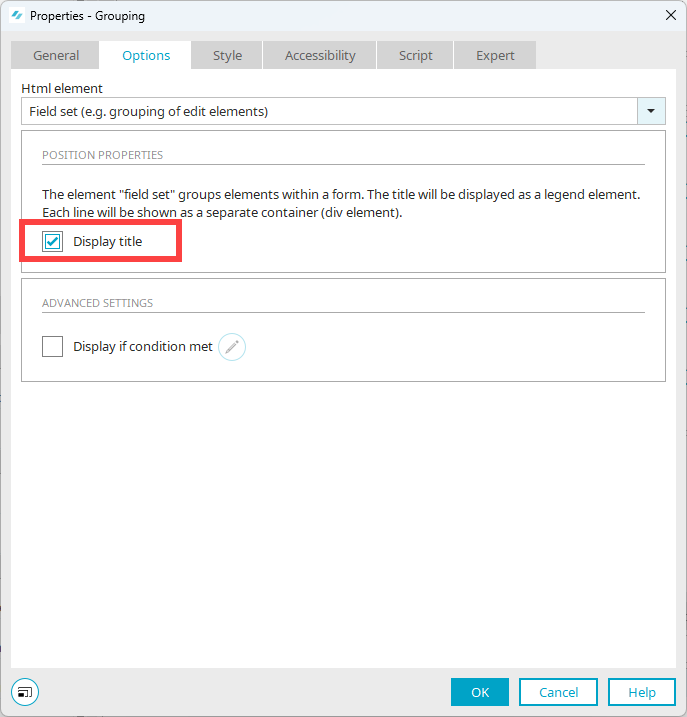
-
Switch to the "View" tab.
-
Click on the pencil icon. (Do not click on the down arrow icon)
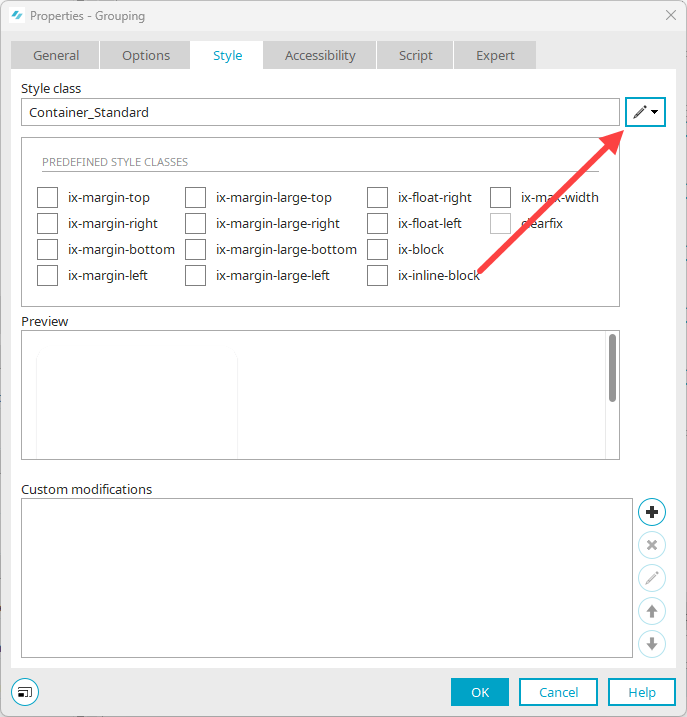
The "Select Style Class" dialog box is displayed.
-
Select the style class you want to use.
-
Click on "OK".
Detailed implementation - Lists
![]() 9.1.3.1b HTML structural elements for lists
9.1.3.1b HTML structural elements for lists
Lists are another element that helps to structure pages. For screen readers to handle lists properly, proper markup with HTML structural elements (ul, ol, and so on) is crucial.
Below, you will find some notes on elements used to create lists in Intrexx.
Listbox
Create lists with the "list field" element.
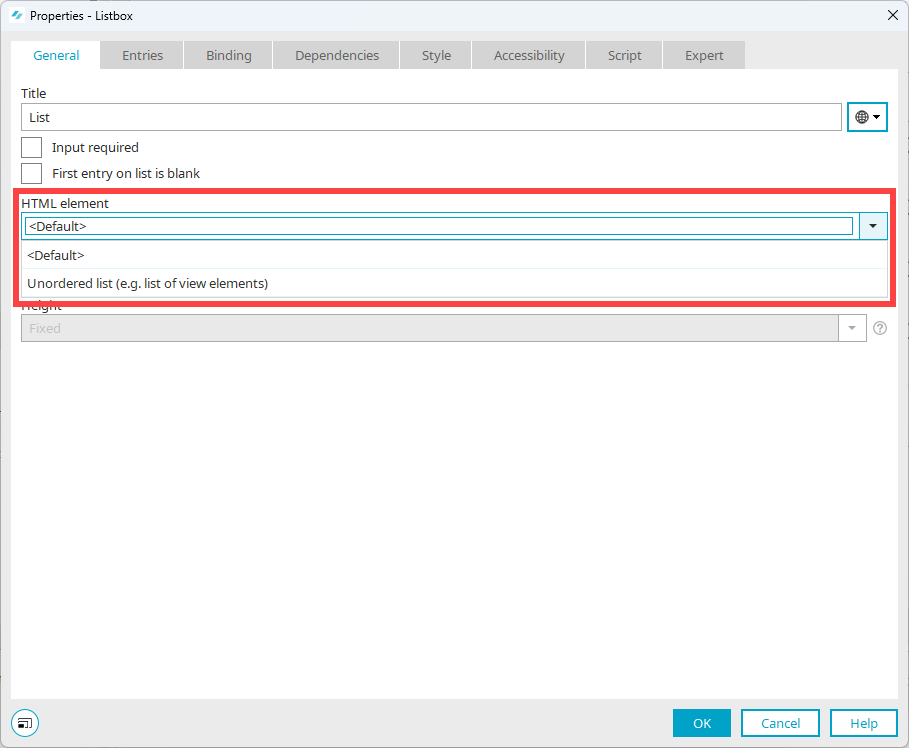
We recommend using the "Standard" selection.
"Unordered List (e.g. list of view elements)" selection
If you select the value "Unordered List (e.g. list of view elements)" for the HTML element, then you must select the ARIA attribute "aria-labelledby" in the "Accessibility" tab and save the ID of its text field. That ensures the title is read out loud correctly.
Detailed information on the use of "aria-labelledby" can be found in section ARIA attribute "labelledby".
More information
Free-layout table as list
Please note that the use of the "Freely designed table" element adds a certain degree of complexity to a page and therefore does not fully comply with the principle of designing an application as simply as possible (see Make your applications as simple as possible).
You have the option of displaying the "Free-layout table" element as an unordered list on a page.
Step-by-step guide
-
Switch to the "Options" tab.
-
Select the value "Unordered List (e.g. list of view elements)" in the selection field "Display records".

Note that the included page does not have a heading with an H1 tag, as the page containing the free-layout table would then contain two H1 tags.
The embedded page should be responsive.
More information
Detailed implementation - Tables
Tables are another way to structure a page. Again, proper markup with HTML structural elements is critical for assistive technologies to handle tables properly.
Structure data tables correctly
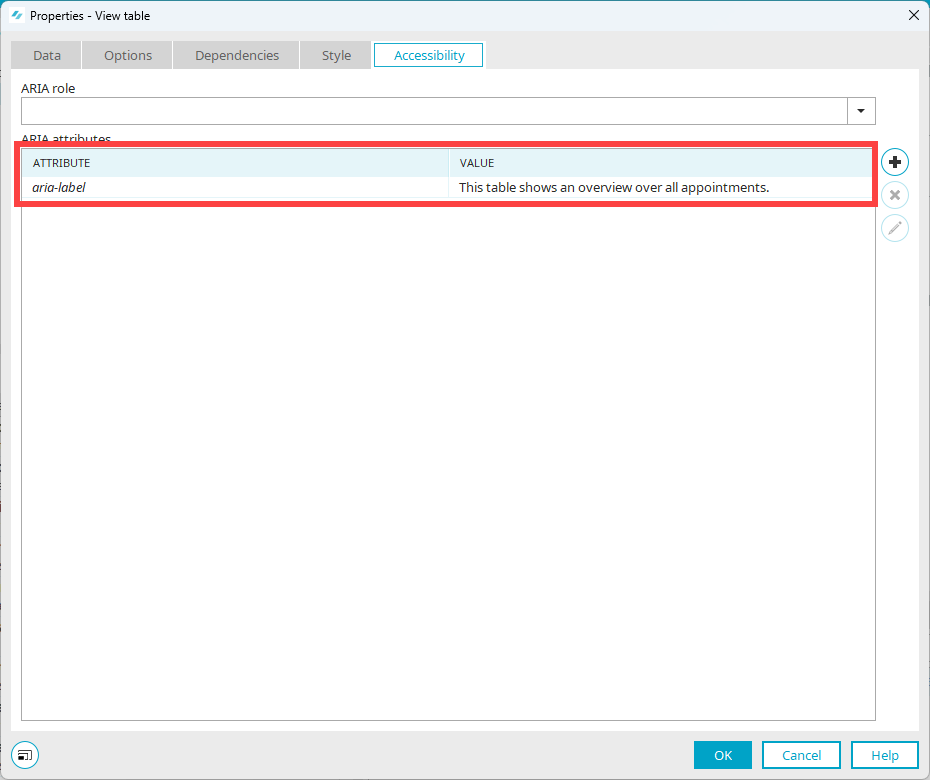
![]() 9.1.3.1e Correct structure of data tables
9.1.3.1e Correct structure of data tables
![]() 9.1.3.1f Assignment of table cells
9.1.3.1f Assignment of table cells
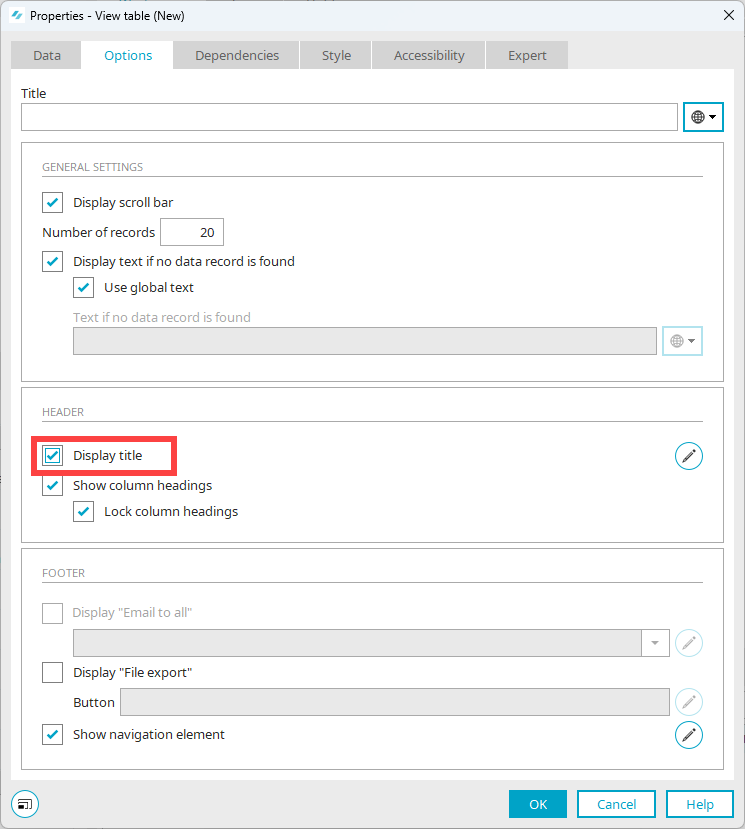
If you use the "View Table" element in Intrexx, the table is automatically marked with the appropriate HTML tags.
Be sure to give the view table a title and check the "Show title" checkbox.
ARIA attribute "aria-label" for view tables
For view tables, it is helpful to use the ARIA attribute "aria-label". You can enter a text that describes the table content.
Detailed implementation - Other
To ensure the accessibility of texts, they must be marked with suitable structural elements (HTML tags). This includes, for example, labeling paragraphs as paragraph <p>. Do not use empty paragraphs to create spacing, such as by using the Return key several times. Blank paragraphs are also output by screen readers.
In Intrexx, the correct formatting is automatically applied. This applies both in the Intrexx Portal Manager, if you use the " static text field" element, for example, but also in the actual portal, if you use the "Content Editor" or "text field" elements (with TinyMCE activated), for example.
HTML structural elements for citations
![]() 9.1.3.1c HTML structural elements for quotations
9.1.3.1c HTML structural elements for quotations
Example - Static text field
You can use any HTML structural elements in the static text field element.
To use these elements, select the "HTML" option on the "Options" tab.
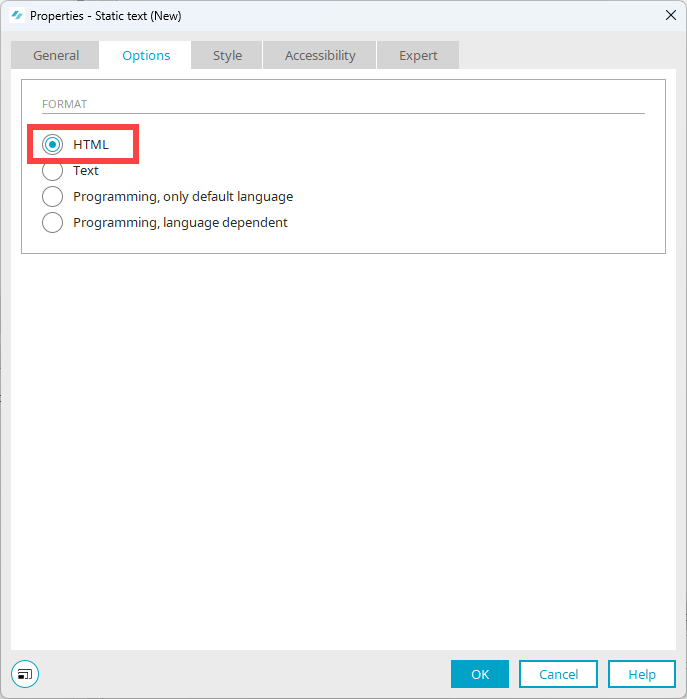
Select (Title).
In the "Title" input field, you can now enter text with the HTML structural elements you want to use.
The text is displayed accordingly on the portal or application page.

Foreign language text
Words or passages in other languages must be marked with a lang attribute. So lang="en" must be inserted for an English language text. This is the only way to ensure that the passage is read with English pronunciation to a blind user. Other foreign language words should also be distinguished.
You can use any HTML structural elements in the static text field element.
Relationship between form element and label
One important aspect of accessibility is the correct relationship between input or form fields and their labels.
(The terms caption, label, title, or field title are often used synonymously)
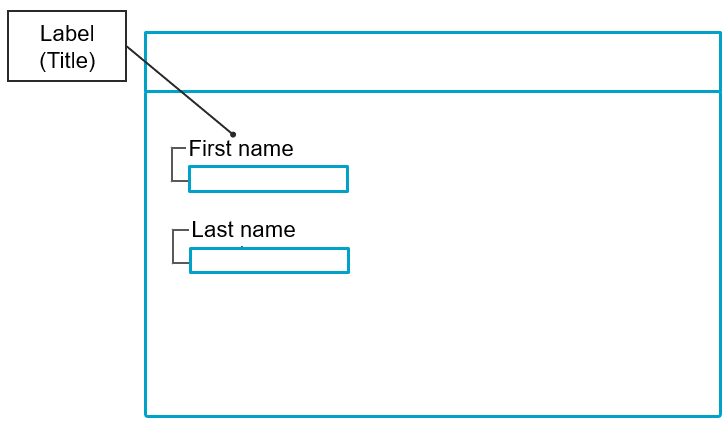
While for sighted people, the relationship between field and label is obvious by their spatial proximity, for blind people this relationship must be programmatically producible. The source code must be interpreted in the browser for assistive technologies to convey this relationship to the blind person.
(This aspect of accessibility is less related to the visual structure of a page and more to the relationship between elements)
![]() 9.1.3.1h Labeling of form elements can be determined programmatically
9.1.3.1h Labeling of form elements can be determined programmatically
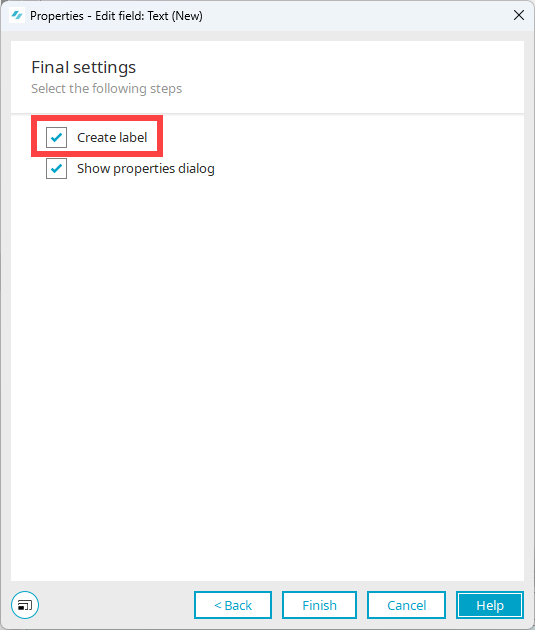
Elements with labels
If you use elements in Intrexx that can be associated with a label, you always have the option of creating the label at the same time as the element. The label is then automatically associated with the element and the relationship can be determined by assistive technologies.
Example: Input field
When creating an input field, activate the "Generate field title" checkbox. The field title is used as a label for the input field.
Example: Form Wizard
When you use the Form Wizard, the title (label) and its data field are displayed.
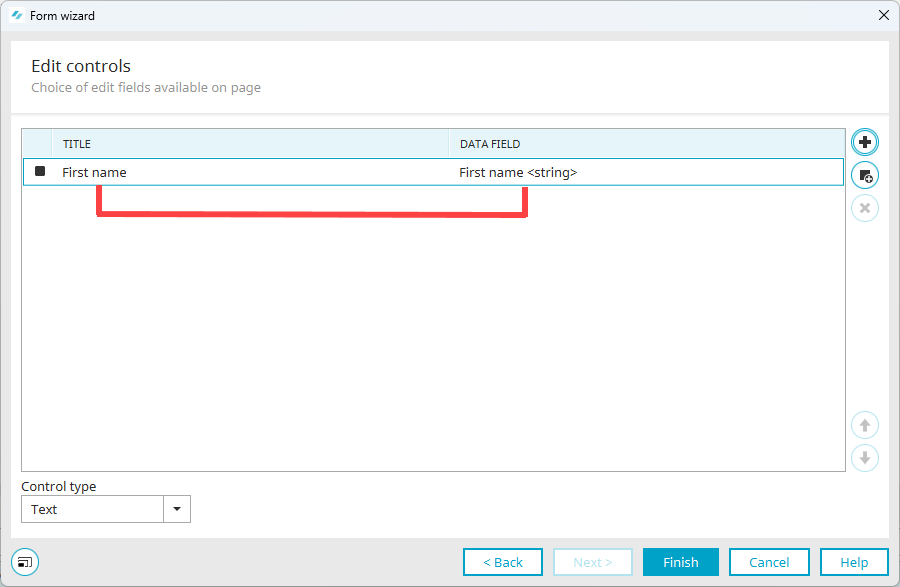
After the Form Wizard is closed, the relationship between the label and field is signaled by visual proximity in the application designer.

Assign a field title (label) to an element retroactively
You can choose not to create an associated field title when creating an element.
To assign a field title (label) retroactively, proceed as follows:
-
Create a static text field.
-
Select the static text field and the element to which you want to assign it as a field title.
-
Right-click on it.
-
Click on the "Assign Label" menu item.
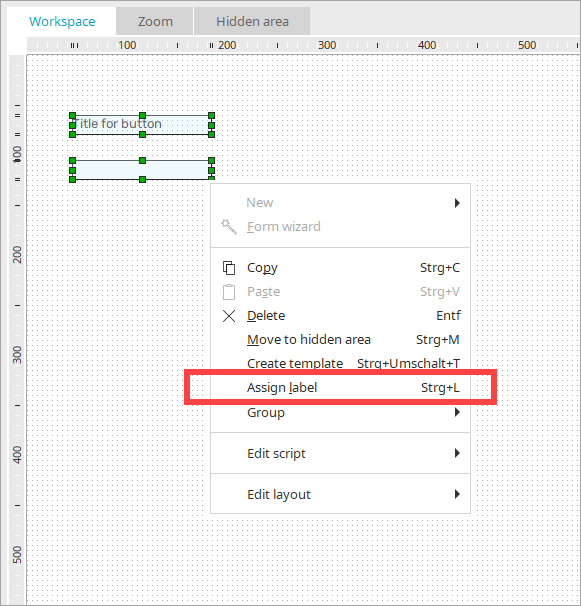
The context menu is no longer displayed.
You have assigned a field title (label) to an element.
Elements that are not "input elements" are not given a label by Intrexx. For these elements, it would be appropriate to use an "aria-labelledby attribute". See section Establish relationship of form element and label with "aria-labelledby". )
Establish relationship of form element and label with "aria-labelledby"
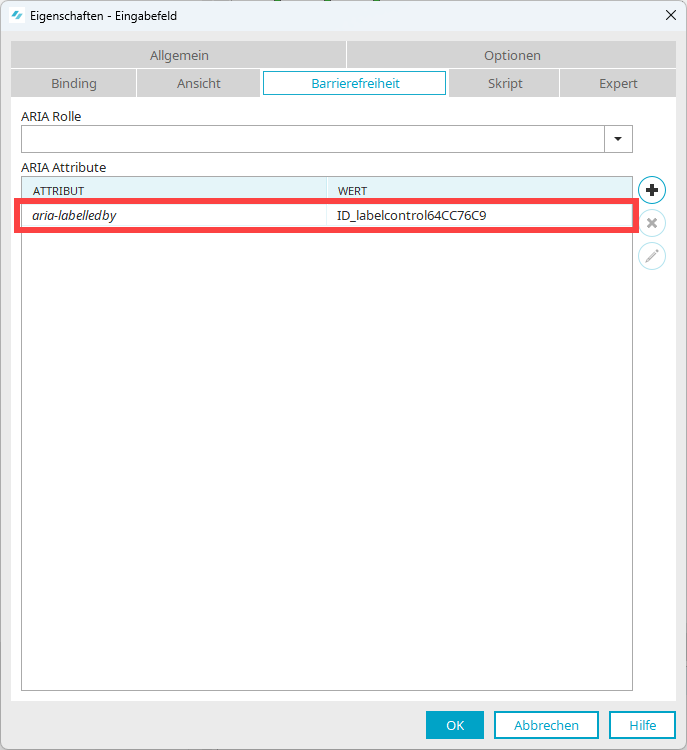
In Intrexx, you have the option of manually establishing the relationship of a (form) element and label With the ARIA attribute "aria-labelledby".
Step 1: Determine the name of the label you want to reference.
Step 2: Enter the name in the element from which you want to reference.
Note that you can determine the name in Expert mode only.
Step 1: Determine the name of the label
Step-by-step guide
To determine the name of an element, proceed as follows:
-
Select the page where the element is located.
-
Right-click on it.
-
Select the "Show elements" option.
-
Select the element whose name you want to determine.
-
Right-click on it.
-
Select the "Details" option.
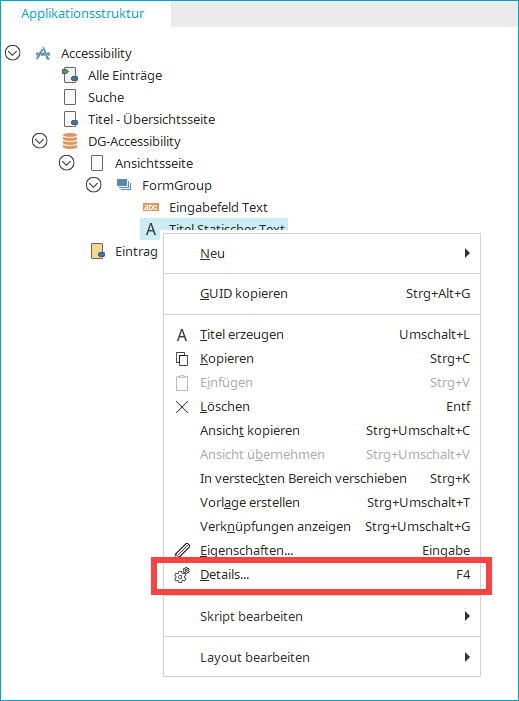
The "Details" dialog box is displayed.
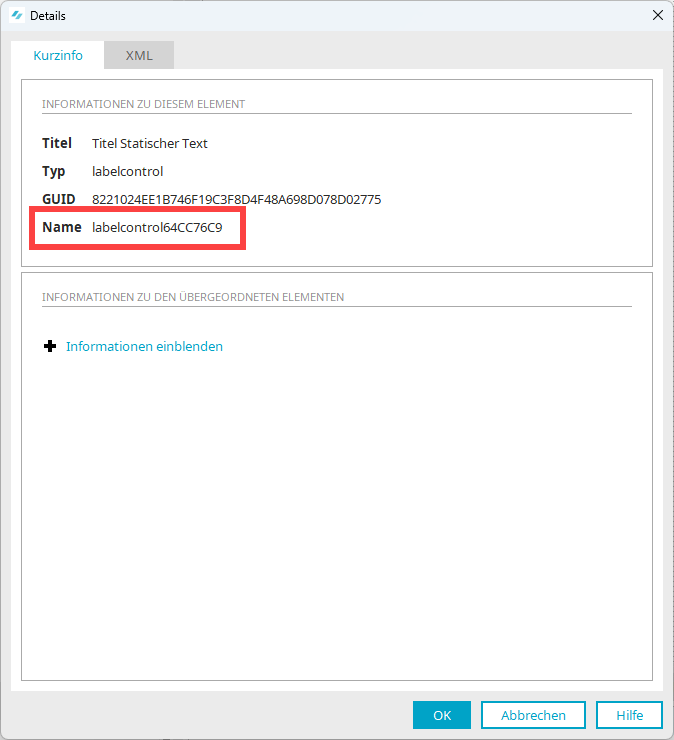
The name is displayed.
Step 2: Enter names
Step-by-step guide
To establish the reference to another element, proceed as follows:
-
Open the element where you want to save the reference to another element.
-
Switch to the "Accessibility" tab.
-
Click on the
 icon.
icon.A new empty record for ARIA attributes is displayed.
-
Select the value "aria-labelledby" in the "ARIA Attributes" drop-down list.
-
Enter the following in the "Value" field: "ID_" + name of the element you wish to reference.
In the example shown, the value is as follows: "ID_labelcontrol64CC76C9"