Drop-down list / Listbox
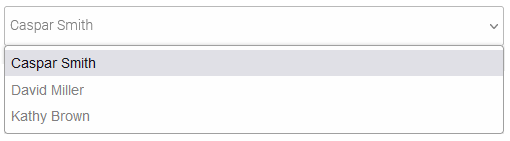
Drop-down lists will be used to display entries in list format.

The listbox offers the same functions as the drop-down list but shows the entries as an open list in the browser.
Both edit controls are basic controls and can be found there under "Lists". The selection can be saved using a corresponding button provided that a data box is associated with the element.
The entries in comboboxes and Listboxes can come from different data sources.
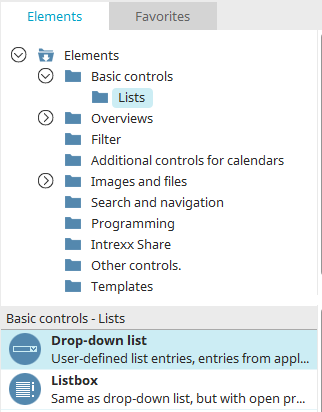
The elements can be found in the "Applications" module in the "Elements" area. A new element can be created by dragging and dropping it from here and positioning it in the workspace.
More information on creating elements can be found here.
The properties dialog of a selection list or listbox opens automatically when a new element is created. The properties dialog of an existing element can be opened by double-clicking the element in the workspace, via the "Properties" context menu, or via the "Edit / Properties" main menu, if the element is selected in the workspace.
Creating a new selection list
General

Title
Enter the title for the drop-down list here. Click here for information on multilingual titles.
Display title in control
The title will be displayed in the edit field in the browser.
Input required
The drop-down list becomes a mandatory field.
First entry on list is blank
This setting will insert an empty entry in front of the other entries.
Display as slider

Causes the selection list to be displayed as a slider on the web. The values that will be defined later for the selection list are used as the scale of the slider.
Click "Next".
Entries - Values from applications

This option uses data from the data groups of applications as entries. The data can also be filtered if only a certain portion of it is to be selectable in the list.
You also have the option to specify a stored value as the source and use a different value from the same data record for the entry in the list (e.g. UserID as the stored value, Username as the display value in the list).
Application, Data group, Stored value
Select here the application, data group and data field whose stored value is to be used as an entry.
![]() Filter
Filter
Opens a dialog where a filter can be defined.
![]() Data Picker
Data Picker
The data picker is used to transfer the values selected in the selection list to input elements that are located on the same page. If you have selected the "User" system application as the data source, for example, you can transfer the user name to any field on your application page here.
Clicking on ![]() "Data Picker" opens a dialog where you can make the data assignment.
"Data Picker" opens a dialog where you can make the data assignment.
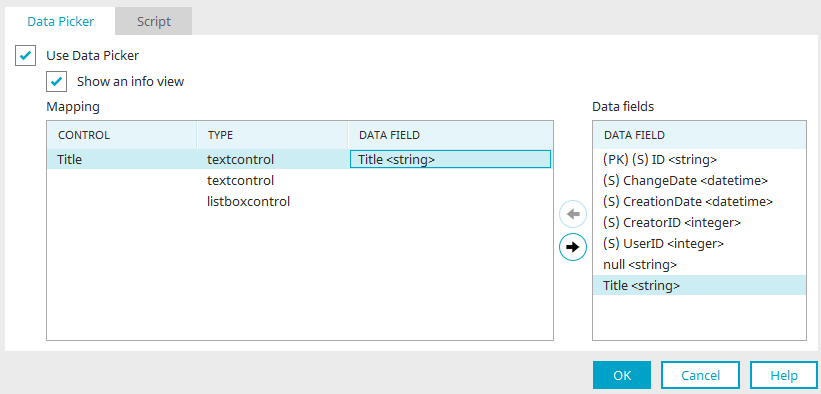
Use Data Picker
Activates mapping.
Show an info view
If this setting is active, a message is displayed in the case of both an unsuccessful assignment ("No record exists") and of records found (e.g. "A record was found and inserted").
Mapping
All edit elements from the page will be listed here.
Data fields
All available data fields are listed here.
![]()
![]() Create / Remove mapping
Create / Remove mapping
Creates the mapping of a data field to a control or removes a mapping, respectively.
Click on "OK" to save the settings and close the dialog.
Hide duplicate entries
Causes duplicate values in the linked data field to be displayed only once in the list. In the database, a "Distinct" query will be sent, filtering the data records.
Maximum number of entries
You can limit the number of entries in the list. With the value -1, all entries will be shown.
Sorting
Displays the current sorting.
![]() Sorting
Sorting
Opens a dialog where the sorting can be edited.
Adjust displayed value for saved value
With this setting, the data field that you have selected in the "Values from applications" area will be used. If this setting is not active, you can define the displayed values yourself. In this case, the value that is saved is that of the data field that you have selected in the "Values from applications" area.
Displayed value
Displays the currently defined displayed value.
![]() Displayed value
Displayed value
Opens a dialog where the data fields that provide values can be selected.
Values from references
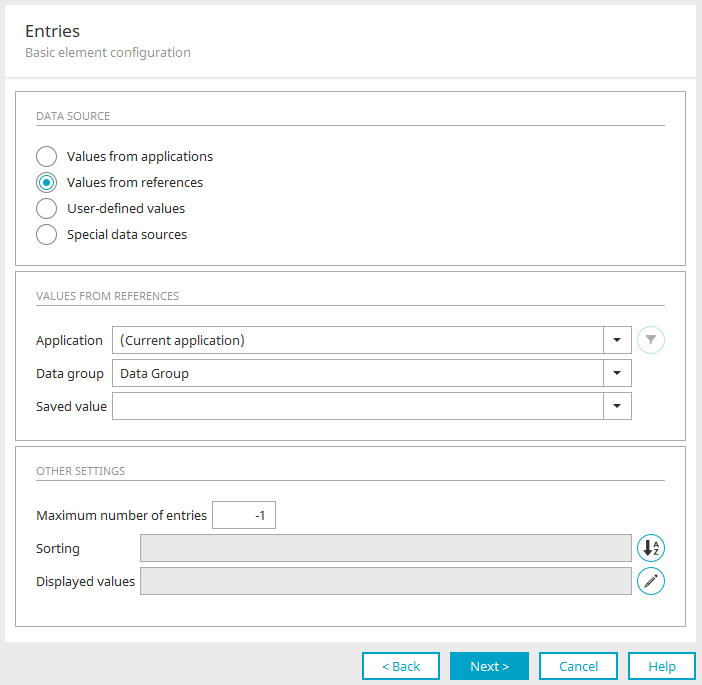
With this setting, references can be selected from the current application or other applications as sources for the entries in the drop-down list. The settings are essentially the same as for the "Values from applications" data source.
User-defined values
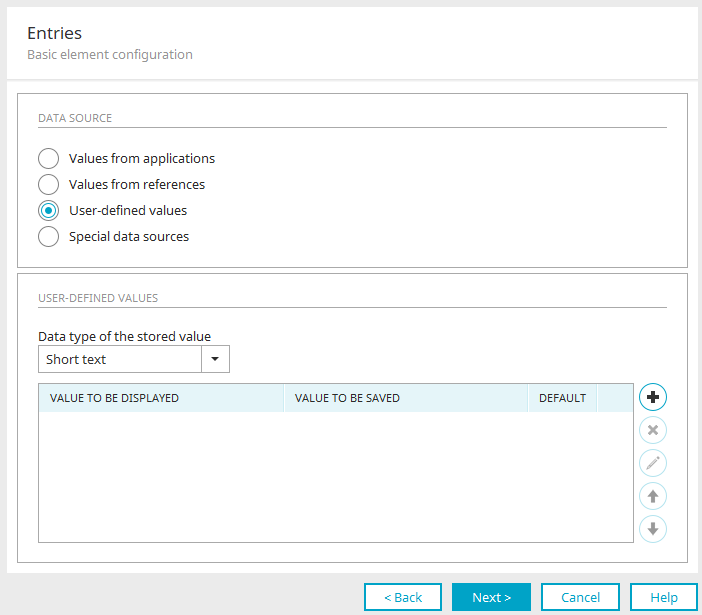
User-defined values are values that do not stem from a data source, but rather are entered statically.
Data type of the stored value
Define the data type of the stored value here.
![]() Add new user-defined value
Add new user-defined value
Opens a dialog where a custom value can be created.
![]() Delete user-defined value
Delete user-defined value
The highlighted entry will be removed.
![]() Edit user-defined value
Edit user-defined value
Opens a dialog where the selected value can be edited.
![]()
![]() Move up / Move down
Move up / Move down
Change the order of the entries.
Default
The entry that is selected in this column, is preselected when the page is loaded in the browser.
Special data sources

Class names that provide the drop-down list entries can be selected here.
|
Class |
Displayed value |
Saved value |
|
User-defined modification |
This option is used for internal modifications to settings |
|
|
CountryListProcessor |
Country name |
Country code |
|
DsContainerListProcessor |
GUID of the container object |
|
|
DsCustomClassListProcessor |
User-defined classes If a class is not defined in the settings, users will be returned. So that classes are returned, the required class ID needs to be specified via a setting: control.listbox.dsClassId for Drop-down lists and Listboxes control.dynamicControl.dsClassId For Dynamic views |
Class ID |
|
DsDistListListProcessor |
GUID of the distribution list |
|
|
DsGroupListProcessor |
GUID of the user group |
|
|
DsOrgUnitListProcessor |
GUID of the organizational unit |
|
|
DsOrganizationListProcessor |
GUID of the organization |
|
|
DsRoleListProcessor |
GUID of the role |
|
|
DsUserProcessor |
GUID of the user |
|
|
LanguageListProcessor |
With the help of the "control.listbox.language.usePortalSettings" setting, only the languages that are activated in the portal can be listed. Click here for more information. |
Language code |
|
LocaleListProcessor |
Language code in combination with the country code |
|
|
PortalGroupLanguageListProcessor |
Portal languages - the active portal languages are at the top of the list and the inactive languages are listed below |
Language code |
|
TimezoneListProcessor |
Time zone |
Click "Next" when you have finished configuring the desired data source.
After that, you can still specify the data field in which the selected value of the list should be stored. Click here for more information.
After clicking on "Next" you will then be taken to the final settings. Click "OK" there to complete the configuration of the selection list.
Create new listbox
General

Title
Specify the title of the listbox here. Click here for all further information on this topic.
Input required
The listbox becomes a mandatory field.
First entry on list is blank
Adds an empty entry before the other entries.
HTML element

Listboxes can be shown as an unordered list in the browser aside from the default setting.
Width / Height
If the listbox is set up as an unordered list, you can adjust the control's size further.
-
Maximal: The element will be shown in the browser with the maximum width / height that is defined in the manager.
-
Minimal: The element will be shown in the browser with the minimum width / height that is defined in the manager.
-
Fixed: The element will be shown in the browser with the exact width / height that is defined in the manager.
If the list is shown as unordered list the option "First entry on list is blank" is not available.
Click "Next". The following dialogs correspond to the dialogs used to create a selection list. The same settings are available for the listbox.