Sortable list / View sortable list
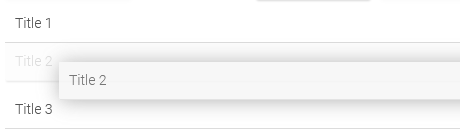
In the "Sortable list" element, the order of the entries in the browser can be changed as desired using drag & drop. If the sortable list is linked to a data field, an entry can be selected and the value can be saved with a corresponding button in the data field. If the page, where the sortable list is located, displays an existing data record, then the corresponding saved value will automatically be selected in the list.
The "View sortable list" element behaves in the same way as the "Sortable list" element, but no selected entries can be saved.
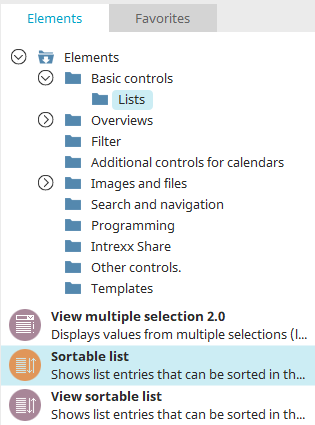
The elements can be found in the "Applications" module in the "Elements" area, under the basic controls in the "Lists" category. A new element can be created by dragging and dropping it from here and positioning it in the workspace.
More information on creating elements can be found here.
The properties dialog of a sortable list opens automatically when a new element is created. The properties dialog of an existing element can be opened by double-clicking the element in the workspace, via the "Properties" context menu, or via the "Edit / Properties" main menu, if the element is selected in the workspace.
Create new sortable List
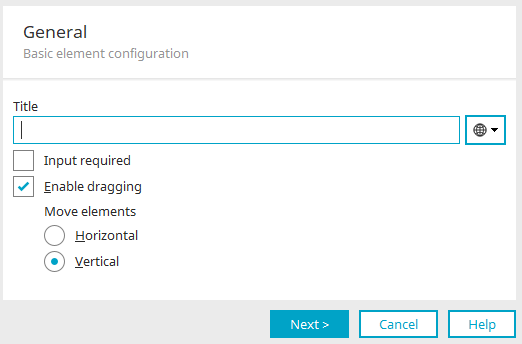
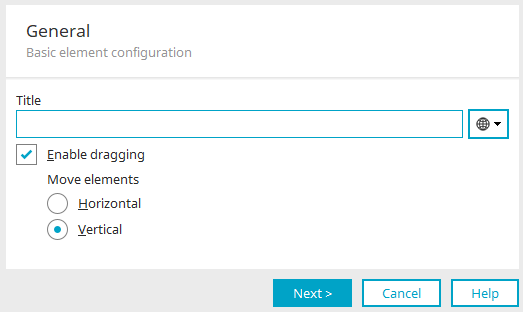
General
Title from constant
Enter a title for the sortable list here. Click here for more information about this topic.
Input required
This setting will make the sortable list mandatory.
Enable moving
This allows for sorting the list in the end device via drag & drop.
Horizontal / Vertical
Defines whether the entries can be dragged horizontally or vertically.
Click "Next".
Entries
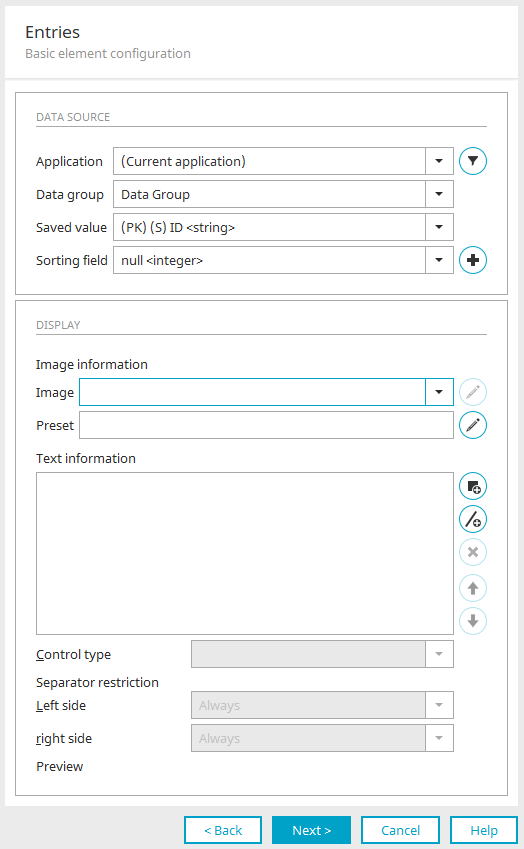
This option uses data from the data groups of applications as entries. The data can also be filtered if only a certain portion of it is to be selectable in the list.
You also have the option to specify a stored value as the source and use a different value from the same data record for the entry in the list (e.g. UserID as the stored value, Username as the display value in the list).
Data source
Application, Data group, Stored value
Select here the application, data group and data field whose stored value is to be used as an entry.
![]() Filter
Filter
Opens a dialog where a filter can be defined.
Sorting field
Here, select an existing data field in which the current order of the list is stored, or create a new sort field by clicking ![]() "Create new data field". Information on the following dialog can be found here.
"Create new data field". Information on the following dialog can be found here.
As the sorting field, please do not use an existing field from your application where data is already stored. This data would be replaced by the value of the order when the list is sorted.
View
Image information
Image
Here you can select a data field with the data type "File", in which references to images are stored.
![]() Edit image options
Edit image options
Opens a dialog where the image format can be edited.
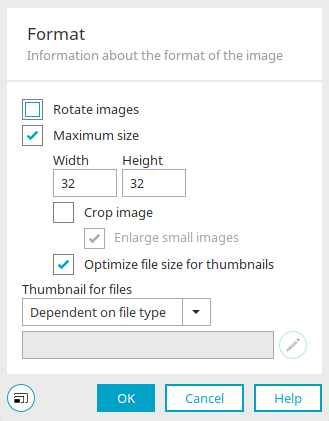
Click here for more information about these settings.
Click "OK" to save the settings and close the dialog.
Default
The image defined here is displayed if an image is not available when a new data record is created.
Text information
Data fields, whose values should be displayed in the list, can be integrated here.
Control type
Select the control type for the text information here.
Separator restriction
The display of each separator can be prevent if the displayed value is empty.
-
Always
A separator is always displayed on the left or right side of the text information.
-
Text is not empty
A separator is displayed on the left or right side of the text information if the complete text on the left or right side of the text information is not empty.
-
Data field is not empty
A separator is displayed on the left or right side of the text information if the data field directly to the left or right of the text information is not empty.
Preview
A preview of the list with the current settings for text information and separators is shown below this.
Click "Next".
After that, you can still specify the data field in which the selected entry of the list should be stored. Click here for more information.
After clicking on "Next" you will then be taken to the final settings. Click "OK" there to complete the configuration of the sortable list.
Create new "View sortable list"
The same settings can be set here as for creating a new "sortable list" - with the exception of the "Input required" setting.
Click "Next".
The settings that still follow correspond to the settings you can edit when creating a "sortable list".
More information
Functions of the sortable list with control type "Image URL"