Intrexx user - Create a portal from the Portal Manager
Requirements
To create a portal, you must first have installed a database.
The following guide assumes that you are using PostgreSQL.
When creating a new portal, a wizard will lead you through numerous dialogs. In each dialog, you will be asked to define settings and make decisions. These primarily concern the following points:
-
Portal name
-
Portal template selection
-
Database selection
-
Front-end web server selection
Start the portal creation process
Intrexx provides you with different ways to start the portal creation process.
|
|
You can create a portal via the Intrexx Portal Builder (The screenshot shows the favorites bar in Ubuntu) |

|
|
|
|
You can create a portal directly after installing Intrexx. To do this, activate the checkbox "Create portal". |
|
|
You can create a portal in the Portal Manager in the "Start" module via the "File" menu item > "New portal..." create. Or press Ctrl+N. |

|
General settings
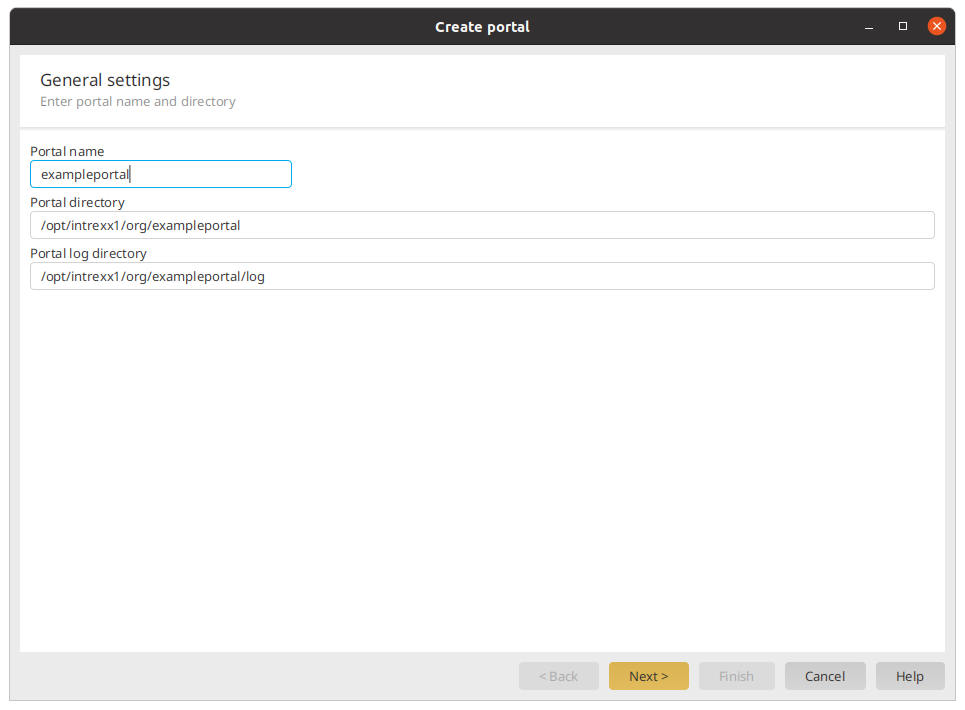
Once you have started the portal creation process, you will be in the "General settings" dialog.
Portal name
Provide the portal with a unique name here.
When you create a portal, Intrexx uses the name entered here for the portal directory on the portal server. Portal-specific files are stored in the portal directory.
The portal name does not correspond to the URL used to access the portal in the browser. You define the URL in the front-end web server. (For more information, see Add website in IIS.)
Portal directory
All of the portal's files can be found in the portal directory on the Intrexx portal server. When you enter a portal name, the name for the subdirectory is automatically formed from the portal name.
Portal log directory
The directory where the portal log files are stored is stated here. The same applies here: When you enter a portal name, the name for the subdirectory is automatically formed from the portal name.
Portal template
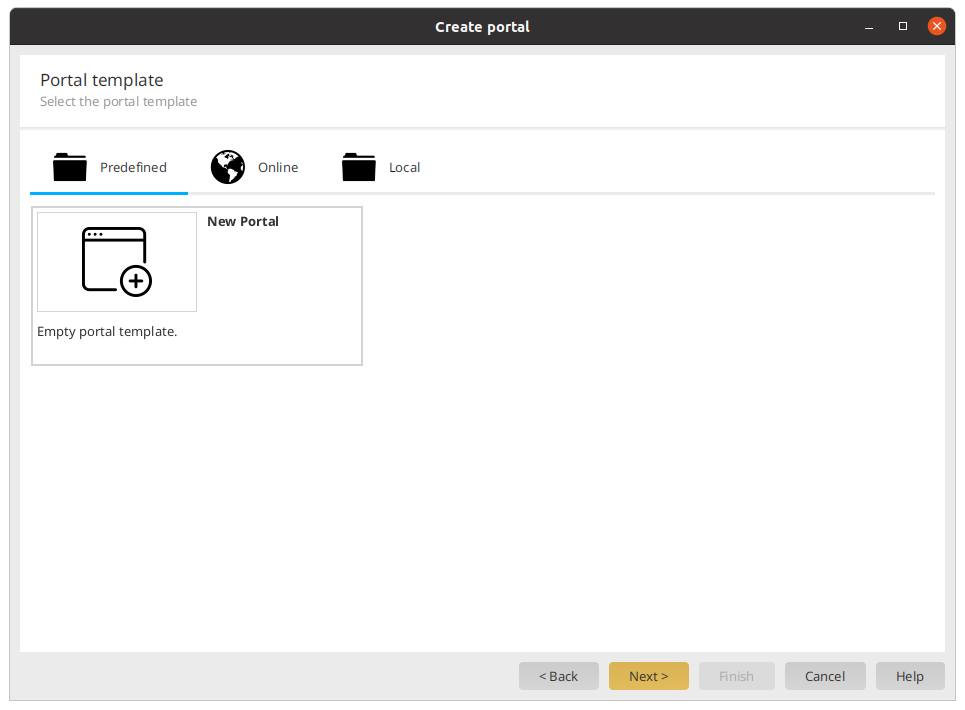
Click on "Next" to go to the "Portal template" dialog.
You can choose between "Predefined", "Online" and "Local".
Standard
Online
Local
Portal template - Default
Select the default template here, this will create an empty portal without example data.
Portal template - Online
Here you can select portal templates that are made available online by Intrexx. If you select one of the online templates, it will be downloaded from Intrexx GmbH and used to create the portal.
The online Intrexx templates and the applications, processes and layouts they contain can be used as a basis for your portal. Please note, however, that the templates contain preconfigured processes and design elements that you will need to adjust.
If you activate "Display templates for older versions as well", you can choose a template from an older version of Intrexx.
Portal template - Custom
This option allows you to use an exported portal as a portal template. This imports the previously exported portal.
You can search for the portal export file by clicking on the ![]() Browse button.
Browse button.
Detailed information on importing portals can be found in section Import portal.
Database server
Click on "Next" to go to the "Database server" dialog.
Database server
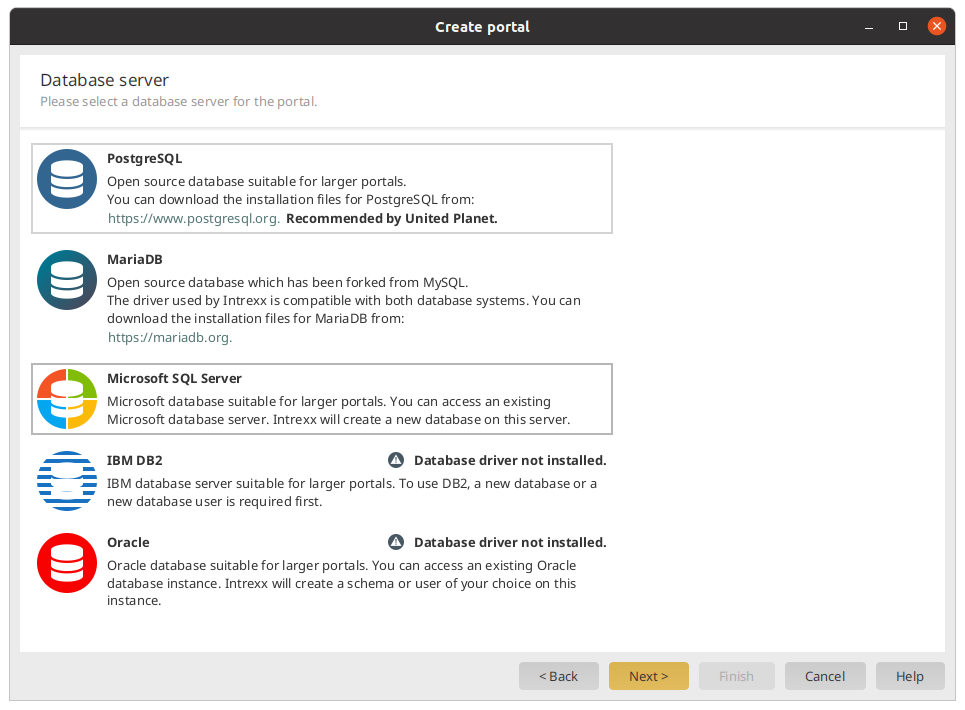
Select the database server for your new portal.
Please note: You need to manually download and install the database drivers from the developer for the database servers IBM DB2 and Oracle.
The subsequent dialogs where the connection to the database server is configured varies from database to database.
In this guide, PostgreSQL will be used as an example.
Select "PostgreSQL" and click on "Next" to go to the "PostgreSQL connection data" dialog.
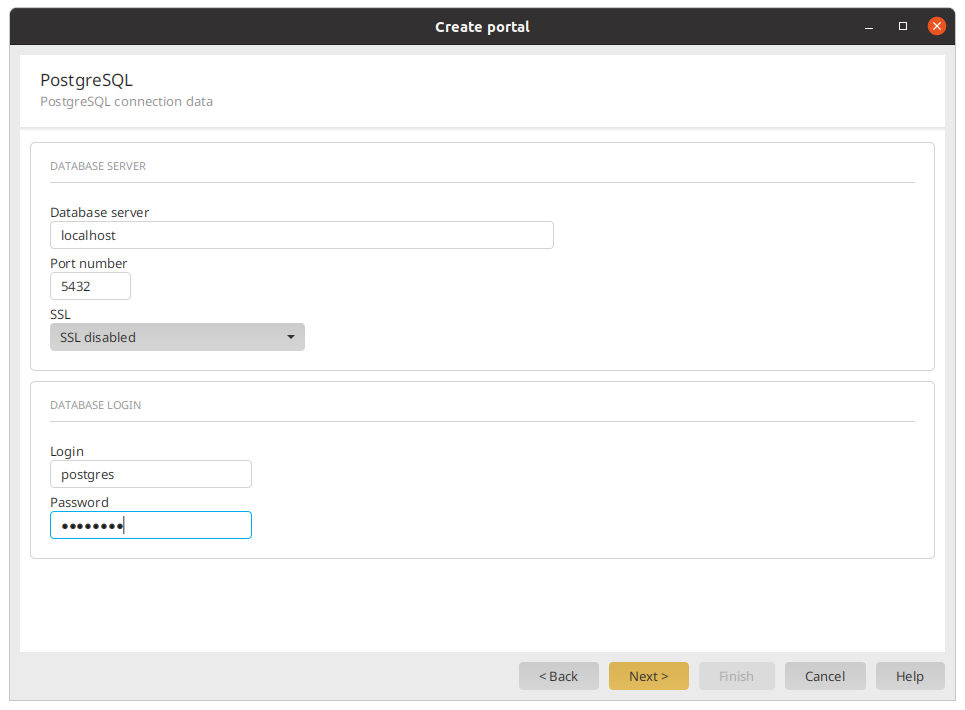
PostgreSQL connection data
Database server
Enter the name or IP address of the database server.
Port number
Enter the communication port for the database.
SSL
Define whether the connection to the database server should be encrypted or not.
You can select "no SSL" while creating the portal and then configure an encrypted connection to the database server later as needed.
If you configure an encrypted connection and select "SSL with certificate validation", you need to add the certificate to the corresponding place on the database server before creating the portal.
Once the portal has been created, you need to add the certificate to the Intrexx portal server for the encrypted connection to the database to work correctly.
Login
Enter the username of the database user.
Password
Enter the password of the database user.
Click on "Next" to go to the "PostgreSQL database settings" dialog.
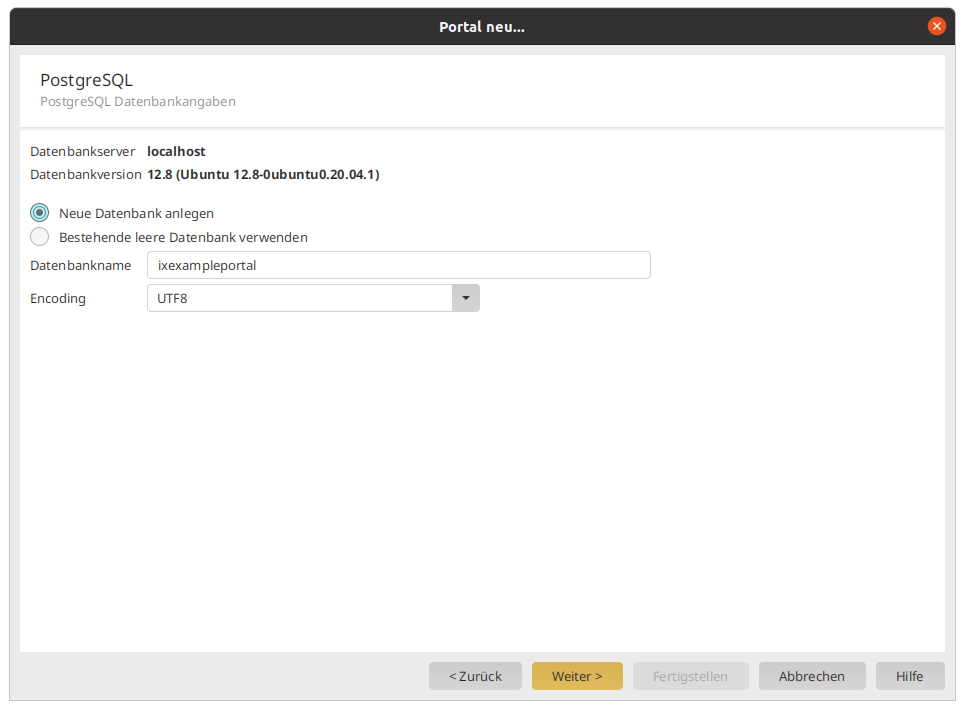
PostgreSQL database settings
New database
A new database is created with this option.
Use existing empty database
An existing database is used with this option.
Database name
The name of the database can be edited here.
Encoding
Select the encoding (character set) for the new database here. The preset (UNICODE - UTF 8) can be kept in most cases.
Click on "Next" to go to the "Front-end web server (reverse proxy / load balancer)" dialog.
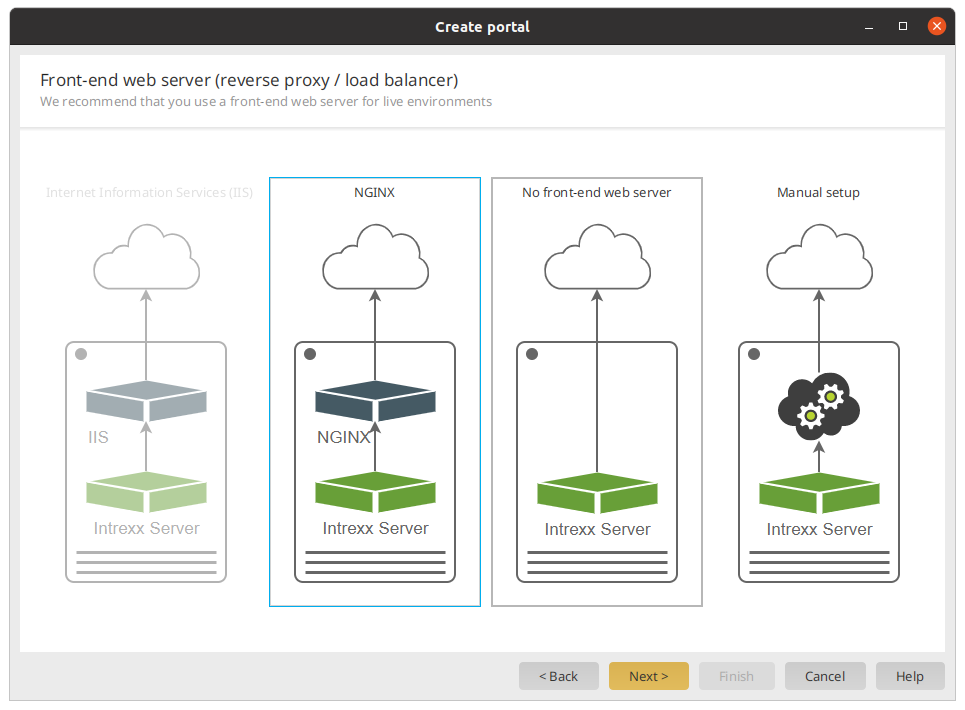
Front-end web server (reverse proxy / load balancer)
In this dialog, you can define which front-end web server (reverse proxy) should be used for communications between the Intrexx portal server and the browser.
NGINX
Intrexx provides a graphical user interface for configuring NGINX.
Use NGINX if you are working in a Linux environment.
More information about using NGINX is available in the chapter Linux - Configure NGINX.
Please note that to use a front-end web server, you need to add a corresponding entry in your DNS server (A or AAAA record). More information about this is available in the chapter Define hostnames in DNS.
No front-end web server
Select this option if you do not want to configure a front-end web server (reverse proxy) for your portal.
Please note that this option can only be recommended for test and development portals.
More information about this option is available in the section No front-end web server.
Manual setup
You have the ability to manually configure communications between embedded Tomcat and the browser. In doing so, you forgo the dialog-supported configuration that is available for the "Internet Information Services (IIS)", "NGINX" and "No front-end web server" options.
In the following steps of this tutorial, NGINX will be used as an example for a front-end web server.
Click on "Next" to go to the "NGINX" dialog.
Front-end web server: NGINX
NGINX virtual host
"NGINX virtual host" refers to the embedded Tomcat. NGINX connects to the Intrexx portal service via the virtual host. Typically, "localhost" should be entered here. (One exception to this is when NGINX is installed on a different server to Intrexx. In this case, the Intrexx server should be specified here.)
NGINX configuration file
You can generate the NGINX configuration file with Intrexx.
Enter the path to the directory that the NGINX configuration file should be generated in.
Example
/myfolder/portal.example.com.conf
Afterwards, copy and link the NGINX configuration file to the desired folder within /etc/nginx.
Example
/etc/nginx/sites-available/portal.example.com.conf
Embedded Tomcat Port
The port that you used in the previous version of Intrexx will be shown here. You can leave this port as it is.
Please note: The port 1337 is predefined for a new installation.
Base URL of the portal
The base URL needs to be entered here.
The first part refers to the protocol. You have configured an encrypted connection between the Intrexx portal server and the browser. The second part is made up of the hostname that you defined in the NGINX configuration file. Please make sure that this ends with a slash (/). It is essential that this is correct so that your portal can be accessed in the browser.
After clicking "Next", you will be taken to the "SolrSearchServer" dialog.
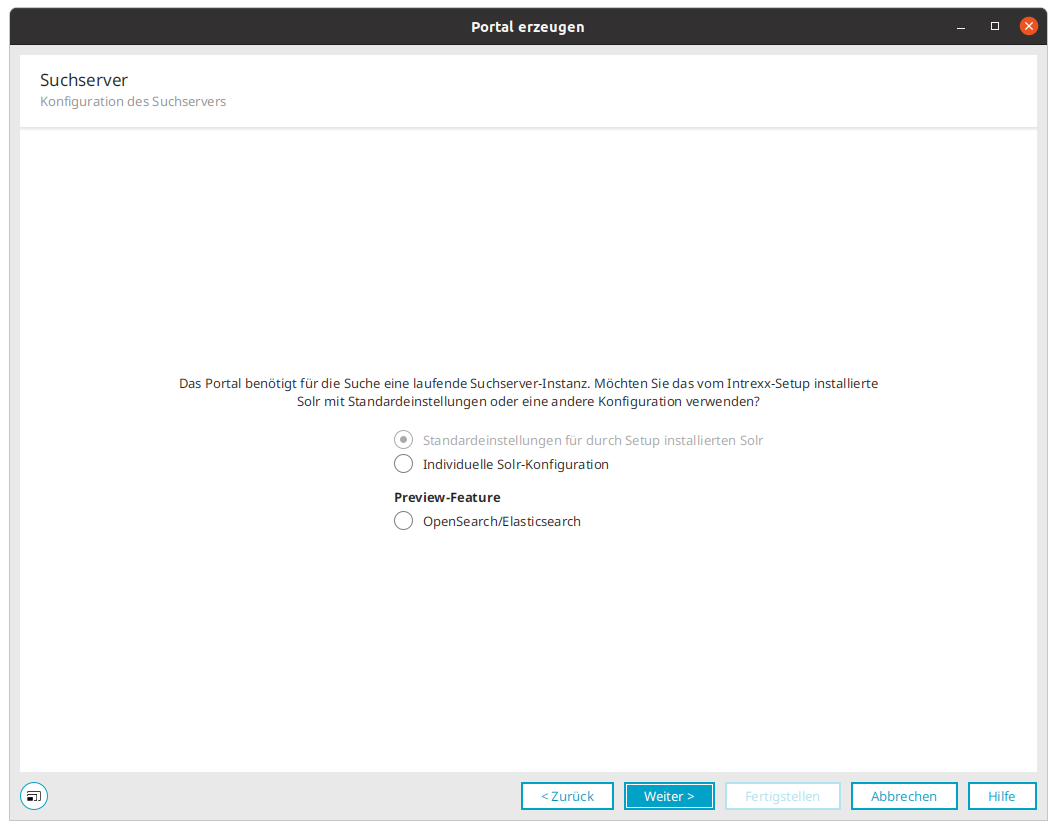
Solr search server
Each portal has a search function. "Solr", Apache's search server, is the infrastructure that provides this feature.
In this dialog, you determine whether you want to apply the default Solr settings or a custom configuration.
Intrexx version 12.0.0
Default settings for Solr installed by Setup
By default, the Solr search server is installed in standalone mode. The Solr search server is installed on the same server as the Intrexx Portal Server. The default user and password are used for authentication on the Solr search server.
If you are using only one instance of the Solr search server, i.e. you are not using SolrCloud, you can usually select the default setting.
Custom Solr configuration
Select this option if you want to configure custom settings for the Solr search server. This is especially the case if you want to make authentication changes to the Solr search server.
Detailed information on the individual Solr configuration can be found in section Custom Solr configuration.
Intrexx version 12.0.1
As of Intrexx 12.0.1, you have the option of using OpenSearch or Elasticsearch as a "preview feature" for the portal search.
OpenSearch/ElasticSearch
Preview feature
Please note that this feature is a so-called "preview feature". Preview features may be incomplete or contain errors. For this reason, they may currently only be used in test and development environments in order to evaluate them accordingly.
Before using a preview feature, we strongly recommend that you carry out a data backup. INTREXX Ltd accepts no liability for the functionality or reliability of preview features. The use of preview features is therefore at the user's own risk.
You have the option of using OpenSearch or Elasticsearch for the portal search.
OpenSearch and Elastiksearch are not included in the scope of delivery. A separate installation with the Docker image of OpenSearch or Elastiksearch is recommended.
Further information on this can be found in the following sections:
Summary
General properties
Opens a dialog where the portal name and directory can be edited.
Web server
Opens a dialog where the web server settings can be edited.
Portal template
Opens a dialog where the portal template can be changed.
Database
Opens a dialog where the database can be changed.
Advanced settings
Opens a dialog where the ports, search engine and other settings can be modified.
Creating portal
Daemon user
While Intrexx is creating the portal, you will be prompted to enter the password for the daemon user.
The daemon user is the user that you created or selected during the Intrexx installation. This is not an Intrexx user but a Linux user. You may need to request the password for the daemon user from your Intrexx administrator.
The password must be entered since Linux and Intrexx services must be stopped and restarted when a portal is created.
Please also refer to the section
Click on "Finish" to go to the "Success" dialog.
Success
When you click on "Finish", you will be returned to the Portal Manager.
You can now open the portal in the browser.

