Tree / View tree
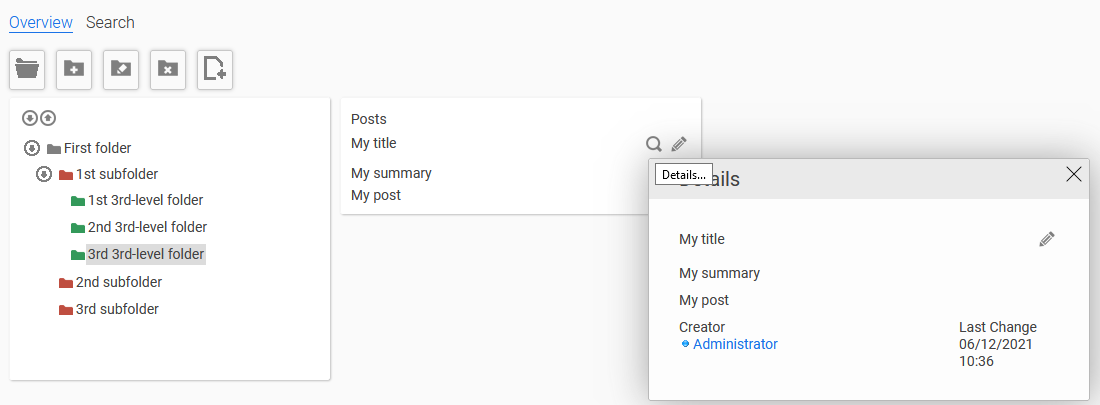
Hierarchical folder structures can be depicted using the Tree element - this can be used for outlines, for example. The folder structure can be changed in the browser using drag & drop. The tree is available as an input element ("Tree") and as a view element ("Tree view").
Both elements can be linked to a data field. The tree edit element can save selected values, while the tree view element can load previously saved values on a page that is specified as a jump target.
Both elements are among the overviews. In the following description, you will learn how to configure the elements in the "Applications" module.
A practical guide to the functions of the tree in the browser can be found here: Tips & Tricks - Tree.
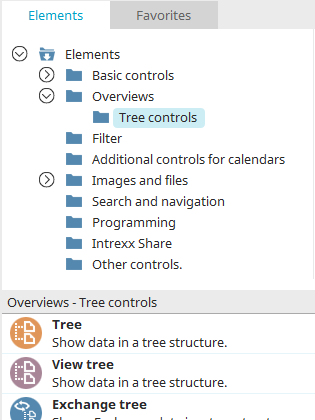
The tree elements can be found in the "Applications" module in the "Elements" area. A new element can be created by positioning the element on the workspace from here using drag & drop.
Further information on creating elements can be found here.
Tree and View tree - Properties
Since the settings of edit control and view control differ only slightly, they are described here together.
General
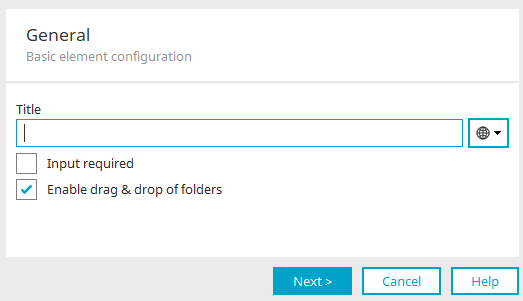
When you create a new tree, the properties dialog opens automatically.
Title
The title of the tree can be specified here. Information on multilingual titles can be found here.
Input required
This setting makes the "Tree" input control a mandatory field.
The setting is not available for the "Tree view" element.
Allow folders to be moved
With this setting, folders in the browser can be moved to another position in the tree using drag & drop.
Click "Next".
Data
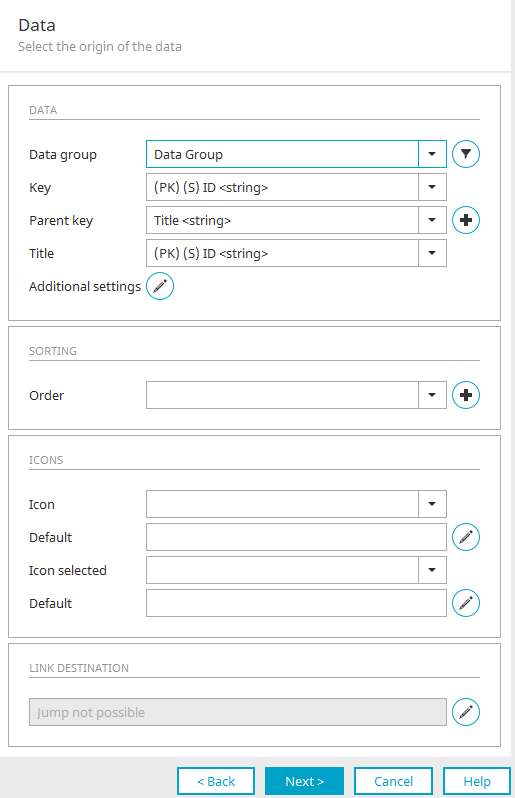
Data
Data group
Select the data group whose values will be displayed in the tree structure. Clicking on ![]() "Filter" opens a dialog in which a filter can be set up to restrict the tree data if required.
"Filter" opens a dialog in which a filter can be set up to restrict the tree data if required.
Key
Key Here, select a field that contains unique values that allow an individual tree node to be identified. This does not have to be the primary key of the data group.
Parent key
Here, a field will be selected where the tree control will automatically enter the ID of the superior folder, as soon as a new folder is created in the browser.
![]() Create new data field
Create new data field
Opens a dialog in which a new data field can be created in the selected data group that contains unique integer values for identifying the data records.
Title
Select a field in here that contains the title of the folder.
![]() Advanced properties
Advanced properties
Opens a dialog in which the display of the tree can be restricted to partial areas.
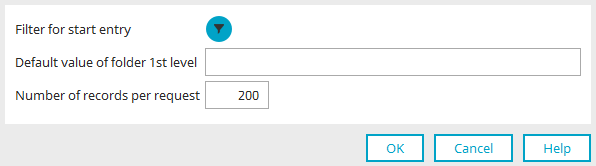
Filter for start entry
Click on ![]() "Filter" to open a dialog in which you can define a filter that hides parts of the tree.
"Filter" to open a dialog in which you can define a filter that hides parts of the tree.
Default value for folder 1. Level
Enter the parent ID of the folder not visible in the partition. This ID can be determined from the database. It is automatically entered by the tree control for newly created folders on the first level in the "Parent key" field. Only by specifying the "Default value for folder 1. Level", the folder hierarchy can be mapped correctly in the complete tree.
Number of data records per request
Here, you can enter the number of data records to pre-load when a branch of records is opened up. This specification increases performance when displaying levels that contain a large number of entries. Ultimately, all entries contained in a folder will be shown in the browser. The restriction entered here refers only to the initial loading of the records.
Click "OK" to save the settings and close the dialog again.
Sort
Sequence
The field that you enter here defines the sorting of the folders that can be found on the same level.
![]() Create new data field
Create new data field
Opens a dialog in which a new data field that determines the sorting can be created.
Please do not change the values that are to be connected here with the key, the superior key, and the order. These values will be automatically managed by the tree control when new folders are created or existing folders are changed. Otherwise the correct function of the tree inspection cannot be guaranteed.
Icons
Icon
You can use this field if the image stored in the "Default" field (see below) is not to be used.
In this case, select the column from the data group that contains the desired image for folders.
Default
The image or icon selected here serves as the default image for the folders in the tree structure.
![]() Edit
Edit
Opens a dialog in which any image or icon can be loaded.
Icon selected
You can use this field if the image stored in the "Default" field (see below) is not to be used.
In this case, select the column from the data group that contains the desired image for selected folders.
Default
The image or icon selected here serves as the default image for the selected folders in the tree structure.
![]() Edit
Edit
Opens a dialog in which any image or icon can be loaded.
Link destination
![]() Edit
Edit
No jump can be executed for the tree input element because clicking on an entry selects it and therefore no second action, such as loading a page, can be executed. Instead, a dialog is opened in which JavaScript functions can be written and events can be assigned.
The "View tree" opens a dialog in which the jump target can be configured
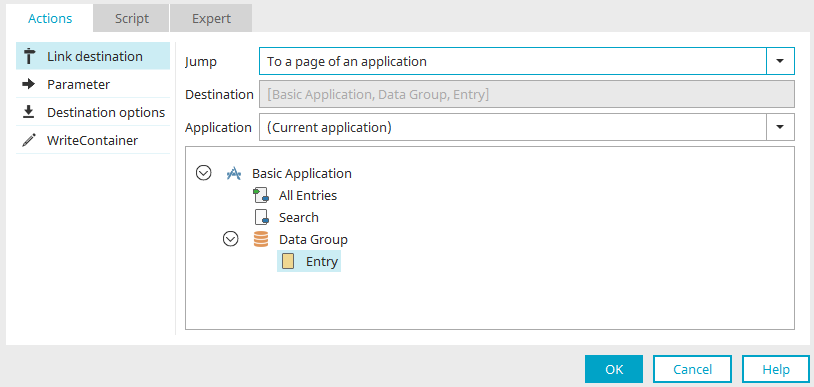
All information on this dialog can be found here.
Click "OK" to save changes and close the dialog again.
Click "Next".
For the tree edit element, the data link can be specified in the next step. Further information can be found here.
In the next step of the "Tree view", you have the option of defining the binding of the element. You can find all the information here.
Then click "Next".
Final settings
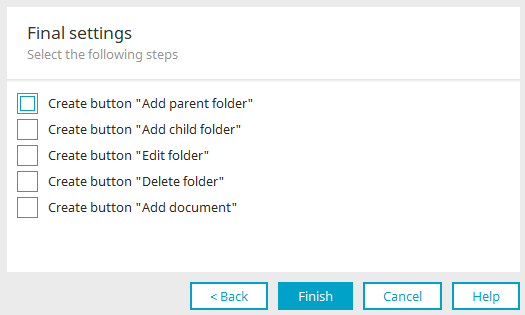
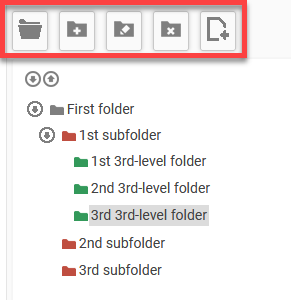
Here, you can add/remove the buttons, which are provided above the tree for editing the folders in the browser.
These buttons can also be created later via the main "Edit" menu if the tree element is selected on the workspace.
Click on "Finish" to save all settings and complete the configuration of the tree.
More information