


Create a New Connection
If the connector for dg archive is selected in the "Integration" module under "Consume Data" in the left pane, you can open a wizard to create a new connection via the main menu option "dg archive / New Data Source" or the corresponding context menu.
General Information

Enter the name and, if necessary, a description of the connection here.
dg archive Service URI / Registration Service URI / Stream Service URI
Please refer to the dg archive server installation for the service URIs. This typically consists of the hostname of the dg archive server, the port, and the name of the web service, such as here, for example:
-
https://serverhostname:8001/HypService
-
https://serverhostname:9001/HypRegService
-
https://serverhostname:10001/HypServiceStream
Access to the dg archive web service is typically via SSL. The URL in question must begin with https://. In addition, the SSL certificate for the dg archive server must first be imported into the Intrexx certificate store. It is also possible to access the services without a certificate by disabling SSL certificate validation.
Authentication
This is where the authentication method is defined that portal users use to log in when accessing dg archive.
Simple
Windows Username / Password
Enter your username and password here.
Kerberos - Integrated Windows Authentication (Single Sign-On)
Username / Password
For both authentication methods (Kerberos / Simple), you must specify a Windows user and their password. This user is required for web service authentication when accessing the system from Portal Manager—for example, to retrieve the dg archive stamp definitions. If the user is also a registered dg archive user, that account is also used to access dg archive metadata and must therefore have the appropriate permissions in dg archive. If you want to use a dg archive-internal user or a different Windows user for the Portal Manager, you can specify it in the last section of the dialog box. The Kerberos authentication method makes it possible to implement single sign-on authentication in a Windows domain environment. The following requirements must be met:
-
The Intrexx Portal Server must run on Microsoft Internet Information Server and be a member of a Windows domain.
-
The Intrexx Portal Server must be configured for Integrated Windows Authentication. Users must be imported from Active Directory.
-
A service principal name must be defined for the dg archive dg connect WCF server.
-
Single Sign-On authentication must be enabled for the dg connect WCF server. For more information, please refer to the dg connect WCF documentation.
-
For every Intrexx user who is to have access to dg archive, there must be a corresponding Windows account user in dg archive.
-
Integrated Windows Authentication must be enabled for the client browsers.
Are the above-mentioned Once the requirements are met, Single Sign-On with Kerberos can be enabled. To do this, you'll need a dg archive username and password to access the metadata.
Service Principal Name
Enter the SPN of the dg archive connect server here. As a rule, it is composed as follows:
http://<dg archive DNS name>
Replace <dg archive DNS Name> with the fully qualified DNS hostname of the dg archive web service server. The hostname must be identical to the hostname specified for the web service URLs. After saving the configuration, built-in authentication is automatically enabled. If the configuration is successful, Intrexx portal users will be automatically logged in to dg archive when they access dg archive files. If you encounter any problems setting up the single sign-on process, you can find additional information here on troubleshooting Kerberos authentication.
Click "Next."
Login Information

From User Management
If "Simple" was selected as the authentication method in the first step, you can choose in this dialog to have the fields in the portal's login dialog automatically pre-filled. For example, the "dg archive" username and password can be automatically retrieved from a field in the Intrexx user record.
From Web Input
Select this option if you do not want any default values to be set.
Click "Next."
Additional Users

For certain use cases, it can be advantageous for access to a dg archive server to always occur under the same user account without requiring an interactive login—for example, when an Intrexx process accesses dg archive via a data group action. Since interactive login is not possible within a process and single sign-on authentication cannot be supported, it makes sense to define a static user for authentication purposes. A static user is always linked to an Intrexx user and contains the dg archive login credentials (username/password). Static users can be defined in data groups or in user-switch actions within processes.

 / Edit additional user
Opens a dialog box where you can select an Intrexx user.
User Selection
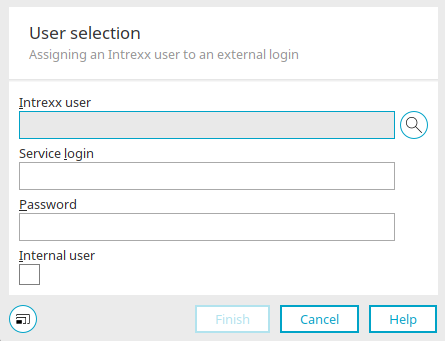
Intrexx Users
The path and name of the selected Intrexx user are displayed here.
 Select a user
Opens a dialog box where you can select an additional user.
Service Login / Password
Enter the username and password for the dg archive user here.
Internal User
This setting must be configured if you want to connect using an internal dg archive user.
Click "Finish."
 Remove an additional user
Removes the selected user from the list.
Click "Next."
Connection Test

Clicking "Test" establishes a connection to the dg archive server and displays the result.
Click "Finish" to complete the connection setup.
Edit Connections

Every connection you've created is listed in the right-hand pane. You can access all editing functions via the "dg archive" main menu or the connection's context menu when an existing connection is selected in the right-hand pane.
The connection displays the name, description, and number of data groups that are integrated with external data groups in applications.
Importing and Exporting dg archive Configurations
dg archive configurations are automatically included in a portal export and recreated during import. If you want to export a single configuration to another portal, this is currently only possible via the file system.
The configuration files are located in the portal directory internal/cfg/dg hyparchive. Each configuration consists of an XML file, and the file name corresponds to the configuration GUID.
If you want to transfer a configuration to another portal, simply copy the corresponding file and paste it into the same subdirectory on the destination portal. After restarting the portal server, the configuration will be available in the integration module.