

Microsoft 365-Create a data group
Simple configuration
Linking Microsoft 365 files to Intrexx records was also possible in earlier versions of Intrexx.
It is now even faster and easier to link files. For example, this reduces the number of steps required, and the necessary fields—such as the item ID for the " Microsoft 365" document—are created automatically. In addition, Intrexx identifies the directories that exist on Microsoft OneDrive and automatically saves the item IDs in the corresponding field of the data group. Therefore, you no longer need the Microsoft Graph API to determine the IDs of the Microsoft 365 objects.
Requirement
You have registered a license for the " Connector for Microsoft 365 and Teams " in Intrexx.
You have registered Intrexx as an application in Microsoft Azure. Register the Intrexx Portal as an app in Microsoft Azure.
You have registered the Connector for Microsoft 365 and Teams in the "Integration" module. Register the connector for Microsoft 365 and Teams.
New data group
Intrexx now includes a new data group type called "MS365 Data Group." It (automatically) contains the "MS365 File" data field. When creating an "MS365 Data Group"—just as when adding an "MS365 File" data field—a Properties dialog box appears, prompting you to enter all the necessary information for connecting to Microsoft 365.
So, for example, if you're creating a new application that will incorporate Microsoft 365 files, it makes sense to create a new "MS365 data group."
Create an MS365 data group
Step-by-Step
To create an MS365 data group, follow these steps:
-
Right-click on the application.
-
Click "New > MS365 Data Group."
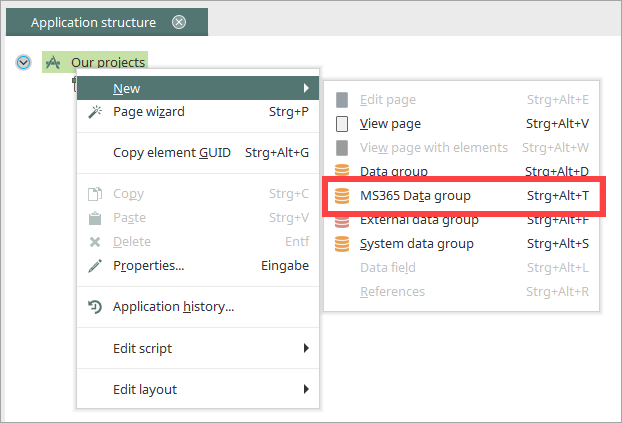
The "Properties - Data Field" dialog box appears.
In diesem Dialog konfigurieren Sie im Wesentlichen die folgenden Einstellungen:
-
Wie die Verbindung von Intrexx zu Microsoft 365 hergestellt werden soll.
-
Wo die Microsoft 365-Dateien abgelegt werden sollen.
-
Welcher Portalbenutzer Zugriff auf die Microsoft 365-Dateien hat.
-
Auf welche Weise der Portalbenutzer sich an Microsoft 365 autorisieren muss.
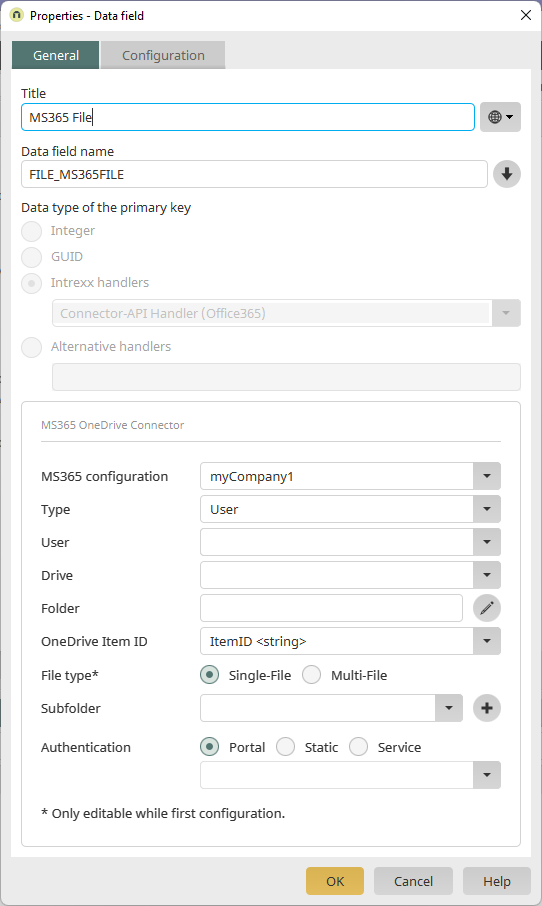
Title
You can change the title of the data field here.
 Multilingualism
Opens a dialog box where the title can be entered in multiple languages.
Data Field Name
Here, you can change the name of the data field.
 Generate a Name from a Title
Uses the title as the data field name. The prefix is retained.
MS365 configuration
Select the desired configuration (registration) for the Connector for Microsoft 365 and Teams here.
The configuration specifies, among other things, the permissions with which the Intrexx Portal Manager accesses Microsoft 365. Sufficient permissions must be configured so that the Intrexx Portal Manager can identify the objects (groups, users, folders, websites) on Microsoft 365 and display them for selection in this dialog box.
Further information is available in the following sections:
Type
Here, you can select where the files are to be stored.
The dialog box changes dynamically. Depending on the settings you have configured in the Connector for Microsoft 365 and Teams and the value you select in the "Type" drop-down menu, different drop-down menus will be displayed.
The following selections are available depending on the setting:
-
My Drive
-
Group
-
Website
-
User
-
Personal Drive: If you select this option, the Microsoft 365 files that you upload via the Intrexx Portal will be stored in the Drive of the user currently logged into the Intrexx Portal.
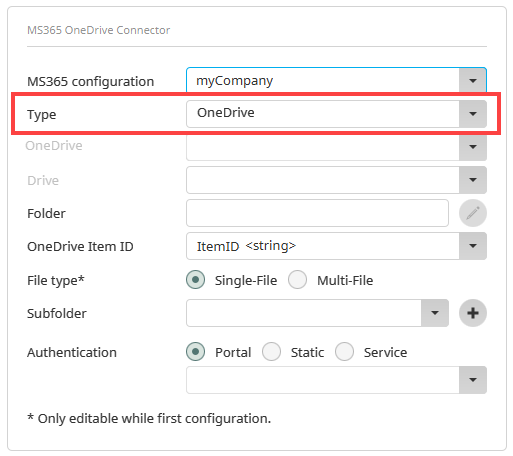
If you also want to see the documents in the Teams group, you should not select the root folder, but rather the channel name of the destination drive.
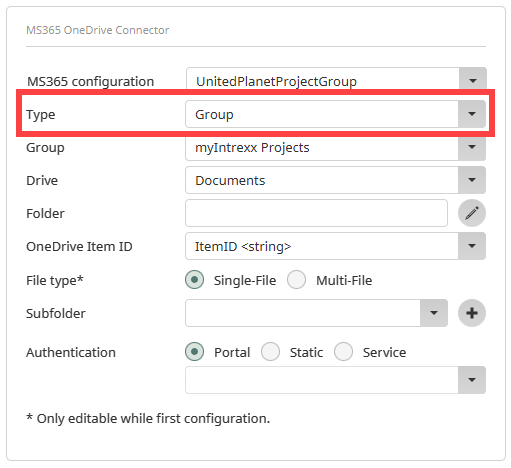

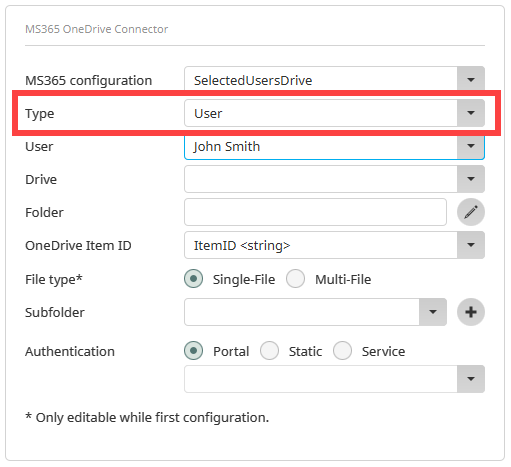
Folder
Enter the name of the folder to which the files are to be uploaded or saved.
You can search for folders. To do this, click the "
 " icon.
Use the displayed context menu to select the root directory or start a search dialog.
You have the following options when searching for folders:
-
* - If you enter an *, all folders located under the previously selected drives (My Drive, Group, Website, User) will be listed.
-
If you leave the field blank, only the root folder of the previously selected drive will be displayed. (This is equivalent to searching for "root".)
OneDrive Item ID
Here, you can select in which data field the item ID of the document is to be saved. By default, the "Item ID" data field is selected; it was created automatically when the MS365 data field was created. However, you can also select another data field of the "string" type.
File type
Single-File: Select this option if the Intrexx record should be linked to only one (single) document.
Multi-File Select this option if the Intrexx record is to be linked to multiple documents. In this case, the (automatic) creation of a (sub)folder into which the documents are uploaded is necessary (see below).
Subfolder
You can specify that uploaded documents be stored in a (sub)folder below the previously selected folder. If you have selected the "Single-File" option in the "File Type" field (see above), creating a subfolder is optional. If you have selected the "Multi-File" option in the "File Type" field (see above), you must create a subfolder.
Select a data field here, or use the "
 " icon to create a data field that contains the name of the subfolder.
Registration
Here, you specify how the ` Microsoft 365` file should be accessed in the Intrexx portal.
Sign in to Microsoft 365 via your browser
If you select this option, a browser window (pop-up) will appear in which the user must enter the required login credentials.
If the user is (already) logged in to Microsoft 365, the browser window will not (any longer) be displayed.

With this option, ensure that the display of dialog boxes (pop-ups) is not suppressed in the browser. If necessary, change the appropriate browser settings.
Portal
Static
Login via a static user account
Select this option if you want users to log in to Microsoft 365 using one of the static user accounts you created earlier. Select the user account of your choice.
Service
Login via a service account
Select this option if you want to log in to Microsoft 365 using one of the service accounts you created earlier. Select the service account of your choice.
-
-
Go to the "Configuration" tab.
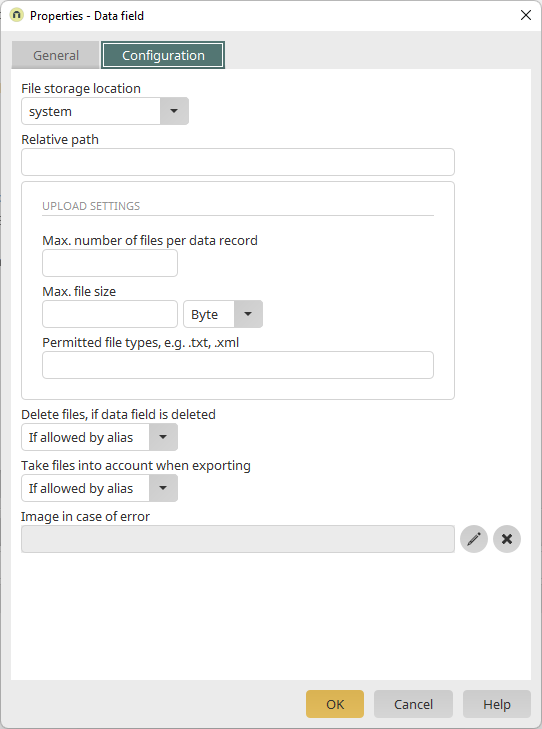
The "File Location" and "Relative Path" fields are disabled because you have already specified the location on the "General" tab.
Upload Settings
Maximum number of files per record
Here you can specify the maximum number of files allowed per record.
Maximum file size
Here you can set the maximum size for uploaded files.
Select the desired unit from the list to the right of the input field.Accepted File Types
Enter the allowed file types here, preceded by a period (e.g., .txt or .xml) and separated by commas.
Delete files when a data field is deleted
Here, you specify how file data fields should be handled when they are deleted.
If allowed by Alias, uploaded files will be deleted if deletion is permitted by the settings configured for the corresponding file location.
No. Uploaded files are not deleted.
Include files during export
If allowed by Alias, uploaded files are included in the export if exporting files is permitted by the settings configured for the corresponding file location.
No. Uploaded files are not exported.
Images in the Event of an Error
Opens a dialog box where you can select an image to display when files are not physically present.
-
Click "OK."
You have created an MS365 data group.