Tips & Tricks - Save a Microsoft Exchange email in a data group
This article shows you step by step how an email from Microsoft Exchange can be assigned to a data record in an application and saved.
Create connection
Create connection If you have not set up a connection to Microsoft Exchange, create one with the Connector for Microsoft Exchange to begin with. A guide is available here.
Import Microsoft Exchange applications
If you have not already done so, import the "Exchange - Email" application, please do so now. Click here if you do not know where the import package is or you require more information.
Modify Exchange applications
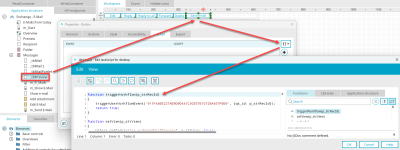
Open the "Exchange - Email" application in the "Applications" module. Open the "_tblPreview" page in the "Messages" data group. Create a button on the page and provide it with the title "Save email". Open the properties dialog of the button and switch to the "Script" tab.
Click on ![]() "Edit JavaScript for Desktop".
"Edit JavaScript for Desktop".
Insert the following script into the JavaScript editor:
function triggerWorkflow(p_strRecId)
{
    triggerUserWorkflowEvent('911F44EE227AE9D9D441C3CE57E10728A457F6E9', {qs_id: p_strRecId});
    return true;
}
With this script a process (we will create this later on) is triggered. The ID of the email is transferred to the process as a request parameter using "p_strRecId". Close the script editor by clicking on "OK". On the "Script" tab, click on ![]() "Add script" and select the event "onclick". In the "Function" field insert the function call
"Add script" and select the event "onclick". In the "Function" field insert the function call
triggerWorkflow('$drRecord.getRecId()'). Confirm all dialogs by clicking on "OK" and then save the application.
Target application
The process, which we will create in the next chapter, can save the email in a data group of any existing or new application. To do this, this data group requires a data field with the "File" data type. Create such a data field in your target application. The new field can, for example, be incorporated into a table that displays data records from the respective data group.
Create process
Switch to the "Processes" module and create a new process.
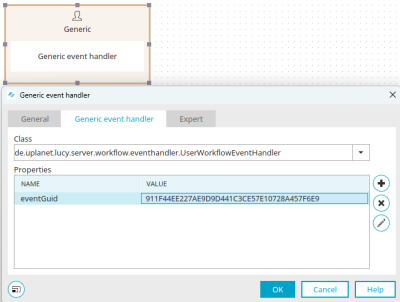
Remove any existing process elements and create a new Generic event handler. In the properties dialog, select the class "de.uplanet.lucy.server.workflow.eventhandler.UserWorkflowEventHandler" and use the GUID that you used in the JavaScript function "triggerWorkflow()" as the eventGuid (in this example "911F44EE227AE9D9D441C3CE57E10728A457F6E9"). Confirm your entries with "OK".
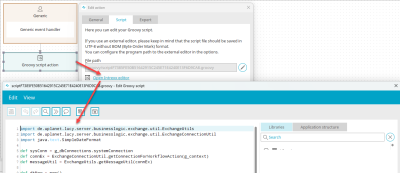
Create a Groovy script action and connect it to the Generic event handler. Insert the following script there:
import de.uplanet.lucy.server.businesslogic.exchange.util.ExchangeUtils
import de.uplanet.lucy.server.businesslogic.exchange.util.ExchangeConnectionUtil
import java.text.SimpleDateFormat

def sysConn = g_dbConnections.systemConnection
def connEx = ExchangeConnectionUtil.getConnectionForWorkflowAction(g_context)
def messageUtil = ExchangeUtils.getMessageUtil(connEx)

def dtNow = now()
def sdf = new SimpleDateFormat("yyyy-MM-dd H-mm")
def dtNowForm = sdf.format(dtNow)

def strMessageId = g_request.get('qs_id')
def fileMail = new File(g_dirWorkflowTmp, "${dtNowForm}.eml")


ExchangeUtils.getMessageUtil().saveMessageAsEML(strMessageId, fileMail)
//messageUtil.saveMessageAsEML(strMessageId, fileMail)

def newId = newGuid()
def strSubject = g_dbQuery.executeAndGetScalarValue(connEx, "SELECT Subject FROM Message WHERE ID = ?"){
                            setString(1, strMessageId)
                         }

g_dbQuery.executeUpdate(sysConn, """INSERT INTO DATAGROUP('2CE389DFC3DDA6113B54C52A1C38907DB781910C')
									(STRID, DTINSERT, DTEDIT, LUSERID, LUSERIDINSERT, STR_TITLE)
									VALUES (?, ?, ?, ?, ?, ?)""")
{
	setString(1, newId)
	setTimestamp(2, dtNow)
	setTimestamp(3, dtNow)
	setInt(4, g_session?.user?.id)
	setInt(5, g_session?.user?.id)
	setString(6, strSubject)
}

g_dgFile.move(guid: "271DFA7E30C3329FBFB0572FB20150E74BC1B77A", id: newId, file: fileMail, name: "${dtNowForm}.eml",
    deleteAlways: true, triggerWorkflow: false)
In the SQL commands SELECT and INSERT, please replace the GUID shown with the GUID of the data group from the target application. The names can be obtained very simply via the "application structure" once you have selected your application. Also replace the GUID "271DFA7E30C3329FBFB0572FB20150E74BC1B77A" in the last script line with the GUID of your file data field from the target application.
In the first step, the desired email will be saved in the cache so that it can then be added to the data group. Afterwards, a new data record is generated in the data group with the SQL statement "INSERT". The email's subject is used as the title for the new entry in the target application.
Please note that special characters in the subject of an email may cause errors during saving.
The last step with the "g_dgFile" is to add the cached email object to the record just created. The following parameters need to be added here:
-
g_context: The current processing context. "g_context" can be used constantly.
-
fileMail: The file object of the cached email.
-
GUID: The GUID of the file data field where the email should be saved.
-
File name: The new file name of the saved file object.
-
true/false: Should a data group event handler, which is defined for the target data group, react to the addition of the file?
As the name of the saved email, the current time is used in our example. Other filenames such as subject (without special characters), customer number or ID are also possible, and can be selected individually. Save and publish the process, and open the email application in the browser. Select a message to be archived, and click on the "Save email" button. Once the process has been performed, you will find the email in your target application.


