Export portal
You can export portals manually via the "Start" module or automatically via the "Tools" module.
When exporting automatically, you can configure a number of additional options. This includes defining the export time or an export cycle if you want to carry out an export regularly. In addition, you can automatically trigger further follow-up orders during automatic export.
Export portal manually
Step-by-step guide
To export a portal manually, proceed as follows:
-
Launch the portal you want to export.
-
Click on "Start > Export portal..."
The "Export portal..." dialog box is displayed.
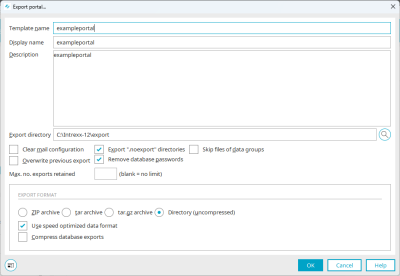
Template name
Template name This corresponds to the filename used for the export file.
Display name
When importing the portal, the display name in the template list (Own) is used.
Description
You can provide the portal export with a description here.
Export directory
The path where the export file will be saved is shown here.
 Select directory
Opens a dialog in which a directory can be selected.
Clear mail configuration
With this setting, the settings that are set in the current portal in the "Tools" module in the e-mail service are not transferred to the export.
Overwrite previous export
With this setting, the last export will be overwritten by the new one.
Empty certificate store
With this setting, no certificates are included in the export. Further information on this topic can be found here.
export ".noexport" directories
You can exclude directories from the export by placing a ".noexport" file in the corresponding directories.
If you do not want to exclude directories that contain a .noexport file from the export in certain scenarios, you can do so by activating this checkbox.File ".noexport"
By default, temporary directories in Intrexx contain .noexport files, as these are not required for the portal export or the exported portal.
If you exclude directories from export yourself with the help of .noexport files, you should document this.
You can create a .noexport file yourself using an editor.
You can find a sample file that you can copy in the following directory: <intrexx-installation directory>\orgtempl\blank\internal\tmp
File ".keep"
In addition to the ".noexport" file, you can also create a ".keep" file in connection with the portal export. If you save a .keep file in an empty directory, this will also be exported during the portal export. (Empty directories are not exported by default)
You can find a sample file that you can copy in the following directory: <intrexx-installation directory>\orgtempl\blank\internal\tmp
Remove database passwords
With this setting, the passwords for authentication to the portal database will be reset in the portal export. Logging on to the database will then be possible without a password.
Number of exports to be retained
Here you can specify how many portal exports should be retained in total. If this number is exceeded, the oldest export is automatically deleted.
Skip files from data groups
With this setting, files from data groups are not included in the export.
(Detailed information on files in file fields or data groups can be found in section Data fields
Export format
Four export formats are available:
-
ZIP archive
-
tar archive
-
tar.gz archive
-
Directory (uncompressed)
Use speed optimized data format
With this setting, the XML in the export file is written in a format that can be read more quickly during import.
Compress database exports
With this setting, the database export files (.data) are compressed as a gz file (.data.gz). In this way, the database export files require less space in the export directory.
-

<intrexx-installation directory>\org\<portalname>\internal\cfg\.
If necessary, you can make manual changes to the file.
Please note that although the portal.wcf file is exported when exporting a portal, it is imported without any manual changes during a subsequent import. This means that you may have to update the portal.wcf file manually.
Background The portal.wcf file contains system-specific information such as paths or ports that cannot normally be transferred 1:1 from one system to another.
Export portal automatically
Step-by-step guide
To export a portal automatically, proceed as follows:
-
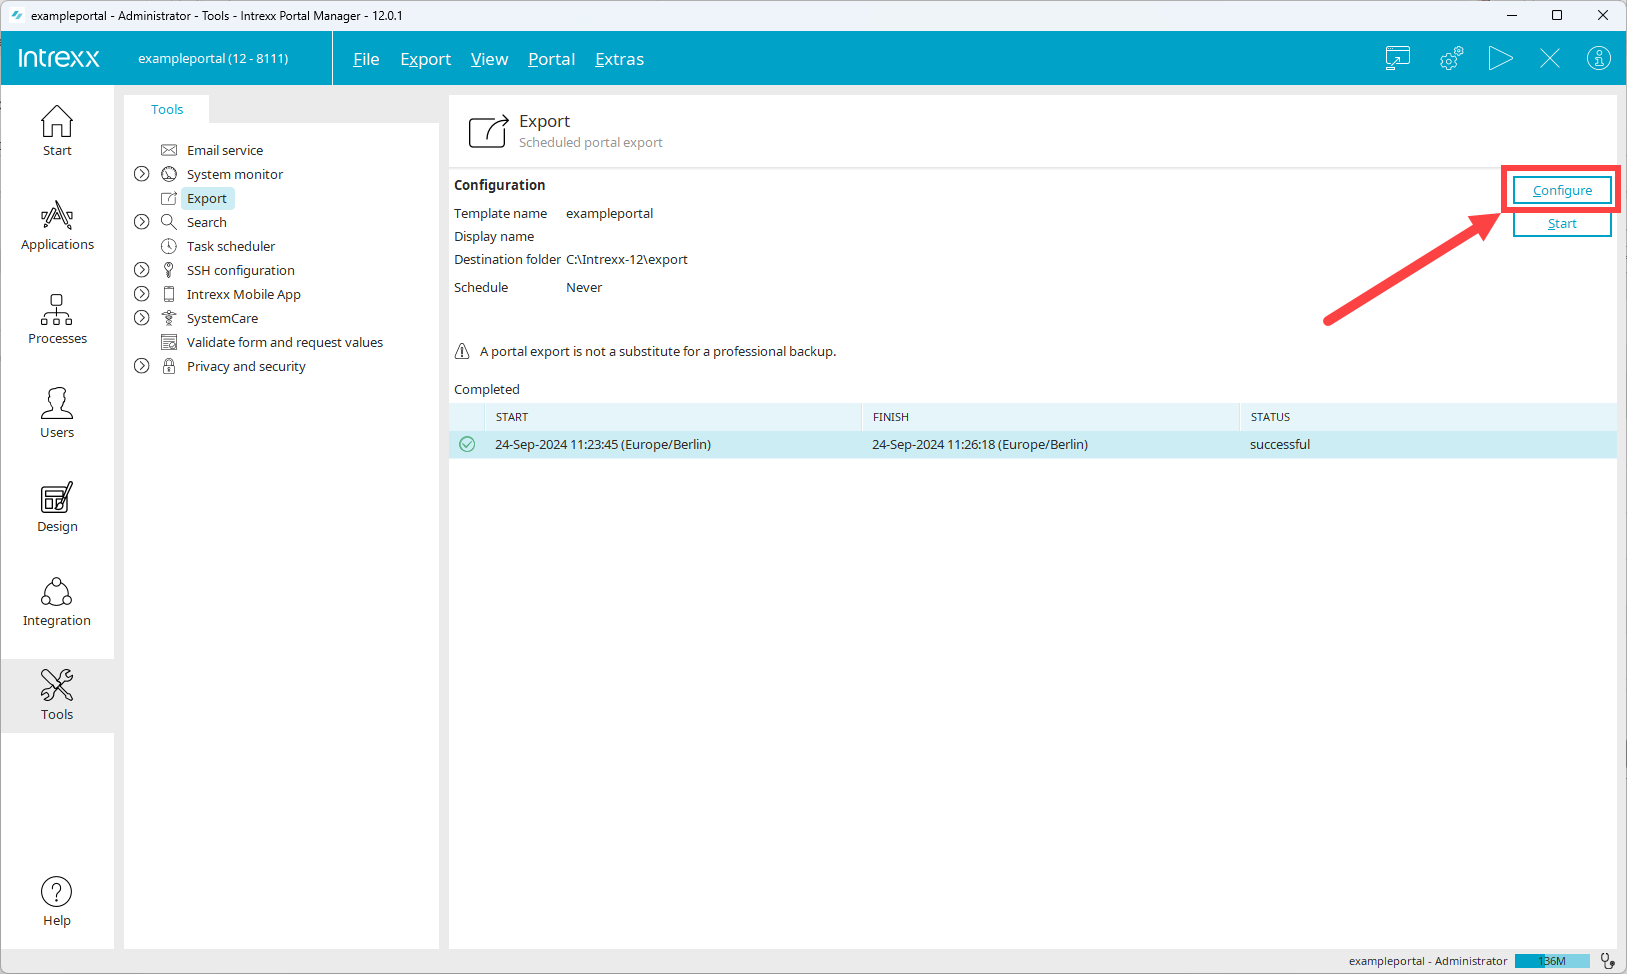
Start the "Tools" module.
-
Click on "Export" in the navigation area.
-
Click on "Configure".

The "Export configuration" dialog box appears.
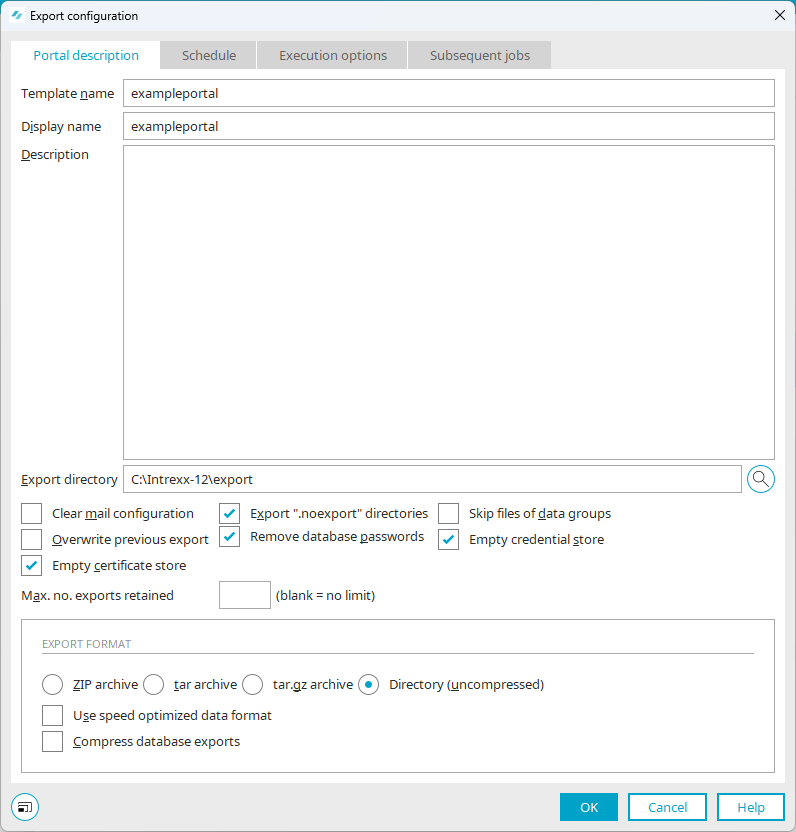
Portal description

Template name
Template name This corresponds to the filename used for the export file.
Display name
When importing the portal, the display name in the template list (Own) is used.
Description
You can provide the portal export with a description here.
Export directory
The path where the export file will be saved is shown here.
Select directoryOpens a dialog in which a directory can be selected.
Clear mail configuration
With this setting, the settings that are set in the current portal in the "Tools" module in the e-mail service are not transferred to the export.
Overwrite previous export
With this setting, the last export will be overwritten by the new one.
Empty certificate store
With this setting, no certificates are included in the export. Further information on this topic can be found here.
export ".noexport" directories
You can exclude directories from the export by placing a ".noexport" file in the corresponding directories.
If you do not want to exclude directories that contain a .noexport file from the export in certain scenarios, you can do so by activating this checkbox.File ".noexport"
By default, temporary directories in Intrexx contain .noexport files, as these are not required for the portal export or the exported portal.
If you exclude directories from export yourself with the help of .noexport files, you should document this.
You can create a .noexport file yourself using an editor.
You can find a sample file that you can copy in the following directory: <intrexx-installation directory>\orgtempl\blank\internal\tmp
File ".keep"
In addition to the ".noexport" file, you can also create a ".keep" file in connection with the portal export. If you save a .keep file in an empty directory, this will also be exported during the portal export. (Empty directories are not exported by default)
You can find a sample file that you can copy in the following directory: <intrexx-installation directory>\orgtempl\blank\internal\tmp
Remove database passwords
With this setting, the passwords for authentication to the portal database will be reset in the portal export. Logging on to the database will then be possible without a password.
Number of exports to be retained
Here you can specify how many portal exports should be retained in total. If this number is exceeded, the oldest export is automatically deleted.
Skip files from data groups
With this setting, files from data groups are not included in the export.
(Detailed information on files in file fields or data groups can be found in section Data fields
Export format
Four export formats are available:
-
ZIP archive
-
tar archive
-
tar.gz archive
-
Directory (uncompressed)
Use speed optimized data format
With this setting, the XML in the export file is written in a format that can be read more quickly during import.
Compress database exports
With this setting, the database export files (.data) are compressed as a gz file (.data.gz). In this way, the database export files require less space in the export directory.
-
-
Switch to the "Schedule" tab.
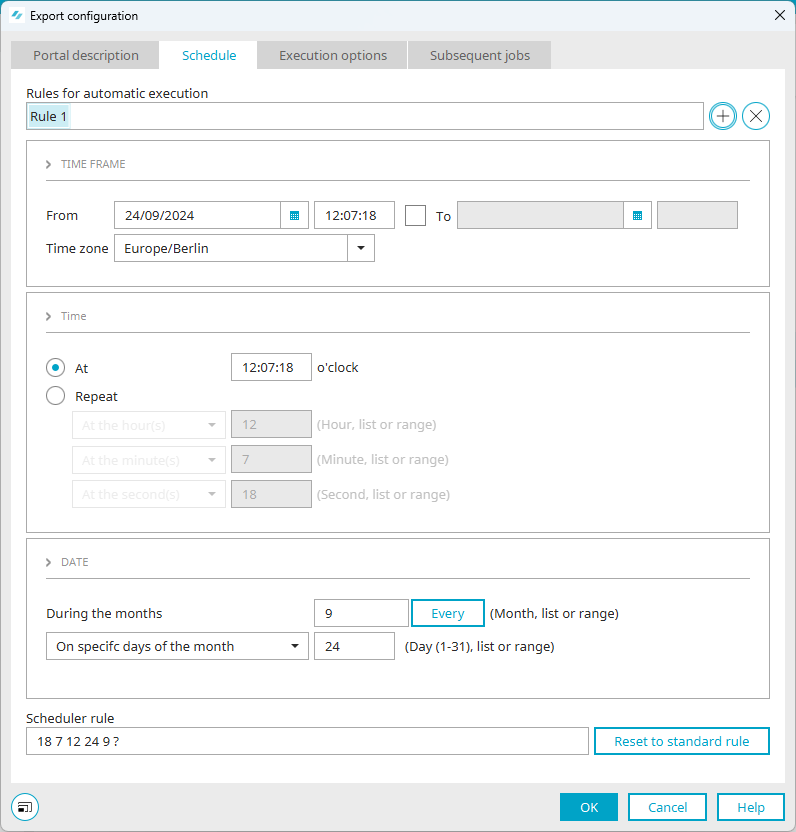
Schedule

Define the how often the task should be automatically executed.
Rules for automatic execution
Any number of rules with differing schedules can be created here. Created rules can be selected and activated individually meaning the task is executed with the corresponding schedule. Create a rule, change the settings (e.g. the time) in the dialog as required and save the rule by selecting another rule or closing the dialog by clicking on "OK".
 Add rule
Adds a new rule.
 Delete rule
Deletes the rule currently selected.
Time frame
From
Defines the start of the period. The first time execution is started at the next full hour from the value entered in the "From" field.
To
Defines the end of the period.
Time zone
Defines the time zone.
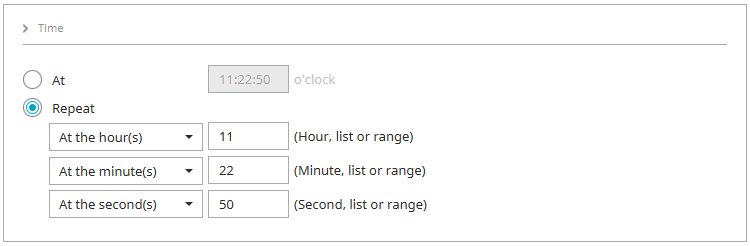
Time
At
With this option, a specific time can be entered when the task should be executed.
Redo
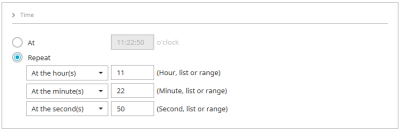
With the "In the hours / minutes / seconds" settings, a single hour (or minute, second), a list (separated by a comma) or a range (e.g. 8-10) can be entered here using an integer.
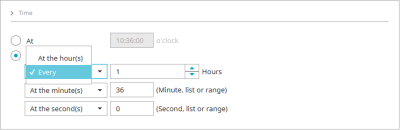
Click on the
 arrow button to the right of the settings listed here to select the "All" entry. This allows you to define an interval in hours, minutes and seconds relative to the last execution.
Date

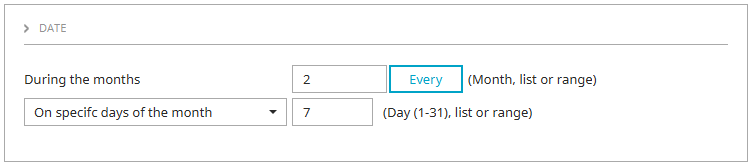
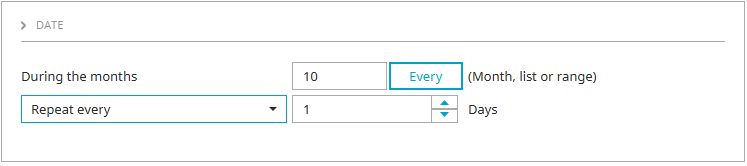
During the month(s)
Here, you can enter an integer for a single month, a list (separated by a comma) or a period (e.g. 3-5) to determine in which month(s) the task should be executed. Click on "All" to start the execution every month.
On specific days of the month
Corresponds to the "In the months" setting for the day unit.
Click on the
arrow button to the right of the setting to display further options.Repeat every
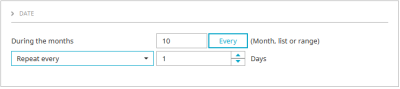
Enter the desired number of days before the end of the month.
On specific days of the week

Define the desired days of the week.
Days before the end of the month
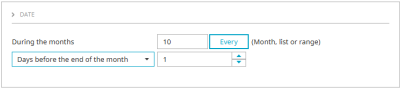
Enter the desired number of days before the end of the month.
Scheduler rule

The scheduler rule can be entered manually here. Information on the structure of the rules can be found here. The detailed description of the CronTrigger expressions can be found here (CronTrigger class).
Reset to default rule
If you click on this button, Intrexx will check the scheduler rule. If Intrexx detects errors, a rule is automatically built, which can be implemented via the input fields in this dialog box. Invalid values in the scheduler rule are discarded.
-
Switch to the "Execution options" tab.
Execution options

Run at server startup when schedule has been missed
With this setting, task will be executed that have not been carried out while the server was stopped.
Maximum history length
The number of entries is limited to the integer entered here.
Maximum age in the history
Defines how long the history entries are valid in milliseconds, seconds, minutes, hours or days. The entries in the history are only corrected when a new run takes place.
Purge successful entries in history
If you activate this checkbox, only the last successfully completed order will be displayed in the history.
Email
An email address can be entered that a message will be sent to as soon as the status, which is selected below, applies.
As of Status
You can select the following values:
- Never
A message will not be sent.
- Errors
Notification is sent in the event of incorrect execution.
- Warnings
A message will be sent when warnings are encountered.
- Always
A message will always be sent.
- Never
-
Switch to the "Follow-up orders" tab.
Subsequent jobs
You can arrange for Intrexx to automatically execute other subsequent jobs after the portal export. Follow-up orders can also be defined in the "Tools" module in task planning when configuring tasks and in the "Integration" module when configuring data transfers.
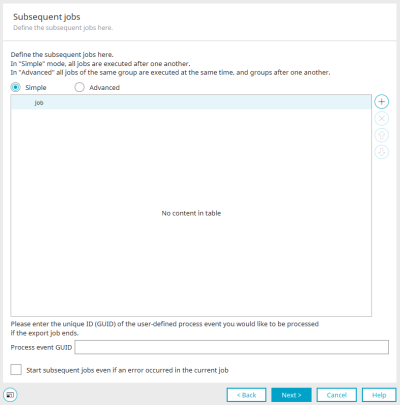
Click on the
icon to add a new follow-up order.You can have follow-up orders executed in "Simple" and "Advanced" mode.
Simple
After the actual order, all subsequent orders are executed one after the other.
Advanced
Using this option, subsequent jobs can be organized into groups. Orders of the same group are executed simultaneously after the actual order, the groups one after the other.
Process Event GUID
A process can be executed once the follow-up orders have been successfully completed. Enter the GUID of the process here.
Start the following processes even in the event of an error
If you activate this checkbox, all entered orders are executed, even if one of the orders was canceled due to an error.
-
Click on "OK" to complete the configuration.


<intrexx-installation directory>\org\<portalname>\internal\cfg\.
If necessary, you can make manual changes to the file.
Please note that although the portal.wcf file is exported when exporting a portal, it is imported without any manual changes during a subsequent import. This means that you may have to update the portal.wcf file manually.
Background The portal.wcf file contains system-specific information such as paths or ports that cannot normally be transferred 1:1 from one system to another.
# All tables starting with "CRITICAL_TABLE_"
CRITICAL_TABLE_.*# Completely ignored tables
[schema+data]
CRITICAL_TABLE
# Export without data
[data]
HUGE_TABLE
GDPR_.*.