Tips & Tricks - Generate QR codes
QR codes are small pictures that usually represent a URL. When the QR code is photographed or viewed in specialized apps, the user can navigate to the URL. The Java library ZXing provides you with the ability to create QR codes yourself. This Tips & Tricks article will demonstrate how to incorporate this library and use it with Groovy to transform entries into a QR code.
The example application for this workshop can be downloaded here. It can be imported into your portal as usual.
The import file also contains a process that must be included in the import. The process is deactivated after the import. If you would like to test this tips & tricks article, activate the process.
Make sure the expert options have been activated so that all of the dialogs explained in this example are available. Background knowledge in Groovy are an advantage in this workshop.
Incorporate the library
First of all, the library needs to be downloaded and made available to Intrexx. The .jar file can be downloaded from: https://repo1.maven.org/maven2/com/google/zxing/core/3.1.0/core-3.1.0.jar. Because this filename is not particularly meaningful, the name should be changed to "zxing-3.1.0.jar". Copy the file to the portal directory "lib/extensions".
Now the portal needs to be informed where it should search for this library. To do this, the file "portal.wcf" in the portal directory internal/cfg needs to be edited. Add the last line at the bottom of this section:
            # Java Classpath (include wrapper.jar)  Add class path elements as
#  needed starting from 1
wrapper.java.classpath.1=<Intrexx-installation-directory>\lib\update
wrapper.java.classpath.2=<Intrexx-installation-directory>\lib\*.jar
wrapper.java.classpath.3=<Intrexx-installation-directory>\lib\remote\*.jar
wrapper.java.classpath.4=<Intrexx-installation-directory>\derby\lib\*.jar
wrapper.java.classpath.5=<Intrexx-installation-directory>\lib\extensions\*.jar
It is important here that the value after wrapper.java.classpath.* increases incrementally. This has to be a consecutive number. Afterwards, restart the portal service.
Application
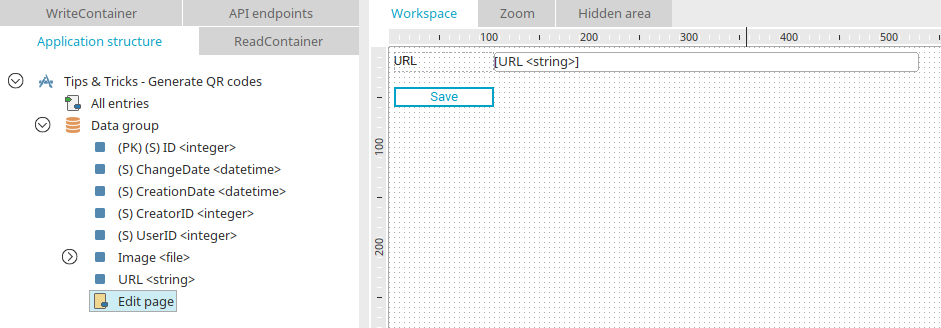
Here is the edit page of the example application where the URL can be entered and saved. The data group contains the file data field "Image".
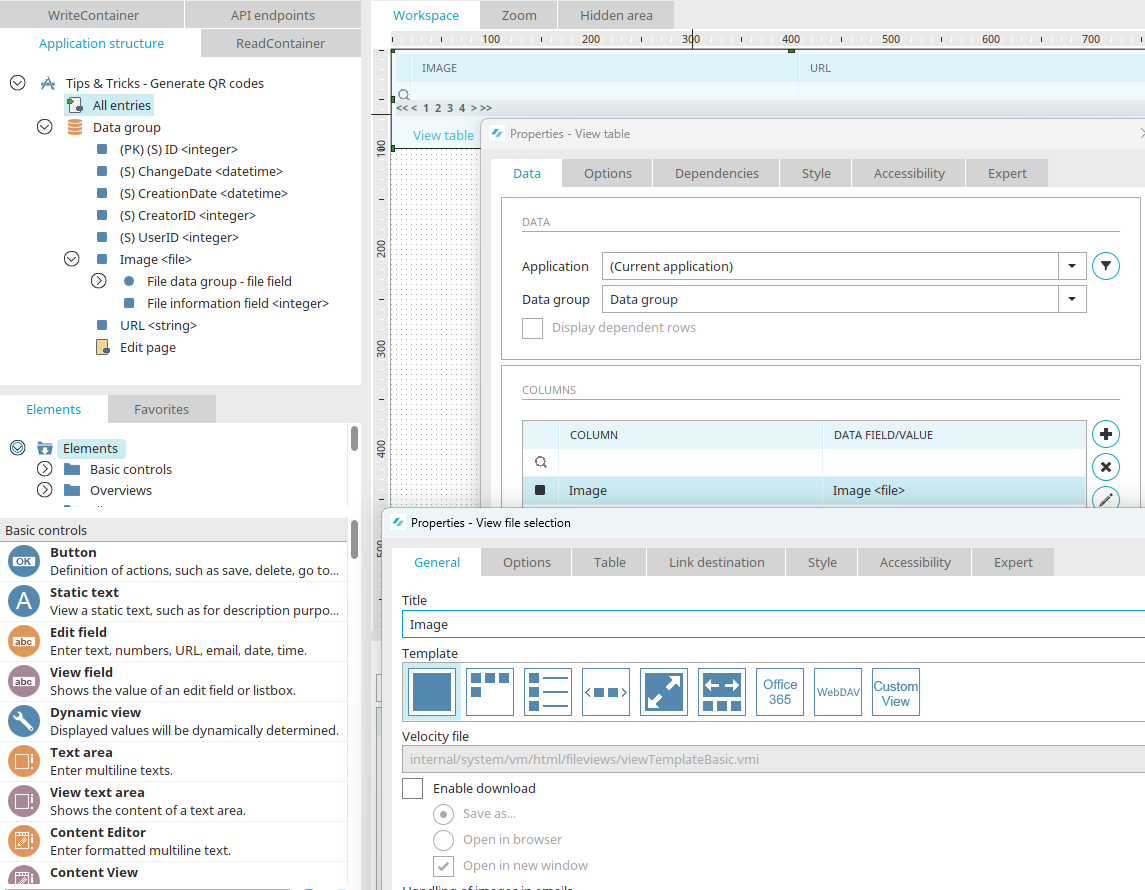
The "All entries" page contains a view tables that displays data from the data group. If you edit the "Image" column, you will see that a template for displaying the QR code in the table is selected here.
Process

The included process contains a data group event handler that responds to data records being added to the data group in the example application.

A Groovy script action is connected to the event handler with the following Groovy script:
            import java.awt.Color
import java.awt.Graphics2D
import java.awt.image.BufferedImage
import java.io.File
import java.util.Hashtable

import javax.imageio.ImageIO
import com.google.zxing.BarcodeFormat
import com.google.zxing.EncodeHintType
import com.google.zxing.common.BitMatrix
import com.google.zxing.qrcode.QRCodeWriter
import com.google.zxing.qrcode.decoder.ErrorCorrectionLevel

//URL to be converted
String recURL = g_record["5BD2494E2A4BD0AD0C427262CE4882C61F639EF3"].value /* datafield URL <string> */

//Size of the image in pixels
int size = 125

//Set error correction level
Hashtable<EncodeHintType, ErrorCorrectionLevel> hintMap = new Hashtable<EncodeHintType, ErrorCorrectionLevel>()
hintMap.put(EncodeHintType.ERROR_CORRECTION, ErrorCorrectionLevel.L)

//Initialize QR Code Writer
QRCodeWriter qrCodeWriter = new QRCodeWriter()

//Calculate QR code from URL
BitMatrix byteMatrix = qrCodeWriter.encode(recURL,BarcodeFormat.QR_CODE, size, size, hintMap)

//Adapt length unit of the image to QR code
int CrunchifyWidth = byteMatrix.getWidth()

BufferedImage image = new BufferedImage(CrunchifyWidth, CrunchifyWidth,BufferedImage.TYPE_INT_RGB)
image.createGraphics()
Graphics2D graphics = (Graphics2D) image.getGraphics()

//Color the entire image white
graphics.setColor(Color.WHITE)
graphics.fillRect(0, 0, CrunchifyWidth, CrunchifyWidth)

//Change color to black
graphics.setColor(Color.BLACK)

//Read black points and set to image
for (int i = 0; i < CrunchifyWidth; i++)
{
    for (int j = 0; j < CrunchifyWidth; j++)
	{
        if (byteMatrix.get(i, j)) {
            graphics.fillRect(i, j, 1, 1)
        }
    }
}

// Convert image to image file
String fileType = "png"
String filePath = "internal/tmp/qrcode-${g_record.getRecId()}.png"
File qrFile = new File(filePath)
ImageIO.write(image, fileType, qrFile)

//Move image to data group
g_dgFile.move(guid: "F80E0F688327BCF0D35A91E5B4930E731861CCA4", id: g_record.getRecId(), file: qrFile, deleteAlways: true, triggerWorkflow: false)
If you use the script in other applications, replace the GUID "5BD2494E2A4BD0AD0C427262CE4882C61F639EF3" with the GUID of your URL data field and the GUID "F80E0F688327BCF0D35A91E5B4930E731861CCA4" with the GUID of your Image file data field.
Application in the browser

If you open the application in the browser, enter the URL on the edit page and save it, a QR code is generated automatically and displayed on the "All entries" page. This image can then be copied to the clipboard from here, for example.