Creating an API endpoint for an application - Advanced
Tutorial content
This tutorial describes two slightly more advanced use cases for creating API endpoints. This is about restricting or filtering the values returned with a request.
In the first use case, this is still done "statically". This means that we specify a certain team from the task manager, for which all tasks, sorted by projects, are returned.
In the second use case, the values are returned "dynamically". This means that the user or consumer of the API endpoint can enter or select any team from the task manager. Subsequently, the tasks of this team, sorted by projects, are returned.
For the restrictions or selections described here, we use the Filter dialog once and the Query Parameters dialog step once.
Preparatory tasks
This "Advanced Tutorial" builds on the tutorial "Create an API endpoint for an application ". It is helpful to first reproduce the use case described there.
The same preparatory activities must be carried out for the Advanced Tutorial as for the "Create an API endpoint for an application" tutorial:
-
Create demo portal or import "Task Scheduler" application into existing portal
This tutorial describes how to create the REST API interface based on the Intrexx demo portal. You can find out how to create a new portal using the Intrexx demo portal as a template in the following section: Using Intrexx Demo Portal as a Portal Template
Alternatively, you can import the "Task Scheduler" application template into an existing portal. The corresponding procedure is described in the following section: Import online application templates.
-
Create user "David Winter".
In the tutorial, the user for the REST API interface is named David Winter. He has the "User" role.
In the Intrexx demo portal, this user is created by default.
-
Download Postman or use online
Install the Postman Client or use "Postman for the Web".
Identify the tasks of a particular team
Requirement
You want to get an overview of all your team's tasks. To get an overview, you want to request the following information:
-
Team title
-
Project title
-
Title of tasks
-
Status of tasks
The "Task" data group contains all the necessary data fields to retrieve the required information. The data field "Title" belongs more directly to the data group "Task". It contains the task title. The other data fields are referenced in the "Task" data group from the "Team", "Project" and "Status" data groups.

Procedure
Step-by-step guide
To get an overview of all the "Sales" team tasks, proceed as follows:
-
Create a new endpoint and assign a descriptive name for it.
-
Click "Data group endpoint".
-
Click on "Next".
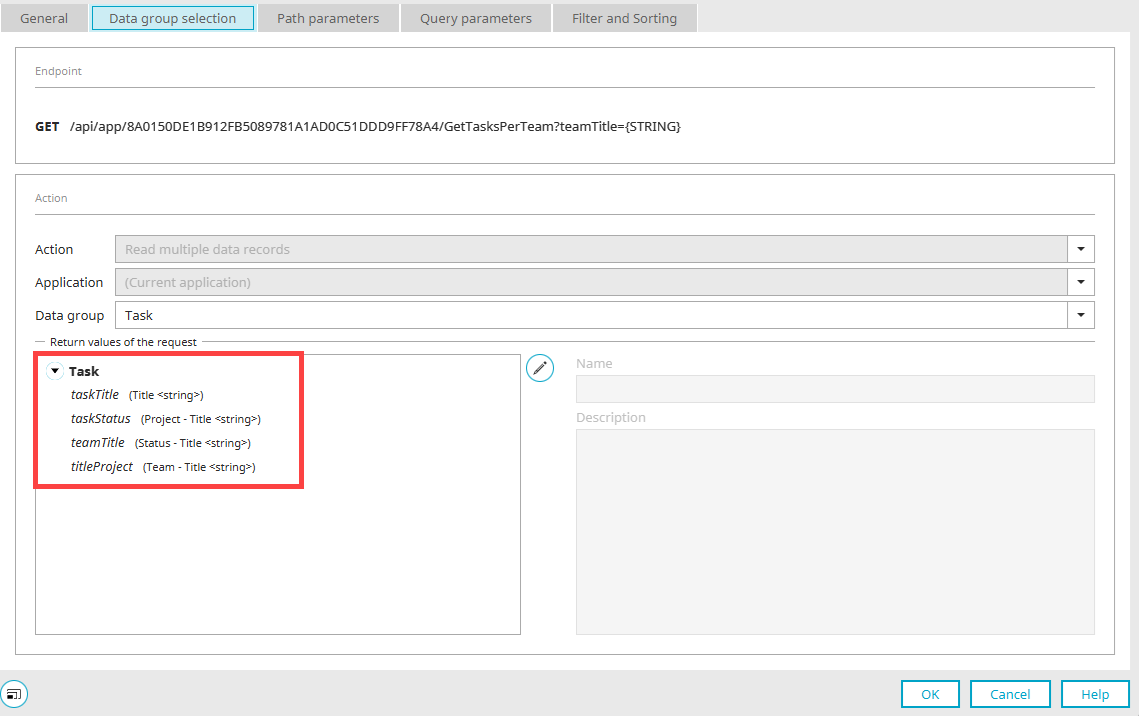
The "Data group selection" dialog step appears.
-
In the "Action" selection field, select the "Read multiple records" value.
-
Select the value "(current application)" in the "Application" selection field.
-
In the "Data group" selection field, select the "Task" value.
-
Click on the
 icon.
icon. -
Clear the checkbox "(PK) (S) (ID)" <string>
-
In the "Add Data Fields" dialog box, select the following data fields:
-
Title <string>
-
Project – Title <string>
-
Status – Title <string>
-
Team – Title <string>
For better readability of the return values and the Swagger documentation, we recommend that the return values are renamed.
For this tutorial, the return values have been renamed as follows:
-
title (title <string>) → taskTitle
-
ref4125cc5b (title <string>) → taskStatus
-
ref0542049e (title <string>) → teamTitle
-
ref5477b5f9 (title <string>) → titleProject
Names of referenced data fields
The names of the data fields referenced in the "Task" data group correspond to the name of the reference fields. You can display these in the Intrexx Expert mode (Expert mode ). To display the fields, select the data group. Right-click on it. Select "Show data fields" from the context menu. Select the referenced data field. Right-click on it. Select "Properties" from the context menu. Switch to the "Expert" tab.

Add data fields one by one
You can add the data fields one by one and rename the newly added field each time.
-
-
Click on "Next".
-
Assign a static path parameter.
In this tutorial, we will assign the name "GetSalesTasks".
-
Click on "Next".
-
Skip the "Query parameters" dialog step and click "Next".
You are taken to the "Filter and sort" dialog.
Filter by "Sales" team
In the "Filter" section, we specify that only the tasks of the "Sales" team are queried.
-
Click on the
 icon.
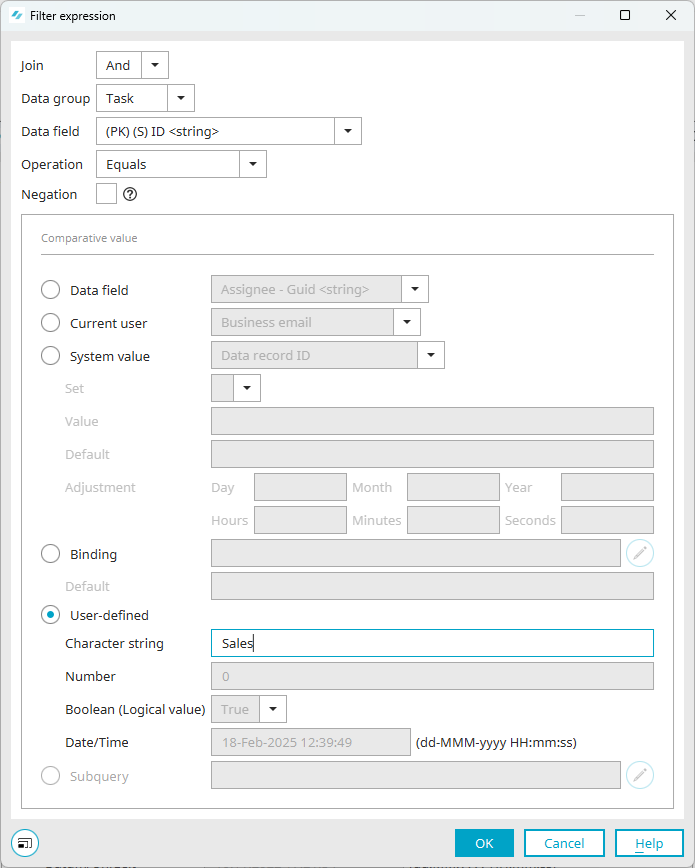
icon.The "Filter Expression Properties" dialog box appears.
-
Select the "Custom" option and enter the string "Sales" in the "String" input field.
-
Click on "OK".
You will be returned to the "Filter and sort" dialog step.
Sort return values
Finally, the sorting of the return values is to be defined. These should be sorted by the project they belong to.
-
First delete the default sorting by "Title <string>". (This would correspond to sorting by task title.)
-
Click on the
icon. -
Select "Task" > "Project – (REF-PK) ID <string>".
-
Click on "Finish".
-
Click on the
 icon (Publish application completely).
Select data fields
Next steps
Now proceed as usual. Assign permissions to the API endpoint, create an API key or enable an existing API key for the API endpoint, create Swagger documentation, and import it into Postman.
After executing the request, the following JSON file is returned.
{
    "information": {
        "limit": 150,
        "offset": 0,
        "orderBy": [
            {
                "field": "F34E2EC1891D7EEC1C1D3271CA53E700F3CD257F",
                "order": "asc"
            }
        ]
    },
    "data": [
        {
            "taskTitle": "Einarbeitung - Workshop planen",
            "taskStatus": "Erledigt",
            "teamTitle": "Sales",
            "titleProject": "Neues ERP"
        },
        {
            "taskTitle": "Interessentenmodul verbessern",
            "taskStatus": "Todo",
            "teamTitle": "Sales",
            "titleProject": "Neues ERP"
        },
        {
            "taskTitle": "Datenübernahme",
            "taskStatus": "In Bearbeitung",
            "teamTitle": "Sales",
            "titleProject": "Neues ERP"
        },
        {
            "taskTitle": "Artikelliste prüfen",
            "taskStatus": "Todo",
            "teamTitle": "Sales",
            "titleProject": "Neues ERP"
        }
    ]
}
Determine the tasks of any team
Requirement
You want to get an overview of the tasks for any team. To do this, you want to enter the title of the respective team in an input field or select it from a selection field and then have the following information returned:
-
Team title
-
Project title
-
Title of tasks
-
Status of tasks
Procedure
Most of the steps in this requirement are the same as the steps in determining the tasks for a particular team. The key difference is that you create a dynamic request instead of a static request, where the user can enter or select the team for which they want to determine the tasks. This is established in the "Query parameters" dialog step. At the same time, filtering by the "Sales" string in the "Filter and Sort" dialog step is omitted.
Step-by-step guide
To get an overview of all tasks of any team, proceed as follows:
-
Create a new endpoint and assign a descriptive name for it.
-
Now proceed as you did for "Determine tasks of a specific team".
-
Select the data fields.
-
Rename the data fields.
-
Assign a static path parameter.
In this tutorial, we will assign the name "GetTasksPerTeam".
-
Click on "Next".
The "Query parameters" dialog step appears.
-
Click on the
icon. -
Enter the name for the "teamTitle" query parameter in the "Name" input field.
The name of the query parameter will be available later in the "Filter and Sort" dialog step.
-
Select the value "STRING" in the "Data type" selection field.
-
Click on the
icon next to the "Fallback" input field.
-
Select the "Static value" option.
-
Enter the text "Sales" in the "Static value" input field.
If no value for the (query) parameter "teamTitle" is entered later when executing the request, the tasks of the "Sales" team are determined by default.
-
Click on "OK".
The dialog step is now as follows:

The left pane displays the query parameter. The data field to which the query parameter refers is not yet displayed, since this has not yet been determined. This is done in the next dialog step "Filter and sort" in the "Filter" area.
-
Click on "Next".
You are taken to the "Filter and sort" dialog.
Filter by "Sales" team
In the "Filter" section, we specify that only the tasks of the "Sales" team are queried.
-
Click on the
icon.The "Filter Expression Properties" dialog box appears.
-
Select the "Binding" option.
Click on the
icon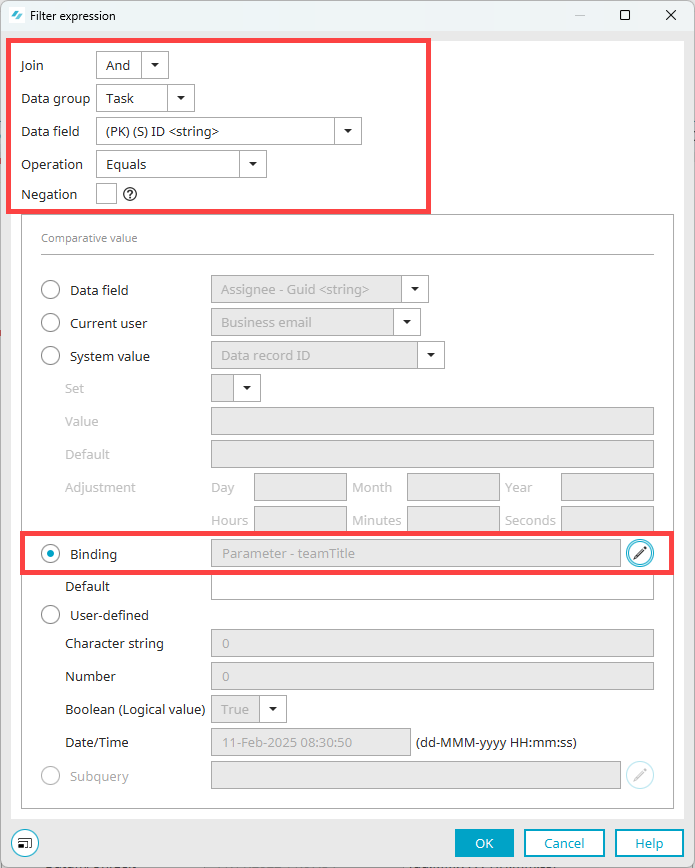
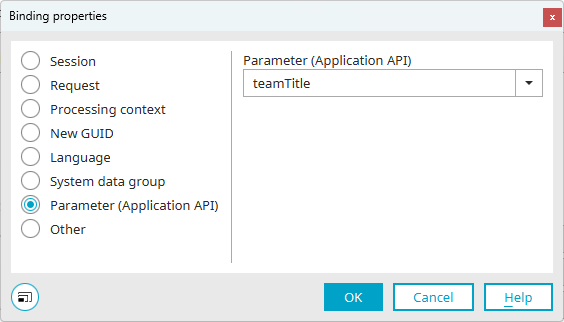
The "Binding properties" dialog appears.
-
Select the "Parameters (Application API)" option on the left.
-
Select the "teamTitle" parameter on the right below "Parameters (Application API)".
-
Confirm the information you have entered.
You will be returned to the "Filter and sort" dialog step.
Data field display for query parameters
Clicking the "Back" button will take you back to the "Query parameters" dialog step. The data field for the query parameter is now displayed there.

Sort return values
Finally, the sorting of the return values is to be defined. In this case, they should also be sorted according to the project they belong to.
-
First delete the default sorting by "Title <string>". (This would correspond to sorting by task title.)
-
Click on the
icon. -
Select "Task" > "Project – (REF-PK) ID <string>".
-
Click on "Finish".
-
Click on the
icon (Publish application completely).
Next steps
Now proceed as usual. Assign permissions to the API endpoint, create an API key or enable an existing API key for the API endpoint, create Swagger documentation, and import it into Postman.
For example, after executing the request, the following JSON file is returned for the Marketing team.
{
    "information": {
        "limit": 150,
        "offset": 0,
        "orderBy": [
            {
                "field": "teamTitle",
                "order": "asc"
            }
        ]
    },
    "data": [
        {
            "teamTitle": "Marketing",
            "taskTitle": "Einladung verfassen",
            "statusTitle": "In Bearbeitung",
            "projectTitle": "Partnertag"
        },
        {
            "teamTitle": "Marketing",
            "taskTitle": "Produktbeschreibung anfordern",
            "statusTitle": "In Bearbeitung",
            "projectTitle": "Classic-Line"
        },
        {
            "teamTitle": "Marketing",
            "taskTitle": "Briefing Vertrieb",
            "statusTitle": "Erledigt",
            "projectTitle": "Classic-Line"
        },
        {
            "teamTitle": "Marketing",
            "taskTitle": "Anmeldungen auswerten",
            "statusTitle": "Todo",
            "projectTitle": "Partnertag"
        },
        {
            "teamTitle": "Marketing",
            "taskTitle": "Liste Einladungen",
            "statusTitle": "Erledigt",
            "projectTitle": "Partnertag"
        }
    ]
}