Below you will find a description of how to configure NGINX as a reverse proxy for Intrexx.
If you want to create your own configurations for web front-ends (Nginx, IIS, Apache, HAProxy, TrafficServer or similar), please note the following:
HTTPS
-
Access only via HTTPS
-
Redirect from HTTP to HTTPS
Blocked URLs
-
Hidden files and directories starting with .. Exception : /.well-known/
-
/WEB-INF/ (recursive)
-
/web.config
-
/bin/ (recursive)
1. Customize configuration file
During an upgrade in the NGINX configuration file, replace the line
location ~ (css|download|images|include|is|script|temp|thirdparty|userfiles) {
with the following line
location ~ ^(/css|/fonts|/images|/include|/script|/thirdparty|/userfiles|/download|/is) {
Usually, this affects NGINX configuration files that were created with Intrexx 20.09, Intrexx 20.03 OU3, 19.09, 19.03 OU13 or older.
NGINX is configured via configuration files. After downloading the Intrexx setup files, you will find three template files for configuring NGINX. You can use this as a basis for configuring your NGINX.
The template files can be found under the following path: <INTREXX-ROOT>/samples/web-tls-configuration/nginx/
The names of the template files are portal-intranet.conf, portal-internet.conf and portal-remote.conf
Note In addition to the information in the "portal-intranet.conf" file, the "portal-internet.conf" file also contains a section for configuring the OCSP stacking.
You can view both files via the following two expandable links and already get an idea of what they look like.
#
# This file may be used as a basic template for running Intrexx behind Nginx.
#
# Nginx performs the required TLS encryption and serves certain static files.
#
# TODO tags indicate which directives have to be modified in your configuration.
#
# Define the upstream connections.
#
# TODO: Ensure that the upstream name (here "backend") is
# unique for all virtual servers that run under this Nginx
# instance.
#
upstream backend {
# Address and port of the Intrexx Portal Service
#
# TODO: Configure the actual address and port of your Intrexx
# Portal Service web connector.
#
server localhost:1337;
}
# Redirect all unencrypted HTTP requests to HTTPS.
#
# TODO: Change the server name and redirect URL.
#
server {
listen 80;
server_name intrexx.example.org;
rewrite ^ https://intrexx.example.org$request_uri? permanent;
rewrite_log on;
}
# Reverse proxy with TLS offloading for the Intrexx Portal Service.
#
server {
listen 443 ssl;
server_name intrexx.example.org;
keepalive_timeout 70s;
# Use dedicated access and error logs.
#
# TODO: If you want to have dedicated access and error logs for
# your Intrexx portal then uncomment the directives below and
# change the paths to fit your needs.
#
#access_log /var/log/nginx/intrexx.example.org-access.log;
#error_log /var/log/nginx/intrexx.example.org-error.log error;
# SSL keys, certificates and optional DHE group
#
# Note: Here the term "modern compatibility" refers to configurations
# that support TLSv1.3 only, while intermediate compatibility supports
# both TLSv1.3 and TLSv1.2.
# See https://wiki.mozilla.org/Security/Server_Side_TLS for additional
# information about which one to choose according to your requirements.
#
# TODO: Configure the actual paths to your certificate and key files.
# For intermediate compatibility copy the provided Diffie-Hellman
# parameters file to an appropriate location specified with the
# ssl_dhparam directive.
# See https://wiki.mozilla.org/Security/Server_Side_TLS#Forward_Secrecy.
#
# The file specified by ssl_certificate should contain the certificate
# chain starting with your server certificate, following the intermediate
# certificates, up to the root certificate. The root certificate may be
# left out for SSL handshake optimization.
#
# The file specified by ssl_trusted_certificate should contain the certificate
# chain starting with your server certificate, following the intermediate
# certificates, up to the root certificate.
#
# As the Diffie-Hellman parameters file you might want to use one of the
# ffdhe*.pem files from samples/web-tls-configuration/nginx/.
#
# http://nginx.org/en/docs/http/ngx_http_ssl_module.html#ssl_certificate
# http://nginx.org/en/docs/http/ngx_http_ssl_module.html#ssl_trusted_certificate (for OCSP)
# http://nginx.org/en/docs/http/ngx_http_ssl_module.html#ssl_password_file
# http://nginx.org/en/docs/http/ngx_http_ssl_module.html#ssl_dhparam
# https://tools.ietf.org/html/rfc7919
#
ssl_certificate /etc/ssl/localcerts/intrexx.example.org.pem;
ssl_trusted_certificate /etc/ssl/localcerts/intrexx.example.org.pem;
ssl_certificate_key /etc/ssl/localcerts/intrexx.example.org.key;
#ssl_password_file /etc/ssl/localcerts/intrexx.example.org.password;
ssl_dhparam /etc/ssl/localcerts/ffdhe2048.pem;
ssl_session_cache shared:SSL:10m;
ssl_session_timeout 30m;
ssl_session_tickets on;
# Configure the TLS protocols
#
# TODO: Choose one of modern or intermediate compatibility below.
#
# Modern compatibility (TLSv1.3 only)
#
# TODO: For modern compatibility uncomment the line below.
#
#ssl_protocols TLSv1.3;
# Intermediate compatibility
#
# TODO: For modern compatibility comment out the three lines below.
#
ssl_protocols TLSv1.2 TLSv1.3;
ssl_prefer_server_ciphers on;
ssl_ciphers 'TLS_AES_128_GCM_SHA256:TLS_AES_256_GCM_SHA384:TLS_CHACHA20_POLY1305_SHA256:ECDHE-ECDSA-AES128-GCM-SHA256:ECDHE-RSA-AES128-GCM-SHA256:ECDHE-ECDSA-AES256-GCM-SHA384:ECDHE-RSA-AES256-GCM-SHA384:ECDHE-ECDSA-CHACHA20-POLY1305:ECDHE-RSA-CHACHA20-POLY1305:DHE-RSA-AES128-GCM-SHA256:DHE-RSA-AES256-GCM-SHA384';
add_header Strict-Transport-Security max-age=63072000; # two years
add_header X-Frame-Options SAMEORIGIN;
# The root path of the Intrexx web application.
#
# TODO: Specify the path to your portal's htmlroot directory.
#
root /opt/intrexx/org/intrexx.example.org/external/htmlroot;
# serve favicon and robots.txt
location ~ (/favicon.ico|/robots.txt) {
try_files $uri =404;
}
# hide hidden files and directories
location ~ /\. {
return 404;
}
# hide WEB-INF
location /WEB-INF/ {
deny all;
return 404;
}
# hide IIS web.config
location ~* /web.config {
deny all;
return 404;
}
# hide the bin directory
location /bin/ {
deny all;
return 404;
}
# Static files that should be served by Nginx.
#
location ~ ^(/css|/fonts|/images|/include|/script|/thirdparty) {
sendfile on;
sendfile_max_chunk 1m;
try_files $uri =404;
}
# Delegate WebSocket requests to the Intrexx Portal Service.
#
location /ws/ {
proxy_pass http://backend;
proxy_http_version 1.1;
proxy_set_header Upgrade $http_upgrade;
proxy_set_header Connection "Upgrade";
}
# Delegate requests to the Intrexx Portal Service.
#
location / {
proxy_pass http://backend;
proxy_set_header X-Forwarded-For $proxy_add_x_forwarded_for;
# Clear potentially unsafe headers. These may be enabled if the backend
# is configured to handle them correctly and in a safe manner.
proxy_set_header Forwarded "";
proxy_set_header X-Real-IP $remote_addr;
proxy_set_header X-Forwarded-Proto $scheme;
proxy_set_header X-Forwarded-Host $host:$server_port;
proxy_set_header X-Original-URL "";
# Security token to authenticate the reverse proxy with the backend.
proxy_set_header X-SecToken "";
# For security reasons we do not pass X-User and X-Domain to the backend by default,
# since these headers might be interpreted by the External Authentication Filter as
# authenticated user information.
proxy_set_header X-User "";
proxy_set_header X-Domain "";
# additional security sensitive headers
proxy_set_header X-KrbTicket "";
proxy_set_header X-AccountName "";
# Set the maximum allowed size of the client request body. The value 0 disables
# this limit check.
# http://nginx.org/en/docs/http/ngx_http_core_module.html#client_max_body_size
client_max_body_size 2048m;
}
}#
# This file may be used as a basic template for running Intrexx behind Nginx.
#
# Nginx performs the required TLS encryption and serves certain static files.
#
# TODO tags indicate which directives have to be modified in your configuration.
#
# Define the upstream connections.
#
# TODO: Ensure that the upstream name (here "backend") is
# unique for all virtual servers that run under this Nginx
# instance.
#
upstream backend {
# Address and port of the Intrexx Portal Service
#
# TODO: Configure the actual address and port of your Intrexx
# Portal Service web connector.
#
server localhost:1337;
}
# Redirect all unencrypted HTTP requests to HTTPS.
#
# TODO: Change the server name and redirect URL.
#
server {
listen 80;
server_name intrexx.example.org;
rewrite ^ https://intrexx.example.org$request_uri? permanent;
rewrite_log on;
}
# Reverse proxy with TLS offloading for the Intrexx Portal Service.
#
server {
listen 443 ssl;
server_name intrexx.example.org;
keepalive_timeout 70s;
# Use dedicated access and error logs.
#
# TODO: If you want to have dedicated access and error logs for
# your Intrexx portal then uncomment the directives below and
# change the paths to fit your needs.
#
#access_log /var/log/nginx/intrexx.example.org-access.log;
#error_log /var/log/nginx/intrexx.example.org-error.log error;
# SSL keys, certificates and optional DHE group
#
# Note: Here the term "modern compatibility" refers to configurations
# that support TLSv1.3 only, while intermediate compatibility supports
# both TLSv1.3 and TLSv1.2.
# See https://wiki.mozilla.org/Security/Server_Side_TLS for additional
# information about which one to choose according to your requirements.
#
# TODO: Configure the actual paths to your certificate and key files.
# For intermediate compatibility copy the provided Diffie-Hellman
# parameters file to an appropriate location specified with the
# ssl_dhparam directive.
# See https://wiki.mozilla.org/Security/Server_Side_TLS#Forward_Secrecy.
#
# The file specified by ssl_certificate should contain the certificate
# chain starting with your server certificate, following the intermediate
# certificates, up to the root certificate. The root certificate may be
# left out for SSL handshake optimization.
#
# The file specified by ssl_trusted_certificate should contain the certificate
# chain starting with your server certificate, following the intermediate
# certificates, up to the root certificate.
#
# As the Diffie-Hellman parameters file you might want to use one of the
# ffdhe*.pem files from samples/web-tls-configuration/nginx/.
#
# http://nginx.org/en/docs/http/ngx_http_ssl_module.html#ssl_certificate
# http://nginx.org/en/docs/http/ngx_http_ssl_module.html#ssl_trusted_certificate (for OCSP)
# http://nginx.org/en/docs/http/ngx_http_ssl_module.html#ssl_password_file
# http://nginx.org/en/docs/http/ngx_http_ssl_module.html#ssl_dhparam
# https://tools.ietf.org/html/rfc7919
#
ssl_certificate /etc/ssl/localcerts/intrexx.example.org.pem;
ssl_trusted_certificate /etc/ssl/localcerts/intrexx.example.org.pem;
ssl_certificate_key /etc/ssl/localcerts/intrexx.example.org.key;
#ssl_password_file /etc/ssl/localcerts/intrexx.example.org.password;
ssl_dhparam /etc/ssl/localcerts/ffdhe2048.pem;
ssl_session_cache shared:SSL:10m;
ssl_session_timeout 30m;
ssl_session_tickets on;
# Enable or disable OCSP Stapling
#
# http://nginx.org/en/docs/http/ngx_http_ssl_module.html#ssl_stapling
# http://nginx.org/en/docs/http/ngx_http_ssl_module.html#ssl_stapling_verify
# http://nginx.org/en/docs/http/ngx_http_core_module.html#resolver
#
ssl_stapling on;
ssl_stapling_verify on;
resolver 9.9.9.9 8.8.8.8 valid=300s;
# Configure the TLS protocols
#
# TODO: Choose one of modern or intermediate compatibility below.
#
# Modern compatibility (TLSv1.3 only)
#
# TODO: For modern compatibility uncomment the line below.
#
#ssl_protocols TLSv1.3;
# Intermediate compatibility
#
# TODO: For modern compatibility comment out the three lines below.
#
ssl_protocols TLSv1.2 TLSv1.3;
ssl_prefer_server_ciphers on;
ssl_ciphers 'TLS_AES_128_GCM_SHA256:TLS_AES_256_GCM_SHA384:TLS_CHACHA20_POLY1305_SHA256:ECDHE-ECDSA-AES128-GCM-SHA256:ECDHE-RSA-AES128-GCM-SHA256:ECDHE-ECDSA-AES256-GCM-SHA384:ECDHE-RSA-AES256-GCM-SHA384:ECDHE-ECDSA-CHACHA20-POLY1305:ECDHE-RSA-CHACHA20-POLY1305:DHE-RSA-AES128-GCM-SHA256:DHE-RSA-AES256-GCM-SHA384';
add_header Strict-Transport-Security max-age=63072000; # two years
add_header X-Frame-Options SAMEORIGIN;
# The root path of the Intrexx web application.
#
# TODO: Specify the path to your portal's htmlroot directory.
#
root /opt/intrexx/org/intrexx.example.org/external/htmlroot;
# serve favicon and robots.txt
location ~ (/favicon.ico|/robots.txt) {
try_files $uri =404;
}
# hide hidden files and directories
location ~ /\. {
return 404;
}
# hide WEB-INF
location /WEB-INF/ {
deny all;
return 404;
}
# hide IIS web.config
location ~* /web.config {
deny all;
return 404;
}
# hide the bin directory
location /bin/ {
deny all;
return 404;
}
# Static files that should be served by Nginx.
#
location ~ ^(/css|/fonts|/images|/include|/script|/thirdparty) {
sendfile on;
sendfile_max_chunk 1m;
try_files $uri =404;
}
# Delegate WebSocket requests to the Intrexx Portal Service.
#
location /ws/ {
proxy_pass http://backend;
proxy_http_version 1.1;
proxy_set_header Upgrade $http_upgrade;
proxy_set_header Connection "Upgrade";
}
# Delegate requests to the Intrexx Portal Service.
#
location / {
proxy_pass http://backend;
proxy_set_header X-Forwarded-For $proxy_add_x_forwarded_for;
# Clear potentially unsafe headers. These may be enabled if the backend
# is configured to handle them correctly and in a safe manner.
proxy_set_header Forwarded "";
proxy_set_header X-Real-IP $remote_addr;
proxy_set_header X-Forwarded-Proto $scheme;
proxy_set_header X-Forwarded-Host $host:$server_port;
proxy_set_header X-Original-URL "";
# Security token to authenticate the reverse proxy with the backend.
proxy_set_header X-SecToken "";
# For security reasons we do not pass X-User and X-Domain to the backend by default,
# since these headers might be interpreted by the External Authentication Filter as
# authenticated user information.
proxy_set_header X-User "";
proxy_set_header X-Domain "";
# additional security sensitive headers
proxy_set_header X-KrbTicket "";
proxy_set_header X-AccountName "";
# Set the maximum allowed size of the client request body. The value 0 disables
# this limit check.
# http://nginx.org/en/docs/http/ngx_http_core_module.html#client_max_body_size
client_max_body_size 2048m;
}
}#
# This file may be used as a basic template for running Intrexx behind Nginx
# when Intrexx and Nginx reside on different machines.
#
# Nginx performs the required TLS encryption.
#
# TODO tags indicate which directives have to be modified in your configuration.
#
# Define the upstream connections.
#
# TODO: Ensure that the upstream name (here "backend") is
# unique for all virtual servers that run under this Nginx
# instance.
#
upstream backend {
# Address and port of the Intrexx Portal Service
#
# TODO: Configure the actual address and port of your Intrexx
# Portal Service web connector.
#
server localhost:1337;
}
# Redirect all unencrypted HTTP requests to HTTPS.
#
# TODO: Change the server name and redirect URL.
#
server {
listen 80;
server_name intrexx.example.org;
rewrite ^ https://intrexx.example.org$request_uri? permanent;
rewrite_log on;
}
# Reverse proxy with TLS offloading for the Intrexx Portal Service.
#
server {
listen 443 ssl;
server_name intrexx.example.org;
keepalive_timeout 70s;
# Use dedicated access and error logs.
#
# TODO: If you want to have dedicated access and error logs for
# your Intrexx portal then uncomment the directives below and
# change the paths to fit your needs.
#
#access_log /var/log/nginx/intrexx.example.org-access.log;
#error_log /var/log/nginx/intrexx.example.org-error.log error;
# SSL keys, certificates and optional DHE group
#
# Note: Here the term "modern compatibility" refers to configurations
# that support TLSv1.3 only, while intermediate compatibility supports
# both TLSv1.3 and TLSv1.2.
# See https://wiki.mozilla.org/Security/Server_Side_TLS for additional
# information about which one to choose according to your requirements.
#
# TODO: Configure the actual paths to your certificate and key files.
# For intermediate compatibility copy the provided Diffie-Hellman
# parameters file to an appropriate location specified with the
# ssl_dhparam directive.
# See https://wiki.mozilla.org/Security/Server_Side_TLS#Forward_Secrecy.
#
# The file specified by ssl_certificate should contain the certificate
# chain starting with your server certificate, following the intermediate
# certificates, up to the root certificate. The root certificate may be
# left out for SSL handshake optimization.
#
# The file specified by ssl_trusted_certificate should contain the certificate
# chain starting with your server certificate, following the intermediate
# certificates, up to the root certificate.
#
# As the Diffie-Hellman parameters file you might want to use one of the
# ffdhe*.pem files from samples/web-tls-configuration/nginx/.
#
# http://nginx.org/en/docs/http/ngx_http_ssl_module.html#ssl_certificate
# http://nginx.org/en/docs/http/ngx_http_ssl_module.html#ssl_trusted_certificate (for OCSP)
# http://nginx.org/en/docs/http/ngx_http_ssl_module.html#ssl_password_file
# http://nginx.org/en/docs/http/ngx_http_ssl_module.html#ssl_dhparam
# https://tools.ietf.org/html/rfc7919
#
ssl_certificate /etc/ssl/localcerts/intrexx.example.org.pem;
ssl_trusted_certificate /etc/ssl/localcerts/intrexx.example.org.pem;
ssl_certificate_key /etc/ssl/localcerts/intrexx.example.org.key;
#ssl_password_file /etc/ssl/localcerts/intrexx.example.org.password;
ssl_dhparam /etc/ssl/localcerts/ffdhe2048.pem;
ssl_session_cache shared:SSL:10m;
ssl_session_timeout 30m;
ssl_session_tickets on;
# Enable or disable OCSP Stapling
#
# TODO: Enable it (optionally)
# http://nginx.org/en/docs/http/ngx_http_ssl_module.html#ssl_stapling
# http://nginx.org/en/docs/http/ngx_http_ssl_module.html#ssl_stapling_verify
# http://nginx.org/en/docs/http/ngx_http_core_module.html#resolver
#
#ssl_stapling on;
#ssl_stapling_verify on;
#resolver 9.9.9.9 8.8.8.8 valid=300s;
# Configure the TLS protocols
#
# TODO: Choose one of modern or intermediate compatibility below.
#
# Modern compatibility (TLSv1.3 only)
#
# TODO: For modern compatibility uncomment the line below.
#
#ssl_protocols TLSv1.3;
# Intermediate compatibility
#
# TODO: For modern compatibility comment out the three lines below.
#
ssl_protocols TLSv1.2 TLSv1.3;
ssl_prefer_server_ciphers on;
ssl_ciphers 'TLS_AES_128_GCM_SHA256:TLS_AES_256_GCM_SHA384:TLS_CHACHA20_POLY1305_SHA256:ECDHE-ECDSA-AES128-GCM-SHA256:ECDHE-RSA-AES128-GCM-SHA256:ECDHE-ECDSA-AES256-GCM-SHA384:ECDHE-RSA-AES256-GCM-SHA384:ECDHE-ECDSA-CHACHA20-POLY1305:ECDHE-RSA-CHACHA20-POLY1305:DHE-RSA-AES128-GCM-SHA256:DHE-RSA-AES256-GCM-SHA384';
add_header Strict-Transport-Security max-age=63072000; # two years
add_header X-Frame-Options SAMEORIGIN;
# hide hidden files and directories
location ~ /\. {
return 404;
}
# hide WEB-INF
location /WEB-INF/ {
deny all;
return 404;
}
# hide IIS web.config
location ~* /web.config {
deny all;
return 404;
}
# hide the bin directory
location /bin/ {
deny all;
return 404;
}
# This is a secret key (security token) that is shared between
# this Nginx configuration and the Intrexx portal. It prevents
# direct connections to the portal's HTTP connector which could
# be a security risk.
#
# TODO: Create the security token as a string only known to this
# configuration and the Intrexx portal (here we use the placeholder
# INSERT_SECURITY_TOKEN_HERE for it). Insert it below.
#
# TODO: Make the corresponding in the portal's web configuration
# file external/htmlroot/WEB-INF/web.xml.
#
# 1.) Set the following property to allow remote connections.
#
# connector.security.header.receiveOnNonLoopbackInterface = true
#
# 2.) Enable the security token by changing the following property.
#
# connector.security.header.secToken.disabled
# -> connector.security.header.secToken.enabled
#
# 3.) Configure the shared security token.
#
# <init-param>
# <param-name>connector.security.token.1</param-name>
# <param-value>INSERT_SECURITY_TOKEN_HERE</param-value>
# </init-param>
#
set $ix_sec_token "INSERT_SECURITY_TOKEN_HERE";
# Delegate WebSocket requests to the Intrexx Portal Service.
#
location /ws/ {
proxy_pass http://backend;
proxy_http_version 1.1;
proxy_set_header Upgrade $http_upgrade;
proxy_set_header Connection "Upgrade";
proxy_set_header X-SecToken $ix_sec_token;
}
# Delegate requests to the Intrexx Portal Service.
#
location / {
proxy_pass http://backend;
proxy_set_header X-Forwarded-For $proxy_add_x_forwarded_for;
# Clear potentially unsafe headers. These may be enabled if the backend
# is configured to handle them correctly and in a safe manner.
proxy_set_header Forwarded "";
proxy_set_header X-Real-IP $remote_addr;
proxy_set_header X-Forwarded-Proto $scheme;
proxy_set_header X-Forwarded-Host $host:$server_port;
proxy_set_header X-Original-URL "";
# Security token to authenticate the reverse proxy with the backend.
proxy_set_header X-SecToken $ix_sec_token;
# For security reasons we do not pass X-User and X-Domain to the backend by default,
# since these headers might be interpreted by the External Authentication Filter as
# authenticated user information.
proxy_set_header X-User "";
proxy_set_header X-Domain "";
# additional security sensitive headers
proxy_set_header X-KrbTicket "";
proxy_set_header X-AccountName "";
# Set the maximum allowed size of the client request body. The value 0 disables
# this limit check.
# http://nginx.org/en/docs/http/ngx_http_core_module.html#client_max_body_size
client_max_body_size 2048m;
}
}
Open the file with an editor of your choice to make the adjustments you need.
TODOs
The file contains instructions for the configuration. These are each marked with "TODO".
Central TODOs are:
-
The specification of the web connector and port
-
The specification of the server name (fully qualified domain name) and port
-
Specifications relating to SSL
-
The path to the certificate file (*.cer or *.pem) and the private key
It is also important to specify the correct path to the "external/htmlroot" directory of the portal.
-
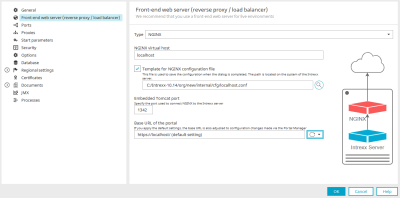
To do this, open "Portal > Portal properties > Frontend web server (reverse proxy/load balancer) > Frontend web server".
Name
Description
NGINX virtual host
"NGINX Virtual Host" refers to the Embedded Tomcat. NGINX connects to the Intrexx portal service via the virtual host. Usually "localhost" is to be entered here. (One exception to this is when NGINX is installed on a different server to Intrexx. In this case, the Intrexx server should be specified here.)
NGINX configuration file
You can generate the NGINX configuration file with Intrexx.
Enter the path to the directory in which you want to create the NGINX configuration file.
Example: /myfolder/portal.example.com.conf
Then copy the NGINX configuration file to the desired location below /etc/nginx.
Example: /etc/nginx/sites-available/portal.example.com.confEmbedded Tomcat Port
The port that you used in the previous version of Intrexx is displayed here. You can leave this port as it is.
note For a new installation, port 1337 is preset here.Base URL of the portal
The base URL must be stored here.
The first part refers to the protocol. You have configured an encrypted connection between the Intrexx portal server and the browser. The second part is made up of the hostname that you defined in the NGINX configuration file. Please make sure that this ends with a slash (/). It is essential that this is correct so that your portal can be accessed in the browser. -
Click on "OK".
Intrexx will now generate the configuration file. The data entered in the edit fields will be written in the configuration file. The generated file is stored in the specified directory.

2. Store the configuration file in the "sites-available" directory
Place the configuration file in the "sites-available" directory.
Note Depending on the Linux distribution and the installation package selected, the "sites-available" directory may not be available.
As a rule, the "sites-available/site-enabled" directories are available when you install Nginx from repositories of Debian-based distributions. If you obtain Nginx from the Nginx repository, the directories do not exist. In this case, only conf.d/ is present. The same applies to other Linux distributions such as CentOS. In this case as well, you only have conf.d/.
In this case, find out how the configuration file must be implemented in your Linux distribution.
3. Create symlink to the configuration file
Create a symbolic link from sites-enabled to the sites-available file. Use the full paths when doing this.
Note When using symlinks, you should ensure that they are created directly in the desired directory.
Example: "ln -s /etc/nginx/sites-available/host.example.org.conf"
4. Restart NGINX
Restart NGINX.
NGINX and Intrexx on different servers (NGINX on remote machine)
-
If the NGINX is running on a server other than Intrexx, you must comment out the following blocks in the configuration file:
Root directive (the root path of the Intrexx web application)
-
Settings for favicon and robots (server favicon and robots.txt)
-
Settings for static files (static files that should be served by NGINX)
It is necessary to comment out these blocks so that static files are not delivered by NGINX as it has no access to the remote htmlroot of the portal.
-
-
You must set the "NonLoopback" parameter to "true " in the "web.xml" file (<Portalverteichnis>\external\htmlroot\WEB-INF\web.xml).
                    <init-param>
    <description>
        Allow receiving security-sensitive headers on non-loopback network interfaces.
        Values: true or false (default).
     </description>
    <param-name>connector.security.header.receiveOnNonLoopbackInterface</param-name>
    <param-value>true</param-value>
</init-param>
See also the example configuration file portal-remote.conf.
Configure WebSockets
So that you can use WebSockets in conjunction with NGINX, you need to specify which URLs should be forwarded to the back end via the WebSocket protocol in the NGINX configuration file. This looks like this for the default configuration:
...
# Delegate WebSocket requests to the Intrexx Portal Service.
#
location /ws/ {
proxy_pass https://backend;
proxy_http_version 1.1;
proxy_set_header Upgrade $http_upgrade;
proxy_set_header Connection "Upgrade";
}
# Delegate requests to the Intrexx Portal Service.
#
location / {
proxy_pass https://backend;
...
Note When upgrading from an earlier Intrexx version, the existing configuration file must be adapted accordingly so that WebSockets can be used.
Further information on WebSockets can be found in the WebSockets chapter.