Requirements
To establish a connection to Microsoft Exchange with the Connector for Microsoft Exchange, you need a MediaGateway installation. You can find the installation instructions here.
The connector must also be licensed.
If the data source is to be configured with OAuth2 authentication, the Intrexx Portal must be registered as an app with Microsoft Azure in advance. You can find instructions here.
The connection can then be configured in the "Integration" module. You will find the connector there in the left-hand area under the "Consume data" entry. Select the "Connector for Microsoft Exchange" entry. A new data source can now be created via the main menu "Data source / New data source" or the context menu "New data source".
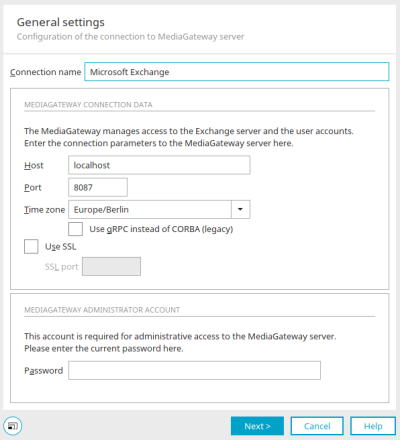
General
Connection name
You can later select the data source in applications under the name you enter here.
Host, Port, Time zone
Enter the Host, Port and Time zone for the MediaGateway server. As a rule, the MediaGateway uses port 8087 and port 9087 for SSL-encrypted connections.
use gRPC instead of COBRA (classic)
With this setting, the gRPC framework is used (recommended). If you do not activate the setting, the CORBA framework is (still) used. Information on this topic can be found here:
Use SSL
This setting encrypts the communication between the Media Gateway Server and the Exchange Server.
SSL port
Enter the port on the Media Gateway server via which the encrypted connection should take place.
![]() Password / Change password
Password / Change password
When creating a new Microsoft Exchange data source, you must enter the password for the Intrexx MediaGateway here. You assigned the password for the Intrexx MediaGateway during the installation.
When the data source has been created and its properties are opened again, you will find the link ![]() "Change password". Clicking on it opens a dialog in which the password can be changed.
"Change password". Clicking on it opens a dialog in which the password can be changed.
Edit password
You should change the default password after the data source has been created.
Click "Change now" to save changes and close the dialog again.
Click "Next".
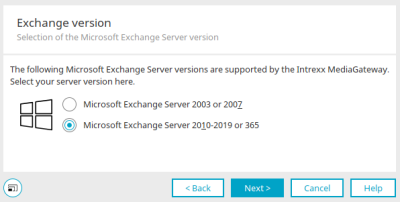
Exchange version
Select the version of your Exchange Server here. Microsoft Exchange Server 2003 or 2007 and Microsoft Exchange Server 2010-2019 or 365 are supported by Intrexx-MediaGateway. Select the option "Microsoft Exchange Server 2010-2019 or 365" if you use Microsoft Exchange Online.
Click "Next".
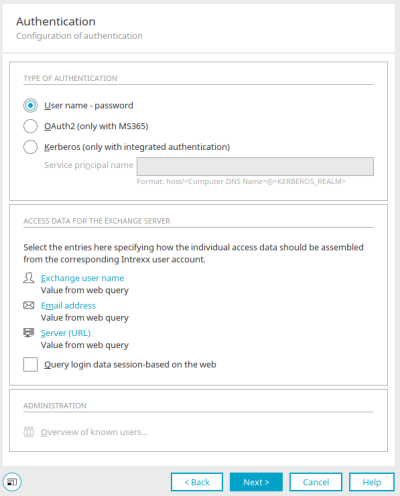
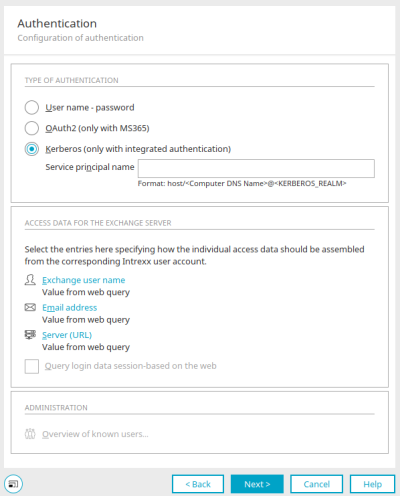
Authentication
There are three authentication types to choose from for authentication with Microsoft Exchange.
User name / Password
With this option, the user name and password that you use for login to Windows will be used in Intrexx to log on to Exchange. The login data can be queried on a session basis. must then be entered by the users every time they log on to the portal again, or
you can enter the data in encrypted format on the MediaGateway in order to avoid needing to renew logins. In this case, a connection will be created by Intrexx between the logged-in Intrexx user and the saved login information for the Exchange server.
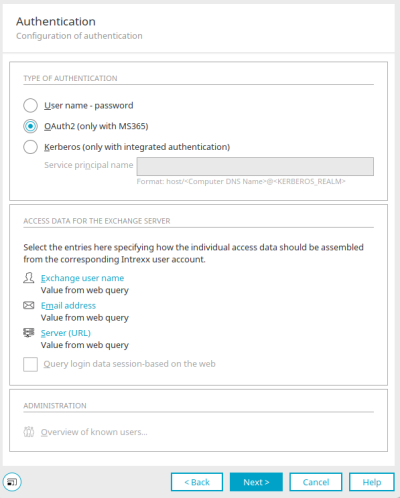
OAuth2 (only with Office 365)
Authentication from Intrexx to Microsoft Exchange Online can take place via OAuth2.
If you choose this option, you will have to perform a number of steps within Intrexx and also some steps outside of Intrexx, especially in Microsoft Azure.
A detailed description of authentication to Microsoft Exchange Online via OAuth2 can be found here: Add Microsoft Exchange data source (OAuth2)
Kerberos
All information on this type of authentication can be found here.
Access data for the Exchange server
The login of an Intrexx user to the Exchange server takes place via a login box that will be shown when an Intrexx Exchange application is called up in the portal.
Kerberos authentication only works if the calling client uses the fully qualified name in the server URL entered in the login box and not the IP of the Exchange server. The request of a portal on client systems depends on the configuration of your DNS server and has to be executed via one of the following URLs:
-
https://12.34.56.78/exampleportal
-
https://intrexxserver.example.org/exampleportal
-
https://intrexxserver/exampleportal
Please ask your system administrator for more information about this.
In the "Authentication" dialog, you can specify in the "Access data for the Exchange server" area whether certain data is already automatically entered in the login box.
![]() Exchange user name /
Exchange user name / ![]() Mailbox /
Mailbox / ![]() Server URL
Server URL
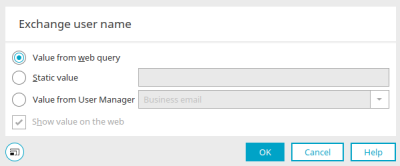
Opens a dialog in which you can specify the source from which the user name, e-mail address and server URL for logging on to the Exchange server should be obtained.
Access data - Configuration
Value from web query
Uses the user name that a user enters to the login box of an Intrexx Exchange application.
Static value
Here, a fixed value can be entered that will be automatically entered into the login box when a user wants to log in.
Value from User Manager
Here you can select a field from the "User" module, the value of which is entered in the login box. In this process, Intrexx determines the currently logged-in user and delivers the corresponding data.
Show value on the web
This setting can be set if the "Static value" option or the "Value from user administration" option is selected. This will cause the corresponding value to be shown in the login box on the web when the user logs in.
Click "OK" to save the settings and close the dialog again.
Query login data session-based on the web
If this setting is not set, all login information from the login box will be saved as a user account in the MediaGateway as soon as the Intrexx Exchange application user logs in for the first time. If this login was successful, the corresponding account information is stored RSA-encrypted in the MediaGateway.
The next time you visit the Intrexx portal, you will not need to log in as long as the connection to the Microsoft Exchange Server can be established. Next, the login box will then only be shown again when changes to the access data of the user come about, i.e. when, for example, the value of a relevant field in the User Manager has changed.
If the setting is set, the information is requested per session and no user account is created in the MediaGateway. The login box will thereafter always be shown the first time an Intrexx user opens an Exchange application in the portal.
An Intrexx portal user can only access the information on the Exchange server for which they have been provided permission by the Exchange Server.
Administration
![]() Overview of known users
Overview of known users
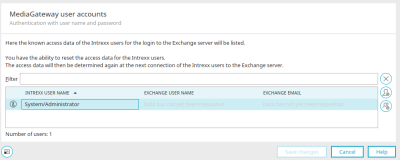
Opens a dialog in which you will find a list of users in the MediaGateway. This link is active if MediaGateway accounts have already been created because users have logged in.
MediaGateway user accounts
The "Filter" field can be used to search for specific users. Click on ![]() "Remove filter" to clear the search field again.
"Remove filter" to clear the search field again.
![]() Reset access data
Reset access data
The MediaGateway account of the selected user is deleted.
![]() Reset all access data
Reset all access data
All MediaGateway accounts of the known users are deleted.
![]() Information on
Information on
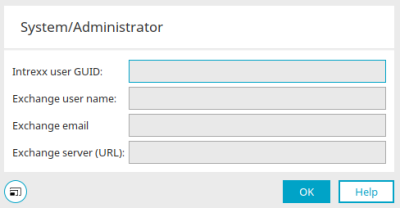
Opens a dialog in which further details of the respective user are displayed.
Show details
Here you can see additional details about the current user, such as the user GUID and the Exchange user name. With Kerberos authentication, you will only find the Exchange e-mail and the Exchange server URL here.
Click "OK" to close the dialog again.
Click "Save changes" if changes have been made or "Cancel" to close the dialog again. You are then back in the "Authentication" dialog.
Click "Next".
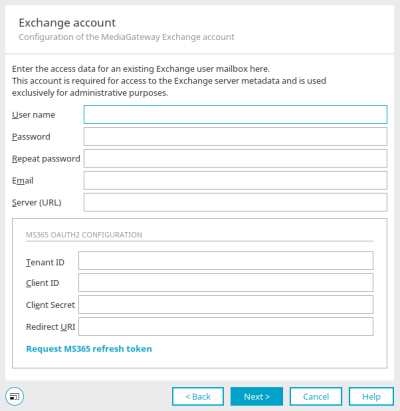
Exchange account
User name / Password
Enter the login details to a user inbox created on the Microsoft Exchange server. The account requires no special permissions. The Connector for Microsoft Exchange will use this account to query meta-information from the Exchange server, which will then be available when creating applications, and delivers information about data fields, field types, and existing tables.
Enter the name of the Exchange inbox or the email address. Make sure to use the primary inbox address. When using alias addresses, the functionality of the connector may be limited.
Server (URL)
Enter the URL of the Microsoft Exchange server here that assumes the Client Access role (e.g. the OWA server). The Exchange Server can be a server that you host yourself or Microsoft Exchange Online.
Example
Self-hosted Exchange Server from Exchange 2010 onwards
https://mailserver.meinefirma.de/ews/Exchange.asmx
As a rule, the URL begins with the protocol "https", followed by the fully qualified server name and "/ews/Exchange.asmx" (from Exchange 2010).
Microsoft Exchange Online
https://outlook.office365.com/ews/Exchange.asmx
MS365 OAuth2 configuration
In this area, you enter the details from Microsoft Azure for OAuth2 authentication. You can find all the information here.
Click "Next".
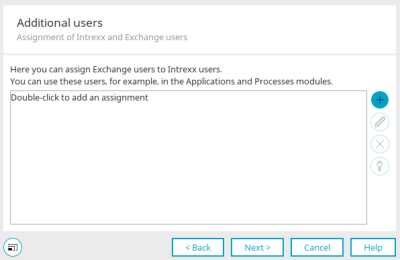
Additional users
In several use cases, it can be necessary to access various mailboxes with one specific account, such as to present appointments from various Exchange calendars together in one Intrexx calendar.
For this purpose, a mailbox can be created on the Exchange server, which receives permissions to the required Exchange calendars. The sharing of the respective calendars must be set in Microsoft Outlook by the users themselves.
Here, an assignment of an Intrexx user for an Exchange mailbox can be defined and then defined as a static user in applications and processes. The use of these static users can be a good idea for applications where an overview of a series of appointments from various users is to be presented. In this way, each user does not have to provide every other user with permission for their calendar. In a process, a user change action can be used to specify that all subsequent actions take place in the role of this user. The process can then, for example, search in the mailboxes to which it has access for appointments with specific characteristics and create or change appointments.
![]() Add /
Add / ![]() Edit
Edit
Opens a dialog in which a user can be created and assigned.
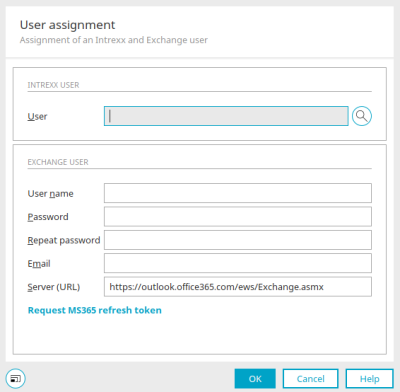
User assignment
Click on ![]() "Select user" to open a dialog in which the desired user can be selected from the "Users" module.
"Select user" to open a dialog in which the desired user can be selected from the "Users" module.
Exchange user
Enter the user name, password and e-mail address of the Exchange user here. Also enter the URL of the Exchange server.
Click "OK" to save changes and close the dialog again.
![]() Delete
Delete
Removes a user from the assignment.
![]() Manage access to shares
Manage access to shares
Opens a dialog in which access rights to Exchange elements can be edited. All information on this topic can be found here.
Click "Next".
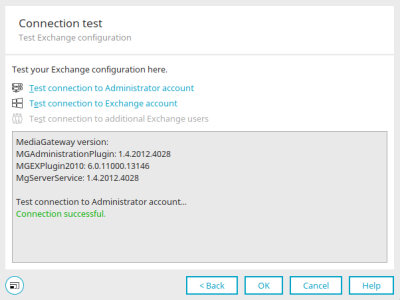
Connection test
![]() Test the connection to the administrator account
Test the connection to the administrator account
Click on this link to test the connection to the Administrator account. If the test is not successful, please check the following points:
-
MediaGateway is not installed
-
MediaGateway service has not been started
-
Host or IP address are entered incorrectly
-
Password incorrect (the default password is 1234)
-
Firewall settings (port 8087 blocked)
![]() Test the connection to the Exchange account
Test the connection to the Exchange account
Click on this link to test the connection to the Exchange account. If the test is not successful, please check the following points:
-
Mailbox does not exist
-
Invalid login information
-
Mailbox has not yet been initialized on the Exchange server (after creating a mailbox, one must log in at least once with Outlook)
-
Outlook Web Access is not reachable (speak to your Exchange administrator)
![]() Test connection to additional Exchange users
Test connection to additional Exchange users
Click on this link to test the connection to additional Exchange users. If the test is not successful, please check the same points that should be checked for the connection test to the Exchange account.
Information on troubleshooting can be found here.
Click on "OK".
A security notice may be displayed prompting you to change the password for the MediaGateway. Follow this prompt if you are still using the password with which the MediaGateway was delivered.
The Microsoft Exchange data source is thus fully configured and can be used in applications or processes, for example.

