WebSockets setup - General description
WebSockets can be useful in very different use cases and scenarios. Therefore, this chapter aims to provide you with an initial general description of the steps that need to be performed to set up WebSockets in Intrexx. An overview of each step should help you implement concrete "WebSocket processes" in Intrexx. Please refer to the chapter Examples for concrete examples of implementation. The steps described here will be demonstrated using these specific examples.
So that you can use WebSockets in Intrexx, you need to perform the following key steps:
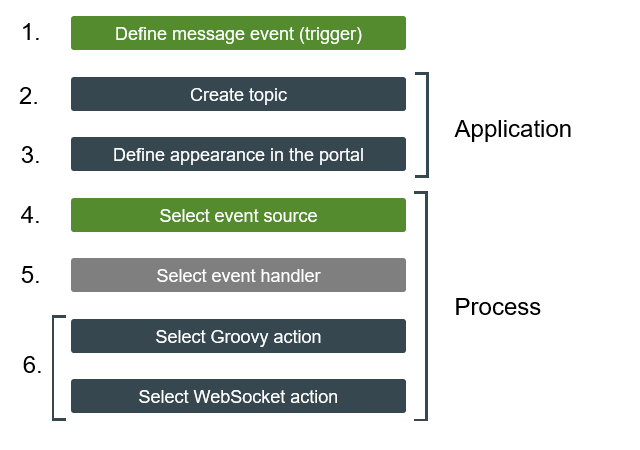
Some of the steps are in the "Applications" module and others are in the "Processes" module.
The steps do not necessarily have to be performed in the order shown above. For example, you could perform step 3. "Define appearance in the portal" at the end. You can also start by creating the process in Intrexx and then create a topic in the application of your choice later. Also, not all steps are required in some use cases.
Define message event (trigger)
The first step is to decide which external or Intrexx-internal event should trigger the message/update. Examples of triggers are available in the chapter Use cases. If an internal event should trigger the message, this first step is not required. Internal events are defined using event sources in Intrexx processes. Please refer to step 4. "Select event source".
Create topic
You need to create (at least) one topic to use WebSockets.
A topic receives the message(s), which are triggered by the event, and delivers them to the browser.
You create topics in applications.
Topics Technically, topics represent the object that WebSocket messages output/make available. A "consumer" can subscribe to a topic. A topic can be compared to a message channel that can be subscribed to.
In Intrexx, you create a topic in the application that you would like to display the message in. You only need to provide the topic with a unique name. To do this, Intrexx generates a GUID for the topic automatically. There are no other steps that are required to set up the "message channel".
Define appearance in the portal
You must define at what point a topic is subscribed to and where the message is displayed in the portal.
This is done via JavaScript methods that you integrate into the application. To subscribe to and unsubscribe from a topic, the following JavaScript methods have been implemented in Intrexx 20.03:
            ix.websocket.subscribeToTopic
ix.websocket.unsubscribeFromTopic
The "ix.websocket.subscribeToTopic" method is used to subscribe to a topic. The "ix.websocket.unsubscribeFromTopic" method is used to unsubscribe from a topic.
You can use the normal JavaScript features in conjunction with these methods. For example, you can call the "ix.websocket.subscribeToTopic" method during an "onload" event of a view or edit page. In this way, the topic is (automatically) subscribed to when the corresponding page is loaded. In addition, you define which JavaScript element or Intrexx control element the message should appear in.
More information
Please refer to the following chapters for detailed information about JavaScript in conjunction with WebSockets:
The API documentation is available at the following links:
-
https://docs.intrexx.com/intrexx/version/11000/steady/api/js/html/modules/IxWebsocket.html
-
From Intrexx version 12.0.0
https://docs.intrexx.com/intrexx/version/steady/api/js/html/modules/api.websocket.html
Select event source
So that an event can trigger a WebSocket message, you must create a process in Intrexx and add an event source to it (as usual).
Internal event You can define an internal event, which should trigger the WebSocket message, in the event source.
External events You can also "integrate" external events, which should trigger the WebSocket message, in the event source.
Defining events in the context of WebSockets (as described here) is exactly the same as in other contexts. The only difference is in the subsequent actions that are used to control the sending of WebSocket messages.
Select event handler
You must "assign" an event handler to the event source. There are no special aspects that need to be considered in the context of WebSockets.
Select Groovy action / Select WebSocket action
As well as creating topics and integrating JavaScript into applications, adding and configuring a WebSocket action or Groovy script action is a key part of the WebSocket function and configuration.
The key functions of both the WebSocket and Groovy script action are in creating the message and linking the message/event to a topic. (When linking the message to a topic in Intrexx, this connects the process with the application.)
Should you use a WebSocket or Groovy script action?
The main advantage of using a WebSocket action is that it is very easy to use. You can select the application and topic that the message should be sent to via drop-down lists. You do not need to know the GUID of the topic, therefore. The WebSocket action is suitable for static or simple messages. However, complex messages can be created using Velocity script.
A Groovy action requires Groovy script to create the message and link it to a topic. You need to use the GUID of the topic to do this. The Groovy action is suitable for more complex messages.
So that a WebSocket message and the link to a topic can be created via a Groovy action, the following Groovy script class is available in Intrexx:
de.uplanet.lucy.server.websocket.groovy.GroovyWebSocketTopic
You can send either text or JSON messages using the following functions, respectively:
            GroovyWebSocketTopic.sendTextMessage
GroovyWebSocketTopic.sendJsonMessage
More information
Please refer to the following chapters for detailed information about Groovy in conjunction with WebSockets:
The API documentation is available at the following links:
Please note:You can continue to use Groovy actions, which do not generate WebSocket messages, as usual in processes.
You may therefore have a process that has both Groovy actions and a WebSocket action.